Getting that perfectly crispy salmon skin is all about the little details—scoring the skin just right and controlling the heat. It sounds simple, but tiny adjustments can turn a good sear into the kind of crispy, crackly skin that makes you want to keep eating. I’ve spent years fine-tuning these tricks, and honestly, it’s a satisfying feeling when it all clicks.
There’s a quiet satisfaction in mastering this skill. It’s not just about presentation; it’s about texture and flavor—crisp on the outside, tender inside. When the skin is just right, it elevates the whole dish, making even a quick weeknight dinner feel special. And really, once you get used to the rhythm of scoring and temperature control, it’s a technique you’ll want to keep refining.
Focusing on the overlooked importance of precise skin scoring and temperature control to achieve the crispiest, most evenly cooked salmon skin, emphasizing how small adjustments can make a big difference in texture and flavor.
The overlooked art of skin scoring
- Getting that perfect crackly skin feels like a small victory every time I nail it.
- I love how the crispy skin adds a layer of texture that totally transforms the dish.
- There’s a weird pride in mastering the tiny scoring details that make all the difference.
- Honestly, the smell of seared salmon with just the right amount of fat rendering is pure comfort.
- I still get a little nervous before flipping, but the crispy skin always makes it worth the risk.
The story behind this recipe
- This recipe started from a simple frustration—trying to get crispy skin without ending up with rubbery, overcooked fish. One evening, I decided to focus solely on the skin, paying attention to every little detail: scoring, heat, timing. Turns out, the small tweaks make all the difference, and I ended up with skin that crackled like potato chips.
- It’s become my go-to method because it’s honest and straightforward, and I love how each crispy bite elevates the whole dish. Once you nail that perfect sear, salmon becomes something special—rich, tender, but with that irresistible crunch. This isn’t just a technique—it’s a little act of kitchen rebellion, claiming crispy skin as your own.
- heading: Overcoming kitchen chaos
Crispy Skin Salmon Trivia
- Salmon skin was once considered a byproduct and often discarded in traditional fishing communities, but chefs discovered its crispy potential in the early 20th century.
- The technique of scoring fish skin to enhance crispiness dates back centuries in Japanese cuisine, particularly in tempura and grilled fish dishes.
- Crispy salmon skin became trendy worldwide in the last decade, especially with the rise of Japanese izakaya-style dining and modern fusion restaurants.
- In some cultures, crispy fish skin is believed to have added health benefits, as the rendered fat contains omega-3s and other nutrients.
- The crackling sound of crispy salmon skin is often associated with comfort and satisfaction, similar to the appeal of crispy pork cracklings or potato chips.
Ingredient breakdown
- Salmon fillet: I choose thick, fresh fillets with bright, firm flesh. You want that slight sheen and a smell of the sea. If yours is older or slimy, the skin might not crisp up right.
- Salmon skin: I make sure to pat it dry thoroughly—moisture is enemy number one for crispiness. Use a paper towel and press gently. A squeaky, dry skin makes all the difference.
- Salt: I prefer coarse sea salt, which draws out moisture and adds crunch. If you only have table salt, use a light hand—it’s finer and can make the skin salty too fast.
- Oil: I use neutral oil with a high smoke point, like canola or grapeseed. It gives that even sear and crackle. Olive oil works in a pinch, but watch the temperature—burnt olive oil can turn bitter.
- Lemon: I add a squeeze of lemon after searing for brightness. You want a fresh, zesty hit that cuts through the richness. Skip it if you prefer a more neutral flavor.
- Herbs or spices: I sometimes sprinkle a little black pepper or dill for extra aroma. Keep it simple; the skin’s crunch is the star, not the seasoning.
- Optional: A splash of soy or fish sauce can add umami. Use sparingly—just a few drops—so it doesn’t overpower the crispy skin.
Spotlight on key ingredients
Salmon skin:
- I look for shiny, firm skin with a slight sheen. It’s the star of the show, providing that crackly texture.
- It behaves differently depending on moisture levels—dry skin crisps better and sears evenly, so thorough patting is key.
Salt:
- I prefer coarse sea salt because it draws out moisture and creates a satisfying crunch. Fine salt can over-salt if used excessively.
- When sprinkling on the skin, press it into the scored lines; it helps render fat and enhances crispiness.
Notes for ingredient swaps
- Fish Oil: I use light vegetable or canola oil for a clean sear. If you prefer extra flavor, try a neutral-flavored sesame oil, but be mindful of its lower smoke point.
- Salt: Coarse sea salt is my go-to for crispiness. If you only have fine table salt, use less—about half as much—to avoid overly salty skin.
- Lemon: Fresh lemon juice brightens the dish beautifully. If unavailable, a splash of lime or a dash of vinegar can add acidity with a different twist.
- Herbs & Spices: I often add dill or black pepper. Dried herbs work in a pinch but won’t provide the same fresh aroma and crunch as fresh.
- Seasoning Alternatives: For a smoky touch, sprinkle with smoked paprika or add a dash of chipotle powder—just a pinch to avoid overpowering the delicate fish.
- Skin Preparation: If you don’t score the skin, it may curl or not crisp evenly. Instead, press down gently with a spatula during searing to keep it flat.
- Fish Type: Atlantic salmon is my favorite for its balanced fat and texture. If using trout or Arctic char, keep an eye on cooking time—they’re leaner and cook faster.
Equipment & Tools
- Non-stick or cast iron skillet: Provides an even, high-heat surface for crisping the skin.
- Tongs: Helps flip the salmon gently without breaking the skin.
- Paper towels: Drys the fish thoroughly to promote crispness and prevent splatters.
- Spatula: Assists in serving and stabilizing the fish during flipping.
Step-by-step guide to pan searing
- Equipment & Tools: Get a non-stick or cast iron skillet—large enough to hold the salmon without crowding. Tongs for flipping, paper towels for drying, and a spatula for serving.
- Prep the salmon: Pat the fillet dry with paper towels, especially the skin. Score the skin with a sharp knife in a crosshatch pattern, about 1/4 inch apart—this helps render fat and crisp evenly.
- Season generously: Salt the skin side, pressing the coarse salt into the scores. Let sit for 10 minutes to draw out excess moisture, then pat dry again.
- Heat the pan: Warm your skillet over medium-high heat until hot, about 2 minutes. Add a thin layer of neutral oil—just enough to coat the bottom—until shimmering but not smoking.
- Place the salmon: Lay the fillet skin-side down in the hot oil. Press gently with a spatula for 10 seconds to prevent curling. Cook undisturbed for 4-5 minutes, until the skin is golden brown and crispy. You should see the fish start to cook up the sides.
- Flip carefully: Using tongs, flip the salmon gently. Cook for another 2-3 minutes, depending on thickness—aim for an internal temp of 50-52°C (122-125°F) for medium-rare.
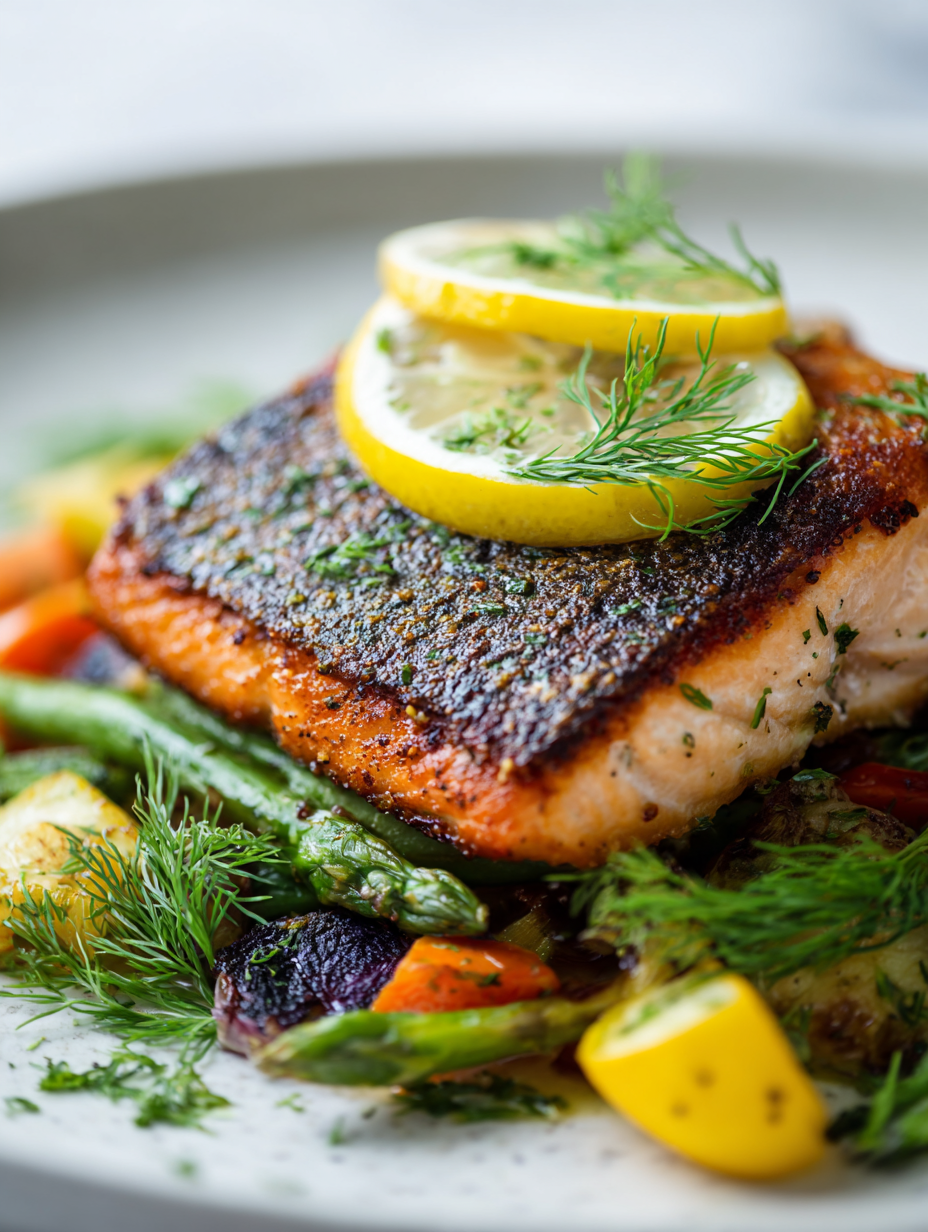
- Check for doneness: The skin should be crackly and dark amber. The flesh should be opaque and slightly flaky. If the skin isn’t crisp enough, increase heat for a quick blast, but watch closely.
- Rest and plate: Let the salmon rest for 2 minutes off heat. Serve skin-side up to keep the crispness intact. Finish with a squeeze of lemon or herbs if desired.
Let the salmon rest for 2 minutes off heat to allow juices to settle. Serve skin-side up to preserve the crispness, optionally topped with lemon or herbs for brightness.
How to Know It’s Done
- Skin is dark golden and crackly, with a slight shimmer of rendered fat.
- Flesh is opaque, slightly flaky, and registers 50-52°C (122-125°F).
- The fish releases easily from the pan without sticking or tearing.
Crispy Skin Salmon
Ingredients
Equipment
Method
- Pat the salmon fillets dry thoroughly with paper towels, especially the skin, until no moisture remains to ensure maximum crispiness.
- Using a sharp knife, score the skin in a crosshatch pattern, about 1/4 inch apart, to help render fat evenly and promote crisping.
- Sprinkle the coarse sea salt generously over the skin, pressing it into the scores to help draw out moisture and enhance crunch. Let sit for 10 minutes, then pat the skin dry again to remove excess salt and moisture.
- Heat a non-stick or cast iron skillet over medium-high heat until hot and shimmering, about 2 minutes. Add a thin layer of neutral oil and allow it to shimmer and just start to smoke.
- Place the salmon fillets skin-side down in the hot oil, pressing gently with a spatula for about 10 seconds to prevent curling. Cook undisturbed for 4-5 minutes, until the skin is golden brown, crackly, and releases easily from the pan.
- Carefully flip the fillets using tongs and cook for another 2-3 minutes, until the flesh is opaque and slightly flaky while the skin remains crispy.
- Remove the salmon from the pan and let rest for 2 minutes. Squeeze fresh lemon juice over the top for brightness and serve skin-side up to preserve the crispiness.
Pro tips for perfect crispy skin
- Dry skin thoroughly: Use paper towels to remove moisture, ensuring maximum crispiness and even searing.
- Score the skin: Crosshatch with a sharp knife to help render fat and promote uniform crackling.
- Start with hot oil: Wait until the oil shimmers before placing the fish, for a quick, crackly sear.
- Press down gently: Use a spatula to keep the skin flat against the pan, preventing curling and uneven cooking.
- Don’t overcrowd: Cook in a large enough pan to avoid steaming the skin, which impairs crispness.
- Finish skin-side up: Rest the fish briefly after flipping to keep the skin crisp and the flesh tender.
- Control the heat: Adjust to medium-high for a deep golden crust without burning, especially at the end.
Common mistakes and how to fix them
- FORGOT to pat dry skin? Use paper towels, moisture ruins crispiness.
- DUMPED oil too early? Wait until shimmer appears, then lay the fish skin-side down.
- OVER-TORCHED skin? Reduce heat slightly and cook longer for even crispness.
- SKIPPING scoring? Score skin in a crosshatch pattern for better fat rendering and crunch.
Quick fixes and pantry swaps
- If skin sticks, splash with hot water to loosen, then gently lift with a spatula.
- When in doubt, patch cracks with a tiny dab of oil and crisp again for 30 seconds.
- Splash a little vinegar in the pan if smoke turns bitter, to mellow the aroma.
- DUMPED oil? Wipe excess with a paper towel, then restart with fresh oil for even sear.
- When skin isn’t crackling, increase heat slightly and give it a few more seconds for shimmer.
Prep, store, and reheat tips
- Pat the salmon skin thoroughly with paper towels before cooking; this can be done a few hours in advance to ensure dryness and maximum crispiness.
- Store the raw, dried salmon fillet in an airtight container or tightly wrapped in plastic in the fridge for up to 24 hours; avoid freezing if planning to cook soon for best texture.
- Cooked crispy skin salmon is best enjoyed fresh, but leftovers can be refrigerated for up to 2 days. Reheat gently in a hot skillet for 1-2 minutes, skin-side up, until the skin re-crisps and the flesh warms through with a crackly surface.
- The skin may lose some crispness after storage; reheating in a hot pan is key to restoring that crackly texture. Sensory cue: smell the searing oil and listen for the crackle to confirm readiness.
Top questions about crispy skin salmon
1. How do I ensure the skin crisps properly?
Make sure the skin is thoroughly dried and scored before searing. Moisture is the enemy of crispness and scoring helps render fat evenly.
2. What’s the key to preventing the skin from curling up?
Use a hot pan with enough oil to shimmer. Lay the salmon skin-side down gently, pressing for a few seconds to prevent curling.
3. How long should I cook the salmon for perfect crispness?
Cook skin-side down for about 4-5 minutes on medium-high heat until golden and crackling, then flip carefully to finish.
4. My skin isn’t crispy enough, what can I do?
If the skin isn’t crackling, increase the heat slightly or give it an extra minute — but watch closely to avoid burning.
5. Should I rest the salmon after searing?
Rest the fish for a couple of minutes after cooking to allow juices to settle and keep the skin crisp when serving.
6. What type of salt is best for crisping the skin?
Use coarse sea salt for better moisture extraction and crunch. Finer salts can over-salt or not crisp as well.
7. How dry should the salmon skin be before cooking?
Pat the fillet dry with paper towels, especially the skin, to remove excess moisture before seasoning and searing.
8. Can I cook multiple fillets at once?
Avoid overcrowding the pan; cook in a large enough skillet for even heat distribution and crisping.
9. When should I add lemon or herbs?
Finish with a squeeze of lemon or herbs to add brightness. Serve skin-side up to keep the crackle intact.
10. How do I reheat leftover crispy salmon?
Store leftovers in the fridge for up to 2 days. Reheat in a hot skillet to restore crispness, listening for the crackle.
There’s a quiet thrill in hearing that crackle as you lift the salmon from the pan, knowing you’ve nailed that crispy skin. It’s not just about the texture—it’s the way it elevates the whole dish, making even a simple meal feel a little more special. That crisp, salty bite is a reminder that sometimes, the smallest details matter most.
Cooking this way is honest and forgiving—once you understand the rhythm of scoring and heat, it’s a technique you can build on. I keep coming back to it, especially when I want something satisfying without fuss. In the end, it’s those little moments of perfect crunch that make it all worth the effort.

Hi, I’m Claire Dawson, and I’m the voice behind The Procrastinators Cookbook. Food has always followed me around, even when I was busy putting other things off. Somewhere between long café shifts, half-finished to-do lists, and meals cooked later than planned, I realized that food was the one thing I always came back to.