Making a perfect chocolate fondant isn’t just about mixing ingredients; it’s about understanding the tiny details that turn a good dessert into a memorable one. I’ve lost count of how many times I’ve watched that molten center turn to solid because I got distracted or misjudged the timing. It’s a dance of precision, patience, and a bit of gut feeling, especially when you’re trying to nail that gooey, rich core every single time.
There’s something deeply satisfying about cracking into a warm fondant and watching that velvety chocolate flow out. I love how it feels like a little act of magic, especially when I get it right on the first try after a few attempts. It’s a dessert that forces you to pay attention, but the reward—an intensely chocolaty, smooth surprise—makes every second of effort worth it. Plus, it’s a special treat that feels fancy but is surprisingly straightforward to whip up.
Focusing on the science of achieving the perfect gooey center, this recipe emphasizes timing and temperature control, revealing how a slight misstep can turn a luscious fondant into a dense cake or a runny mess. It’s about understanding the delicate balance between a firm exterior and that molten, oozing interior, and how to master it consistently.
The science behind perfect gooeyness
- There’s a quiet thrill in mastering that perfect gooey center, like catching a fleeting secret of chocolate.
- I still get nervous before cracking open a fondant, worried the molten core might turn into a dense mass.
- Nothing beats that moment when the warm, rich chocolate flows out with a velvety shimmer—pure relief and pride.
- Over the years, I’ve learned that timing is everything, and patience makes all the difference in that luscious finish.
- Baking these reminds me of childhood, the smell of warm cocoa filling the kitchen and making everything feel a little special.
The story behind this recipe
- I first stumbled upon the magic of chocolate fondant in a tiny Parisian bakery, where the smell of melting chocolate and baked sugar filled the air. Watching that molten core ooze out when the plate was cracked open felt like witnessing a secret between me and the baker. Since then, I’ve been chasing that perfect balance of gooey and cooked, trying to recreate that moment at home with my own twists.
- There’s a quiet joy in understanding how just a few seconds can make or break the texture—how the edges stay firm while the center stays luxuriously liquid. My kitchen has seen many experiments, some more successful than others, but each batch teaches patience and precision. It’s a dessert that demands respect for timing but rewards you with a rich, velvety chocolate surprise every time.
- heading: The magic of molten chocolate
Chocolate Fondant Trivia
- Chocolate fondant originated in France, with its name meaning ‘melted’ or ‘flowing’ fondant, referencing its gooey center.
- The dessert gained popularity in the early 2000s, thanks to its indulgent texture and elegant presentation in fine dining.
- Its roots are linked to classic French pastry techniques, blending rich chocolate with delicate baking precision.
- The secret to a perfect fondant lies in the balance of baking time and temperature, a science as much as an art.
- Some chefs believe that the first recorded recipe appeared in a 1980s French cookbook, but variations date back even further.
Key ingredients breakdown
- Dark chocolate: I prefer 70% cocoa, it melts smoothly and gives that deep, slightly bitter edge—swap for bittersweet if you like a cleaner finish.
- Butter: Use unsalted, room temp. It creates a tender crumb and shiny crust—try browned butter for a nutty aroma that heightens the chocolate’s richness.
- Eggs: Fresh eggs help achieve that delicate rise and structure—whisk until just combined, no need for overmixing to keep it tender.
- Sugar: I stick to superfine sugar for quick dissolving—if you only have caster, go for it; coarser sugars might give a grainy texture.
- Flour: Just a touch of plain flour stabilizes the batter—gluten-free options like almond flour work, but expect a slightly denser, nuttier result.
- Cocoa powder: Use natural, unsweetened cocoa—it intensifies the chocolate flavor and adds depth, don’t skip it or the fondant might feel dull.
- Salt: A pinch enhances the chocolate’s richness—don’t forget it, or the flavor could seem flat, especially with high cocoa content.
Spotlight on key ingredients
Dark chocolate:
- I prefer 70% cocoa, it melts smoothly and gives that deep, slightly bitter edge—swap for bittersweet if you like a cleaner finish.
- Butter: Use unsalted, room temp. It creates a tender crumb and shiny crust—try browned butter for a nutty aroma that heightens the chocolate’s richness.
- Cocoa powder: Use natural, unsweetened cocoa—it intensifies the chocolate flavor and adds depth, don’t skip it or the fondant might feel dull.
Eggs and Sugar:
- Eggs: Fresh eggs help achieve that delicate rise and structure—whisk until just combined, no need for overmixing to keep it tender.
- Sugar: I stick to superfine sugar for quick dissolving—if you only have caster, go for it; coarser sugars might give a grainy texture.
- Flour: Just a touch of plain flour stabilizes the batter—gluten-free options like almond flour work, but expect a slightly denser, nuttier result.
Notes for ingredient swaps
- Dairy-Free: Swap butter for coconut oil or dairy-free margarine. You might notice a slightly different richness and a subtle coconut aroma.
- Vegan: Use dark chocolate with no dairy and replace eggs with aquafaba or flaxseed meal. Expect a slightly denser, more fudgy texture.
- Lower Sugar: Reduce sugar by a third; chocolate still shines through, but the fondant will be less sweet and more intense.
- Gluten-Free: Substitute all-purpose flour with almond flour or gluten-free baking mix. The texture might be a touch denser, but still luscious.
- Bittersweet: Use 85% cocoa chocolate for a deeper, more intense flavor—less sweet, more chocolate punch.
- White Chocolate: Swap dark for white chocolate for a creamier, sweeter fondant, with a softer, milky center.
- Cocoa Powder: Use Dutch-processed cocoa for a mellower, less acidic flavor—if you prefer a brighter chocolate note, stick with natural cocoa.
Equipment & Tools
- Ramekins: To bake individual portions with controlled shape and size.
- Bain-marie or microwave: For gentle melting of chocolate without burning.
- Mixing bowls: To combine and fold ingredients smoothly.
- Spatula or spoon: For folding batter and smoothing tops.
- Baking sheet: To hold ramekins during baking for stability.
- Cooling rack: To rest the fondants briefly before inverting.
Step-by-step guide to chocolate fondant
- Preheat your oven to 200°C (390°F). Grease four ramekins generously with butter, then dust with cocoa powder to prevent sticking.
- Chop 200g (7 oz) of good-quality dark chocolate into small pieces. Melt it gently over a bain-marie or in short bursts in the microwave, stirring until smooth. Let it cool slightly.
- In a separate bowl, beat 100g (1/2 cup) of unsalted butter with 150g (3/4 cup) of superfine sugar until pale and fluffy, about 2-3 minutes.
- Add 3 large eggs, one at a time, beating well after each addition. The mixture should become glossy and slightly increased in volume.
- Fold in 100g (3/4 cup) of sifted all-purpose flour and 2 tablespoons of unsweetened cocoa powder. Mix just until combined—do not overmix.
- Pour the slightly cooled melted chocolate into the batter and gently fold to incorporate, creating a shiny, smooth batter.
- Divide the batter evenly among the prepared ramekins. Smooth the tops with a spatula or the back of a spoon.
- Place the ramekins on a baking sheet and bake for exactly 12-14 minutes. The edges should be set, but the center still slightly jiggly when shaken.
- Remove from the oven and let rest for 2 minutes. Carefully invert each ramekin onto a serving plate and let sit for another 30 seconds before gently lifting off.
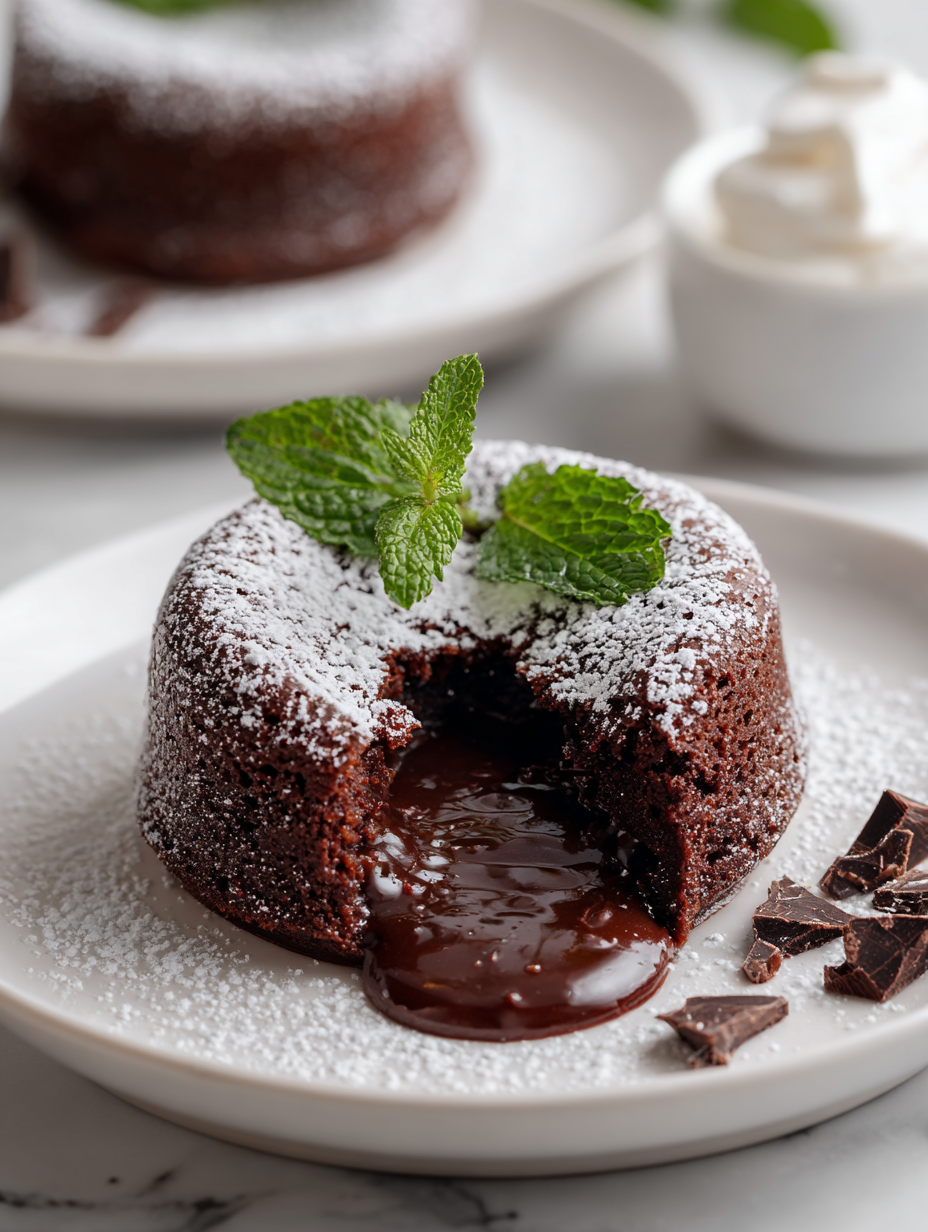
- Serve immediately. The outside should be firm, with a molten, gooey center that oozes when cracked open.
Let the baked fondants rest for 2 minutes in the ramekins, then invert onto plates. Serve immediately to enjoy the molten center. Pair with a dusting of powdered sugar or a scoop of vanilla ice cream if desired.
How to Know It’s Done
- Edges are set and slightly pulling away from ramekin sides.
- Center jiggles gently when ramekin is shaken.
- A knife or toothpick inserted in the center emerges with moist crumbs, not raw batter.
Chocolate Fondant
Ingredients
Equipment
Method
- Preheat your oven to 200°C (390°F). Generously butter four ramekins and dust them with cocoa powder to prevent sticking.
- Chop the dark chocolate into small pieces. Gently melt it over a bain-marie or in short bursts in the microwave, stirring until smooth. Let it cool slightly so it doesn’t cook the eggs.
- In a mixing bowl, beat the butter and superfine sugar together until the mixture is pale, fluffy, and fragrant—about 2-3 minutes, with your mixer on medium speed.
- Add the eggs one at a time, beating well after each addition. The batter should become glossy and slightly increase in volume, which indicates proper aeration.
- Fold in the sifted flour and cocoa powder gently, just until combined. Be careful not to overmix, to keep the batter tender and airy.
- Pour the slightly cooled melted chocolate into the batter and fold gently until the mixture is smooth and glossy—this is your rich, chocolatey base.
- Divide the batter evenly among the prepared ramekins, smoothing the tops with a spatula or spoon for an even surface.
- Place the ramekins on a baking sheet and bake for exactly 12-14 minutes. The edges should be set, but the center still jiggles slightly when shaken—this is key to the molten center.
- Remove the ramekins from the oven and let them rest for 2 minutes, allowing the outer crust to set while the center remains molten.
- Carefully invert each ramekin onto a serving plate and hold for a few seconds before gently lifting off—watch for the shiny, slightly crusted exterior and the gooey center that begins to ooze out.
- Serve immediately while warm, enjoying the rich, velvety chocolate flow that spills out with each crack—perfect on its own or with a dusting of powdered sugar or a scoop of vanilla ice cream.
Tips for Perfect Chocolate Fondant
- Bolded Mini-Head: Use room temperature ingredients → Ensures smooth, even melting and better incorporation.
- Bolded Mini-Head: Gently melt chocolate → Use a bain-marie or short microwave bursts to prevent seizing or burning.
- Bolded Mini-Head: Watch the baking time → Remove at 12-14 minutes; edges should be firm, center jiggly.
- Bolded Mini-Head: Don’t overmix batter → Keeps the fondant tender and prevents dense textures.
- Bolded Mini-Head: Rest briefly after baking → Rest 2 minutes to set the outer crust before inverting.
- Bolded Mini-Head: Serve immediately → The molten center is best enjoyed right out of the oven, with oozing richness.
- Bolded Mini-Head: Use a toothpick test → Insert in the center; moist crumbs indicate perfect gooeyness.
Common mistakes and how to fix them
- FORGOT to preheat the oven → Ensure oven is fully heated before baking.
- DUMPED the batter into ramekins → Pour gently to avoid air bubbles and spills.
- OVER-TORCHED the fondant → Check at 12 minutes; edges should be set, center slightly jiggly.
- UNDERSCORED the baking time → Slightly longer baking can firm the edges without losing gooey center.
Quick fixes and pantry swaps
- When batter is too thick → Splash in a teaspoon of warm milk to loosen.
- If fondant cracks during baking → Patch with a little extra melted chocolate on top.
- Dumped too much flour → Shake ramekin gently to even out batter instead of stirring.
- Over-torched edges → Shield with foil and lower oven temperature for next attempt.
- When center isn’t molten → Rescue with a 30-second microwave blast, watch for ooze.
Prep, store, and reheat tips
- Prepare the batter up to a day in advance; cover tightly and keep in the fridge. The flavors deepen overnight.
- Baked fondants can be stored in an airtight container in the fridge for up to 24 hours. Reheat gently to preserve that molten center.
- Reheating: Warm in the oven at 150°C (300°F) for 8-10 minutes until just heated through and gooey again. Avoid microwaving to prevent overcooking.
- The texture might slightly change after storage, but the rich chocolate flavor remains intact. Serve immediately for best results.
Top questions about chocolate fondant
1. How do I get the perfect molten center?
A molten center is achieved by baking just enough so that the outer edges are firm while the middle remains gooey. Timing and temperature are crucial.
2. Why isn’t my fondant gooey in the middle?
If the fondant is too dense or cake-like, it’s probably overbaked. Slightly reducing baking time or checking earlier can help.
3. What kind of chocolate should I use?
Use high-quality dark chocolate with at least 70% cocoa for a rich, glossy melt. Cheaper chocolates may seize or be dull.
4. Can I prepare this in advance?
Make sure your eggs and butter are at room temperature; cold ingredients won’t incorporate smoothly, affecting texture.
5. Can I use a convection oven?
Baking in a convection oven might require lowering the temperature slightly and watching the time more closely.
6. Can I freeze the batter?
Yes, you can freeze unbaked batter in ramekins wrapped tightly for up to a week. Bake directly from frozen, adding a minute or two.
7. My edges are overdone, what now?
If the edges are overcooked or dry, cover with a damp cloth and serve quickly before they firm up too much.
8. How do I know when it’s done?
Use a toothpick inserted in the center; moist crumbs indicate it’s ready. The top should be set but slightly springy.
9. How can I fix overbaking?
A quick microwave blast (about 20 seconds) can revive a slightly overbaked fondant, making it ooze again.
10. What ramekins should I use?
Choose ramekins that are oven-safe and not too deep; shallow ones help achieve a more pronounced molten center.
Achieving that perfect molten center in a chocolate fondant is like catching a fleeting secret of dessert making. When it works, it’s a quiet thrill that makes all the careful timing worth it. Every batch teaches patience, and the reward—rich, velvety chocolate flowing out—makes the effort feel entirely justified.
In the end, this dessert isn’t just about the taste. It’s about the small moments of mastery, the warm aroma filling the kitchen, and that moment of joy when you crack the top and reveal the gooey treasure inside. It’s a simple pleasure that stays with you long after the last spoonful.

Hi, I’m Claire Dawson, and I’m the voice behind The Procrastinators Cookbook. Food has always followed me around, even when I was busy putting other things off. Somewhere between long café shifts, half-finished to-do lists, and meals cooked later than planned, I realized that food was the one thing I always came back to.