Homemade chicken tenders hold a special place in my kitchen, especially when I get creative with leftovers. Using bread crusts that would otherwise get tossed, I turn them into a crispy, flavorful coating that’s full of character. It’s a way to make everyday scraps feel special, transforming them into something crispy and satisfying.
This recipe is a reminder that comfort food doesn’t have to be complicated or greasy. It’s about taking simple ingredients—chicken, bread, a few seasonings—and turning them into something that feels like a little celebration. Plus, it’s a great way to get kids to eat more protein without the fuss.
Focusing on the nostalgic comfort of homemade chicken tenders, but with a twist: using leftover bread crusts to create a crispy, flavorful coating that turns everyday scraps into a satisfying meal.
Turning Leftover Crusts into Crispy Tenders
- Making these tenders reminds me of lazy Sunday afternoons with my family, laughter spilling over crispy bites.
- There’s a quiet pride in turning bread scraps into something everyone reaches for first.
- Even after a long day, frying up these tenders fills my kitchen with a warm, savory aroma that comforts me.
- Seeing my kids gobble them up makes me feel like I’ve cracked some secret code to kid-approved dinner.
- This recipe is chaos in the best way—messy, satisfying, and totally worth every crunchy bite.
The story behind this recipe
- This recipe for chicken tenders came from a need to repurpose bread crusts that I’d otherwise toss. I wanted something crunchy and satisfying, but with a personal touch that felt homey and real. It’s funny how scraps from the bread bag can turn into a favorite dinner.
- The idea sparked one chaotic evening in the kitchen, when I was knee-deep in leftovers and craving comfort food that didn’t feel greasy or heavy. I started experimenting with different coatings, and this crispy crust made from bread crusts just clicked. Now, it’s become my go-to for a quick, honest meal.
- heading
- story_type
Trivia and Historical Snippets
- Chicken tenders as a concept date back to the mid-20th century, gaining popularity as a finger-food favorite.
- The crispy coating idea likely evolved from Southern fried chicken techniques, simplified for quick, handheld bites.
- In many households, chicken tenders became a staple during the 1980s fast-food boom, especially as a kid-friendly option.
- Using bread crusts for coating taps into a long tradition of resourcefulness—turning kitchen scraps into something delicious.
- Today, homemade tenders are a way to reclaim control over ingredients, steering clear of preservatives and additives.
Key Ingredients and Tips
- Chicken breasts: I prefer skinless, boneless breasts—they stay juicy and cook evenly. You can swap with thighs if you want more flavor and tenderness.
- Bread crusts: These give the tenders their crunch, with a toasty, slightly smoky aroma. Use fresh crusts or leftover bread, just pulse them into crumbs before coating.
- Eggs: They help the crust stick, turning gooey when beaten, binding everything together. For a richer coating, add a splash of milk or buttermilk.
- Flour: I use plain all-purpose flour for a light, crisp base. If you’re avoiding gluten, try rice flour or cornstarch for extra crunch.
- Seasonings: Salt, pepper, paprika—simple but essential. Feel free to add garlic powder or cayenne for a spicy kick, which elevates the flavor.
- Oil: Use vegetable or canola oil for frying—neutral and high smoke point. If you want less mess, try baking at 200°C (400°F) for a healthier version.
- Optional herbs/spices: Fresh thyme or dried oregano can add a herby note—just a pinch for aroma without overpowering.
Spotlight on key ingredients
Chicken breasts:
- I prefer skinless, boneless breasts—they stay juicy and cook evenly. You can swap with thighs if you want more flavor and tenderness.
- Bread crusts: These give the tenders their crunch, with a toasty, slightly smoky aroma. Use fresh crusts or leftover bread, just pulse them into crumbs before coating.
- Eggs: They help the crust stick, turning gooey when beaten, binding everything together. For a richer coating, add a splash of milk or buttermilk.
Bread crusts:
- These give the tenders their crunch, with a toasty, slightly smoky aroma. Use fresh crusts or leftover bread, just pulse them into crumbs before coating.
- Eggs: They help the crust stick, turning gooey when beaten, binding everything together. For a richer coating, add a splash of milk or buttermilk.
Notes for ingredient swaps
- Dairy-Free: Swap milk or buttermilk in the egg wash with a splash of almond or oat milk. Slightly less rich, but still effective at binding.
- Gluten-Free: Use rice flour or cornstarch instead of all-purpose flour for dredging. Keeps the coating light and crispy, but may be a touch less sturdy.
- Breadcrumbs: Replace bread crusts with crushed gluten-free crackers or pork rinds for a different crunch and flavor profile.
- Oil: If you prefer baking, use a preheated oven at 200°C (400°F) on a foil-lined sheet for a crispier finish. Less greasy, but watch closely to avoid burning.
- Seasonings: Add a pinch of cayenne or chili powder to the breadcrumb mix for a spicy kick. Adjust to your heat tolerance.
- Eggs: For an egg-free version, use a thickened mixture of ground flaxseed and water (1 tbsp flaxseed + 2 tbsp water per egg). Slightly less binding but still effective.
- Herbs & Spices: Fresh thyme or oregano can be added to the coating for a fragrant, herby note that elevates simple tenders.
Equipment & Tools
- Sharp knife: For cutting chicken into strips.
- Large cutting board: Provide a stable surface for prep.
- Shallow bowls: Hold flour, eggs, and breadcrumbs for dredging.
- Cast iron pan: Maintain even heat for frying.
- Wire rack: Drain excess oil and keep tenders crispy.
- Paper towels: Blot excess moisture and drain cooked tenders.
Step-by-step guide to chicken tenders
- Equipment & Tools: Gather a sharp knife, large cutting board, shallow bowls for dredging, a frying pan (preferably cast iron), and a wire rack for draining. Have paper towels ready for blotting.
- Cut chicken breasts into strips about 1-inch wide, 4-inch long. Pat dry with paper towels to remove excess moisture.
- Prepare breadcrumbs by pulsing leftover bread crusts in a food processor until fine but not powdery. Mix with a pinch of salt and paprika.
- Set up three shallow bowls: one with flour, one with beaten eggs, and one with seasoned breadcrumb mixture.
- Dredge each chicken strip in flour, shaking off excess. Then dip into the egg, letting excess drip off.
- Coat thoroughly in breadcrumb mixture, pressing lightly to adhere well. Place on a plate.
- Heat 2-3 cm of oil in the frying pan over medium heat (about 180°C/356°F). To test, drop a small breadcrumb—if it sizzles and bubbles, oil’s ready.
- Fry tenders in batches, without crowding, for about 4-5 minutes per batch. Turn occasionally, watching for golden-brown crust.
- Check for doneness: the coating should be crisp and golden, and the chicken should feel firm but not rubbery when gently pressed.
- Remove tenders with a slotted spoon, drain on the wire rack, and sprinkle with a little more salt if needed. Let rest for 2 minutes.
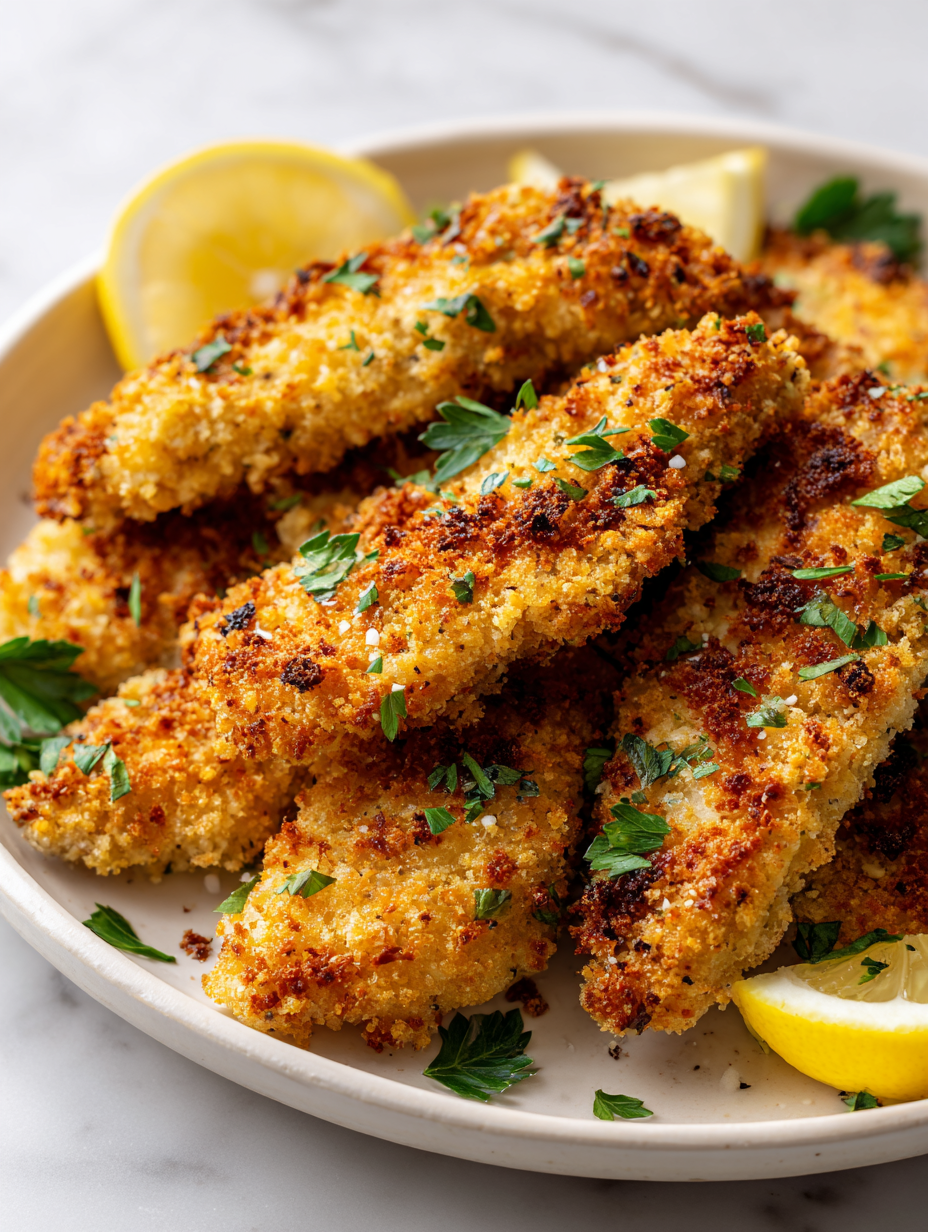
- Resting & Finishing: Serve immediately with your favorite dipping sauce. The tenders should be crispy, juicy inside, and fragrant with paprika and toasted bread aroma.
- Checkpoints & How to Know It’s Done: The crust is golden and crackly, chicken registers 75°C (165°F) internally, and tenders feel firm yet tender when pressed.
Let the tenders sit for 2 minutes on a wire rack to let the crust set. Serve hot with a side of dipping sauces or a fresh salad. Enjoy the crunch and juicy interior with every bite.
How to Know It’s Done
- Golden, crispy crust with even coloring.
- Internal temperature reaches 75°C (165°F).
- Tenders feel firm but not hard when pressed.
Homemade Chicken Tenders with Crispy Bread Crusts
Ingredients
Equipment
Method
- Trim the chicken breasts and cut them into strips about 1 inch wide and 4 inches long. Pat them dry with paper towels to remove excess moisture, which helps the coating stick better.
- Pulse leftover bread crusts in a food processor until they reach a fine, crumb-like consistency. Transfer the crumbs to a shallow bowl and stir in a pinch of salt, paprika, and black pepper for flavor.
- Set up three shallow bowls: one with all-purpose flour, one with beaten eggs, and one with seasoned bread crumbs.
- Dredge each chicken strip in the flour, shaking off any excess to ensure a light coating.
- Dip the floured chicken into the beaten eggs, turning to coat evenly and letting any excess drip off.
- Press the chicken strip into the bread crumb mixture, ensuring an even coating all around. Place the coated strip on a plate and repeat with the remaining pieces.
- Pour vegetable oil into a cast iron pan until about 1 inch deep and heat over medium heat until it reaches about 180°C (356°F), or until a breadcrumb sizzles vigorously when added.
- Carefully place the coated chicken tenders into the hot oil, working in batches to avoid overcrowding. Fry for 4-5 minutes, turning occasionally, until golden brown and crispy.
- Use a slotted spoon to transfer the tenders onto a wire rack set over paper towels, allowing excess oil to drain and the crust to stay crispy. Let rest for 2 minutes.
- Serve the tenders hot, with your favorite dipping sauces or a fresh salad. The crust should be crispy and toasted, with juicy chicken inside ready to enjoy.
Pro tips for perfect tenders
- Bolded mini-head: Use a gentle hand when pressing breadcrumbs onto the chicken to ensure an even coating.
- Bolded mini-head: Maintain oil temperature at around 180°C (356°F) for crispy, non-greasy tenders.
- Bolded mini-head: For extra crunch, double-dip the tenders—dunk in egg and breadcrumbs twice before frying.
- Bolded mini-head: Rest the cooked tenders on a wire rack instead of paper towels to keep the crust crispy.
- Bolded mini-head: When frying in batches, let the oil come back to temperature before adding more tenders.
- Bolded mini-head: Add a pinch of smoked paprika to the breadcrumb mix for a subtle smoky aroma and flavor.
- Bolded mini-head: If the coating starts to burn, lower the heat slightly and cook more slowly for even browning.
Common mistakes and how to fix them
- FORGOT to dry chicken: Moisture prevents crispiness. Pat chicken dry thoroughly before coating.
- DUMPED too much oil: Use enough oil to cover the tenders partially, not deep-fry level.
- OVER-TORCHED coating: Keep an eye on the heat; adjust if crust darkens too quickly.
- MISSED resting time: Let fried tenders sit 2 minutes to set the crust and avoid sogginess.
Fast fixes for chicken tenders
- When oil shimmers and crackles, your oil is ready for frying.
- Splash cold water when oil splatters too much to control the heat.
- Patch soggy tenders by reheating in a hot oven with a sprinkle of fresh breadcrumbs.
- Shield burnt crusts by lowering heat immediately and transferring to a cooler part of the pan.
- If breadcrumbs aren’t sticking, ensure chicken is thoroughly dried before coating.
Prep, store, and reheat tips
- Prep the chicken by cutting into strips and coating in seasoned flour and breadcrumbs up to 24 hours ahead. Keep covered in the fridge for best crunch and freshness.
- Store cooked tenders in an airtight container in the fridge for up to 3 days. Reheat in a hot oven (around 200°C/390°F) for 5-7 minutes until crispy and heated through, with a satisfying crunch on the outside.
- Frozen cooked tenders can last up to a month. Reheat directly from frozen in the oven, adding a couple of extra minutes to regain crunch.
- To reheat raw coated tenders, fry them within 1-2 days for optimal crispness. Over time, the coating may soften, losing some of its original snap.
- Sensory note: reheated tenders should smell savory, with a crispy crackle when bitten into. Avoid soggy texture—watch reheating times carefully.
Top questions about chicken tenders
1. How do I choose the best chicken for tenders?
Use fresh chicken breasts and cut into even strips for uniform cooking. Keep them dry to ensure crispiness.
2. How can I tell when the tenders are cooked through?
Breadcrumbs should be golden and crispy, and the chicken should be tender and juicy inside. Use a thermometer to check internal temp.
3. What’s the ideal oil temperature for frying?
Fry in oil heated to around 180°C (356°F). The tenders should crackle when added, and the coating should turn golden within a few minutes.
4. Can I bake these instead of frying?
Yes, baking at 200°C (400°F) on a lined sheet can give a crispy exterior with less mess. Expect slightly less crunch than frying.
5. Are there gluten-free substitutes that work well?
Use gluten-free options like rice flour or cornstarch for dredging. They produce a light, crispy coating without gluten.
6. What should I look for in a perfectly crispy coating?
Crust should be evenly coated and slightly smoky in aroma. The chicken should feel firm but tender when pressed.
7. How do I avoid soggy chicken tenders?
Overcrowding the pan cools the oil and makes tenders soggy. Fry in small batches, maintaining temperature.
8. How long should I rest the tenders before serving?
Rest cooked tenders on a wire rack for 2 minutes to set the crust and keep them crispy.
9. How do I reheat leftovers without losing crunch?
Reheat in a hot oven at 200°C (390°F) for 5-7 minutes until crispy and heated through. Avoid microwave to keep crispness.
10. What’s the best way to test if the oil is hot enough?
Ensure oil is at temperature before frying. Test with a breadcrumb—if it bubbles vigorously, it’s ready.
Making these chicken tenders from scratch is a small act of rebellion against the fast-food rush. The aroma of crispy bread crust and tender chicken feels like a quiet victory in a busy day.
They’re imperfect, messy, and real — just like the kitchen itself. Sometimes, the best moments happen when you’re not aiming for perfection, but for something honest and satisfying.

Hi, I’m Claire Dawson, and I’m the voice behind The Procrastinators Cookbook. Food has always followed me around, even when I was busy putting other things off. Somewhere between long café shifts, half-finished to-do lists, and meals cooked later than planned, I realized that food was the one thing I always came back to.