I’ve always loved mozzarella sticks, but fried food isn’t exactly my go-to anymore. So I started experimenting with baking them—turning that greasy, crispy snack into something a bit healthier without losing the gooey, cheesy core we crave. It’s honestly surprising how well they turn out—crisp on the outside, melty inside, just like the fried version but with way less mess.
Baking mozzarella sticks feels like a small act of rebellion, a way to satisfy that snack craving without feeling guilty afterward. Plus, it’s a good way to sneak a little extra nutrition into something that usually feels indulgent. The smell alone—baked cheese, toasted breadcrumbs—sets the whole kitchen up for a cozy, cheesy welcome. It’s a simple recipe, but it’s got that homemade touch that makes all the difference.
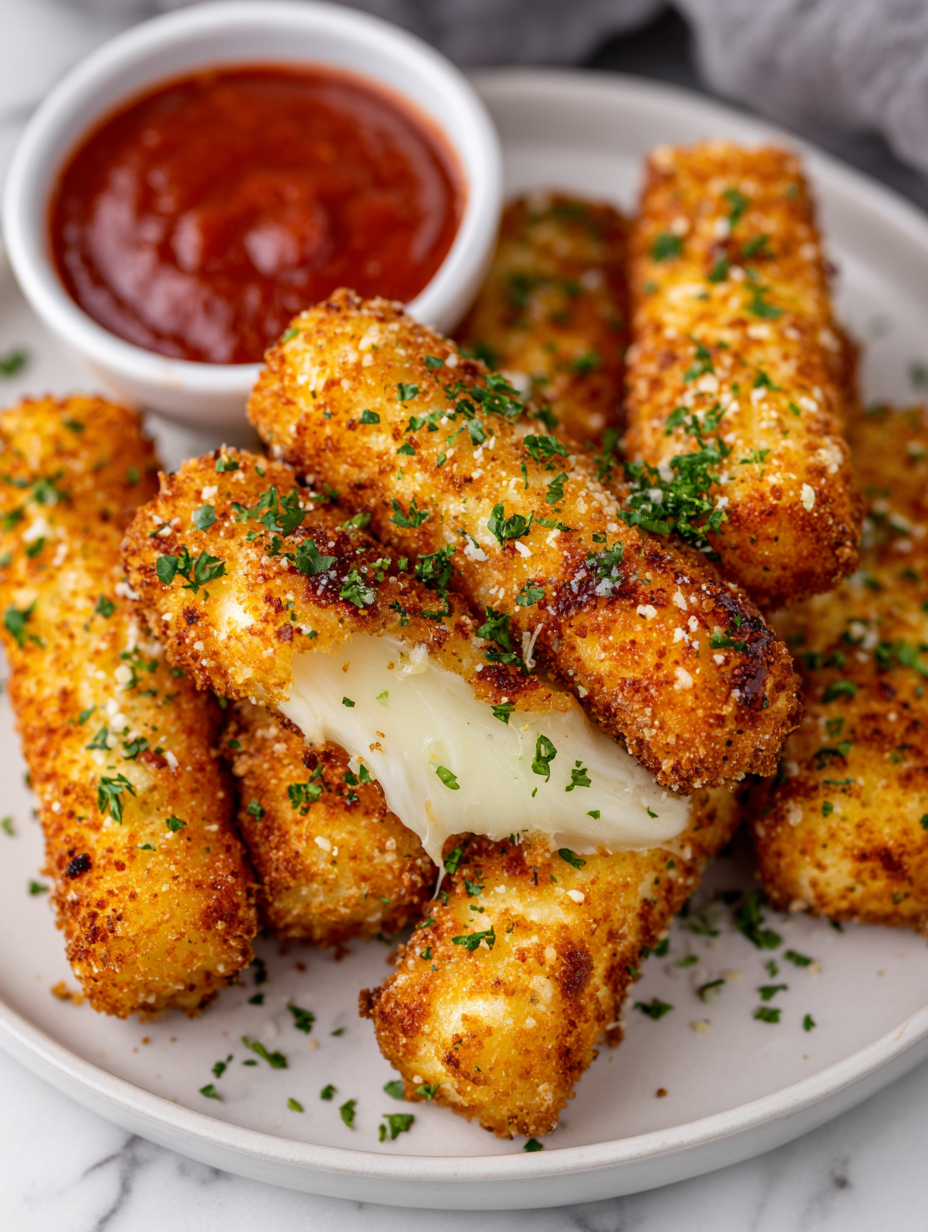
Transforming the classic fried snack into a healthier, oven-baked version without sacrificing that irresistibly gooey interior.
The story behind this recipe
- This recipe came from a lazy weekend experiment, wanting to enjoy mozzarella sticks without the deep-fry mess. I realized baking gave me that same crispy crust and gooey center, just without the oil splatters everywhere. It became a go-to when I wanted comfort food that feels a little smarter.
- My kids love helping out with the breading process—there’s something satisfying about turning simple ingredients into something that smells like a cheesy, toasted dream. Over time, I tweaked the seasoning and breading to get that perfect balance of crunch and melt. It’s become a small victory in my kitchen, proving you can have indulgence with less guilt.
- heading: The story behind this recipe
Key Ingredients and Tips
- Mozzarella cheese: I love the gooey stretch—make sure to cut thick slices so they don’t leak during baking. Use fresh mozzarella for that perfect melt, but pre-shredded works in a pinch if you’re in a rush.
- Breadcrumbs: I prefer panko for extra crunch, especially when toasted golden. Feel free to add some grated Parmesan or herbs for a flavor boost—just don’t skip the toasting step, it really deepens the aroma.
- Egg wash: I beat a couple of eggs with a pinch of salt—makes the breading stick like a charm. If you’re avoiding eggs, a little milk mixed with cornstarch can also work, but it won’t hold as well.
- Flour: I keep it simple with all-purpose flour—helps the egg adhere and creates a barrier for even crispness. If you’re gluten-free, try rice flour or cornstarch for a lighter crunch.
- Oil spray: I use a light spray of neutral oil on the breaded sticks before baking—this helps them crisp up evenly and gives that slightly shiny, appetizing look. No oil? A quick brush with melted butter can do the trick too.
- Seasonings: I toss in a little garlic powder, paprika, or Italian herbs into my breadcrumb mix—adds a flavor punch. Keep it simple if you want to taste more cheese, or go bold with spicy paprika for a smoky kick.
- Optional: dipping sauces: I love serving these with a tangy marinara or a spicy aioli—complements the cheesy richness perfectly. Keep some handy for dipping, but these sticks are pretty great solo too.
Spotlight on key ingredients
Mozzarella cheese:
- I love the gooey stretch—make sure to cut thick slices so they don’t leak during baking. Use fresh mozzarella for that perfect melt, but pre-shredded works in a pinch if you’re in a rush.
- Breadcrumbs: I prefer panko for extra crunch, especially when toasted golden. Feel free to add some grated Parmesan or herbs for a flavor boost—just don’t skip the toasting step, it really deepens the aroma.
Breadcrumbs:
- I prefer panko for extra crunch, especially when toasted golden. Feel free to add some grated Parmesan or herbs for a flavor boost—just don’t skip the toasting step, it really deepens the aroma.
- Egg wash: I beat a couple of eggs with a pinch of salt—makes the breading stick like a charm. If you’re avoiding eggs, a little milk mixed with cornstarch can also work, but it won’t hold as well.
Notes for ingredient swaps
- Dairy-Free: Use shredded dairy-free cheese or a thickened cashew cream for that melty feel—flavor’s milder, texture varies.
- Gluten-Free: Swap panko for crushed rice crackers or gluten-free breadcrumb mix—crispness stays, but it’s a different crunch.
- Vegan: Replace cheese with firm tofu or vegan mozzarella—watch for moisture, it won’t ooze like cheese.
- Low-Sodium: Opt for unsalted breadcrumbs and reduce added salt—less salt, but still flavorful.
- Herb Variations: Add dried oregano, basil, or chili flakes to breadcrumbs—boosts flavor with a fragrant, spicy punch.
- Breadcrumbs: Use crushed cornflakes or crushed pretzels—these give extra crunch and a slightly different flavor profile.
- Egg Substitute: Mix aquafaba or a flaxseed slurry—helps coating stick, but won’t add richness of eggs.
Equipment & Tools
- Baking sheet: To hold and bake the sticks evenly.
- Wire rack: Allows heat to circulate for crispiness.
- Mixing bowls: Hold breading ingredients for assembly.
- Small saucepan: Warm the oil for spraying or brushing.
Step-by-step guide to baked mozzarella sticks
- Equipment & Tools: Gather a baking sheet, wire rack, mixing bowls, and a small saucepan. The wire rack helps air circulate for crispiness.
- Prep cheese: Slice mozzarella into 1/2-inch thick sticks, about 4 inches long. Keep cold so it doesn’t melt prematurely.
- Set up breading station: In one bowl, beat 2 eggs with a pinch of salt. In another, mix 1 cup panko with spices. In a third, place 1/2 cup flour.
- Bread sticks: Dip each cheese stick into flour, then egg wash, then coat thoroughly with breadcrumb mixture. Press gently so breadcrumbs stick well.
- Preheat oven: Set to 220°C / 425°F. Line baking sheet with parchment, place a wire rack on top. Spray rack lightly with oil.
- Arrange sticks: Place breaded mozzarella sticks on the wire rack, leaving space between. Spray lightly with oil for extra crunch.
- Bake: Insert into oven, bake for 12-15 minutes. Watch for golden edges and bubbling cheese through cracks. The smell should be cheesy and toasted.
- Check doneness: The coating should be crispy, cheese melted and slightly oozy, and sticks evenly golden. If not, bake a few more minutes.
- Rest & serve: Let sit for 2-3 minutes after baking. Serve immediately with marinara or spicy aioli for dipping. They’re best hot and crispy.
Let the sticks rest for 2-3 minutes on a cooling rack before serving to prevent cheese from leaking out. Serve hot with your favorite dipping sauce.
How to Know It’s Done
- Golden, crisp exterior with no pale spots.
- Cheese is melted and slightly bubbly through cracks.
- Breading feels firm and crunchy when pressed lightly.
Baked Mozzarella Sticks
Ingredients
Equipment
Method
- Start by slicing the mozzarella into four 1/2-inch thick sticks. Keep them chilled so they stay firm while breading.
- Toast the panko breadcrumbs in a dry skillet until golden and fragrant, then transfer to a shallow plate. This step boosts crunch and flavor.
- Set up your breading station: in one bowl, beat the eggs with a pinch of salt; in another, place the all-purpose flour; and in a third, combine the toasted breadcrumbs with garlic powder, salt, and pepper.
- Dip each mozzarella stick into the flour, ensuring it’s coated evenly, then into the egg wash, and finally press it into the seasoned breadcrumbs, turning to coat thoroughly. Gently press the breadcrumbs onto the cheese for a good crust.
- Arrange the breaded sticks on a wire rack placed over a baking sheet. Lightly spray the sticks with olive oil to enhance crispness and give them a shiny finish.
- Preheat your oven to 220°C / 425°F. Place the baking sheet with the wire rack inside and bake for 12-15 minutes, until the coating is golden brown and crispy, and the cheese is bubbling through small cracks.
- Once baked, remove the sticks from the oven and let them rest on the rack for 2-3 minutes. This brief rest helps set the cheese and reduces drips during serving.
- Serve the mozzarella sticks immediately with marinara sauce or your favorite dip. The exterior should be crispy and golden, while the inside remains irresistibly gooey and cheesy.
Pro tips for perfect baked mozzarella sticks
- Cold cheese: Keep mozzarella chilled until breading—prevents leaks and keeps it firm during baking.
- Panko toasting: Toast breadcrumbs in a dry skillet until golden—enhances crunch and adds nutty aroma.
- Egg wash prep: Beat eggs with a pinch of salt and a splash of water—helps breadcrumbs stick evenly.
- Spray for crispness: Lightly spray or brush the breaded sticks with oil before baking—boosts crunch and shine.
- Hot oven: Bake at 220°C / 425°F—ensures a crispy exterior and gooey interior without overcooking.
- Watch the color: Remove when edges are golden and cheese just starts to bubble—avoids over-baking and cheese leakage.
- Rest briefly: Let cooked sticks sit 2-3 minutes—allows cheese to set, reducing drips and spills.
Common mistakes and how to fix them
- FORGOT to preheat oven → Always preheat for even baking and proper crispness.
- DUMPED cheese too early → Wait until cheese is bubbling and slightly oozy before removing.
- OVER-TORCHED breadcrumbs → Keep an eye on breadcrumbs, remove when golden to avoid bitterness.
- MISSED resting period → Let sticks rest 2-3 minutes to set cheese and prevent leakages.
Quick fixes for common issues
- IF cheese leaks out → Chill mozzarella thoroughly before breading to keep it firm.
- WHEN breadcrumbs burn → Reduce oven temperature slightly and toast breadcrumbs separately beforehand.
- SPLASH oil during spraying → Use a fine mist for even coverage and avoid excess oil shimmer.
- PATCH soggy sticks → Return to oven at 200°C / 390°F for 3-5 minutes for extra crispness.
- SHIELD cheese from over-browning → Cover with foil loosely if edges darken too quickly during baking.
Prep, store, and reheat tips
- Prep mozzarella sticks: Assemble and bread the sticks a day ahead, then keep refrigerated to prevent cheese from softening too much.
- Store baked sticks: Once cooled completely, place in an airtight container in the fridge for up to 2 days. Reheat in oven or air fryer for best crispness.
- Shelf life: Reheated mozzarella sticks stay crispy for about 10 minutes, but the cheese may be less gooey. Consume sooner for optimal texture.
- Reheating tips: Bake at 180°C / 350°F for 5-7 minutes until heated through and crispy. Keep an eye on them to avoid over-drying.
- Sensory note: The aroma should be cheesy and toasted, with a crunchy exterior and warm, melty center. Avoid sogginess by reheating properly.
Top questions about baked mozzarella sticks
1. How do I prevent cheese leaks?
Look for cheese that’s firm and cold, so it doesn’t leak during baking. Thick slices work best.
2. What’s the best breadcrumb choice?
Use panko breadcrumbs for a crunchier crust, and toast them lightly before breading for extra flavor.
3. How long should I bake them?
Bake at 220°C / 425°F until golden and bubbly. Usually about 12-15 minutes, but watch for color and smell.
4. How do I get a crispy exterior?
Spray or brush lightly with oil before baking; it helps crisp up the coating and gives a shiny finish.
5. Can I reheat leftovers?
Reheat in a hot oven or air fryer at 180°C / 350°F for 5-7 minutes until hot and crispy again.
6. Can I make these in advance?
Yes, you can prepare the sticks a day ahead, coat them, and keep refrigerated until ready to bake.
7. Are vegan options possible?
Use dairy-free cheese or vegan mozzarella if you want a dairy-free version. The melt won’t be quite the same.
8. What common mistakes should I avoid?
Avoid over-baking to prevent burning breadcrumbs and drying out the cheese. Keep an eye on the color.
9. Any tips for preparing?
Chill mozzarella well before breading to keep it firm. Also, don’t overcrowd the baking sheet for even crispiness.
10. What equipment makes a difference?
Use a wire rack on your baking sheet for better air circulation and crispier sticks. It helps prevent sogginess.
Baked mozzarella sticks are a small but satisfying way to enjoy a cheesy snack without the grease. They remind me of childhood afternoons spent dipping and crunching, but now I appreciate the simplicity of baking them to crispy perfection. It’s a little act of comfort that fits into a busy evening or a casual get-together.
In the end, it’s all about the texture and the melty cheese—those moments when everything comes together in that perfect, cheesy stretch. These sticks might not be fancy, but they’re honest, warm, and just right for when you need a quick, cheesy bite that hits all the right notes.

Hi, I’m Claire Dawson, and I’m the voice behind The Procrastinators Cookbook. Food has always followed me around, even when I was busy putting other things off. Somewhere between long café shifts, half-finished to-do lists, and meals cooked later than planned, I realized that food was the one thing I always came back to.