Achieving that satisfying crunch in chicken tenders without the mess of deep-frying has been a small kitchen quest of mine. I’ve played around with oven temperatures and coatings, and I finally landed on a method that delivers a crispy, golden crust every time, with none of the grease. It’s honest, straightforward, and honestly, just as good as frying — maybe even better for a quick weeknight dinner or a snack that feels indulgent but isn’t.
What I love about oven-baked tenders is how adaptable they are. You can customize the seasoning, add a little heat or keep them simple with just salt and pepper. Plus, the smell of toasty breadcrumbs filling the house when they’re baking — that’s what really makes the whole kitchen feel inviting. No oil splatters, just a warm, savory aroma that promises crispy goodness.
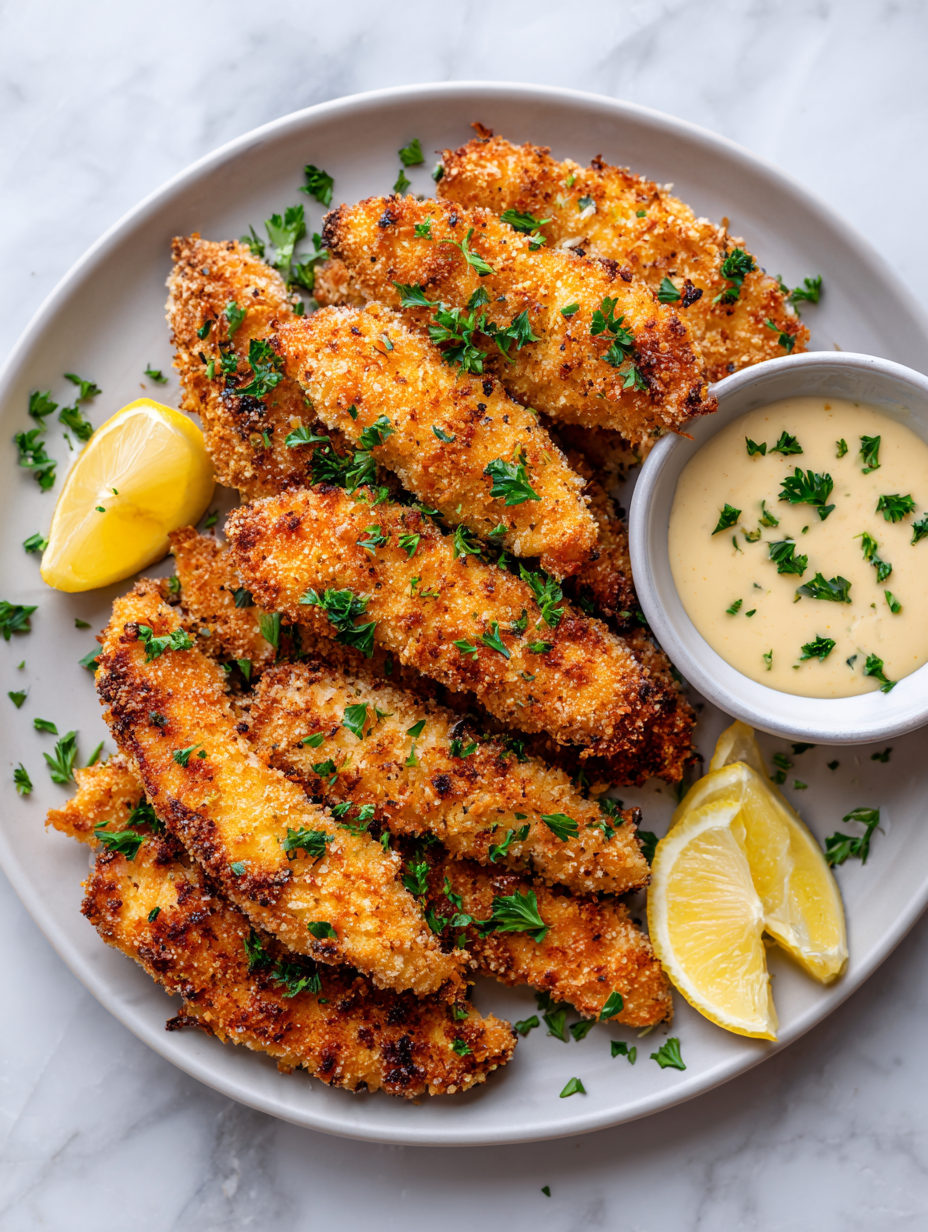
Focusing on how to achieve ultra-crispy chicken tenders using only the oven, without deep-frying, and sharing tips for that perfect crunch every time.
The story behind this recipe
- This recipe started as a quest for a chicken tender that could stand up to my crispy, fried favorites without the excess oil. I remember the first batch coming out with a crackly crust, the smell of toasted breadcrumbs filling the kitchen, and that satisfying crunch I’d been craving. It was a small victory that made weeknights feel a little more special, even when I was in a rush.
- I often think about how my kids love these tenders, especially when I double the batch and freeze some for quick lunches. It’s funny — a simple idea, baked instead of fried, has become a little ritual around here. The best part? No greasy cleanup, just a tray of golden tenders that disappear fast.
- heading: The story behind this recipe
Ingredient breakdown
- Chicken breasts: I prefer skinless, boneless breasts—they stay juicy and cook evenly, plus you avoid that gamey flavor. If yours are a little thick, pound them to an even thickness for consistent crispness.
- Breadcrumbs: I like panko for that airy crunch, but regular breadcrumbs work too. Toast them slightly in the oven before coating for a deeper, nutty flavor that really stands out.
- Egg wash: A simple beaten egg helps the coating stick and creates a shiny, golden crust. If you’re short on eggs, a splash of milk or buttermilk can do the trick, adding a slight tang.
- Seasonings: Salt, pepper, and a pinch of smoked paprika give the tenders a smoky, savory punch. Feel free to toss in a dash of garlic powder or cayenne if you want a bit more kick.
- Cooking spray or oil: I spray lightly to crisp up the coating without drowning it in oil. For an extra crunch, a light drizzle of olive oil before baking can boost browning and add a subtle fruity aroma.
- Optional: Parmesan cheese: I sometimes sprinkle grated Parmesan into the breadcrumb mixture—adds umami and a crispy cheesy crust that really makes these tenders special.
- Lemon juice: A squeeze of fresh lemon right after baking brightens the flavors and adds a fresh, zesty contrast to that toasty coating.
Spotlight on key ingredients
Breadcrumbs:
- Chicken breasts: I prefer skinless, boneless breasts—they stay juicy and cook evenly, plus you avoid that gamey flavor. If yours are a little thick, pound them to an even thickness for consistent crispness.
- I like panko for that airy crunch, but regular breadcrumbs work too. Toast them slightly in the oven before coating for a deeper, nutty flavor that really stands out.
- Egg wash: A simple beaten egg helps the coating stick and creates a shiny, golden crust. If you’re short on eggs, a splash of milk or buttermilk can do the trick, adding a slight tang.
Notes for ingredient swaps
- Dairy-Free: Swap regular milk or egg wash for almond or oat milk; it won’t bind quite as well but still helps the coating stick.
- Gluten-Free: Use crushed gluten-free crackers or almond flour instead of panko for a crispy finish that’s gentle on gluten sensitivities.
- Low-Sodium: Opt for unsalted breadcrumbs and reduce added salt; you’ll still get flavor from seasonings and lemon juice.
- Spicy Kick: Include cayenne or hot paprika in the breadcrumb mix for a fiery twist that still crisps up beautifully.
- Herb Variations: Toss in dried oregano, thyme, or basil into the breadcrumb coating for extra herbal aroma and flavor.
- Sweetening: For a slightly sweet touch, sprinkle a pinch of brown sugar into the breadcrumb mixture—adds a subtle caramelized crunch.
- Oil Alternatives: Use a light spray of avocado oil or sesame oil instead of standard cooking spray for richer aroma and flavor.
Equipment & Tools
- Baking sheet: To hold the tenders for baking and ensure even heat distribution.
- Parchment paper or silicone mat: To prevent sticking and facilitate easy cleanup.
- Three shallow dishes: For flour, eggs, and seasoned breadcrumbs, to set up the breading station.
- Wire rack (optional): To elevate the tenders, promoting crispiness on all sides.
- Tongs or fork: To handle chicken strips without messy fingers.
- Cooking spray or oil: To help achieve a golden, crispy crust.
Step-by-step guide to baked tenders
- Preheat your oven to 220°C (425°F). Line a baking sheet with parchment paper or a silicone mat for easy cleanup and even heat distribution.
- Prepare your equipment: a shallow dish for flour, another for beaten eggs, and a third for seasoned panko breadcrumbs. Have a wire rack ready if you prefer crispy tenders on all sides.
- Pat the chicken breasts dry. Slice into strips roughly 1-inch wide, about 3-4 inches long. For even cooking, pound thick parts to an even thickness with a meat mallet or rolling pin.
- Set up your breading station: Dredge each chicken strip in flour, shaking off excess. Dip into the beaten eggs, then coat thoroughly in the seasoned panko breadcrumbs, pressing gently to adhere.
- Arrange the coated tenders on your prepared baking sheet or on a wire rack set over it. Lightly spray or drizzle with oil—this helps achieve that golden, crispy crust.
- Bake for 15-20 minutes. Halfway through, flip or rotate the tenders for even browning. Keep an eye on them; they should turn a deep golden and smell toasty.
- Check for doneness: the tenders should be opaque inside, with a crispy exterior that crackles when you bite. If they’re not quite there, bake for another 2-3 minutes and check again.
- Remove from oven and let rest for 2 minutes. Serve with a squeeze of lemon or your favorite dipping sauce for added brightness and flavor.
Let the tenders rest for 2 minutes on a wire rack or plate. Serve immediately, optionally drizzled with lemon juice or accompanied by dipping sauces. Enjoy that crunch with every bite, still warm and crispy.
How to Know It’s Done
- Golden-brown crust with crackly texture.
- Internal temperature reaches 75°C (165°F).
- Juices run clear when sliced.
Oven-Baked Crispy Chicken Tenders
Ingredients
Equipment
Method
- Preheat your oven to 220°C (425°F). Line a baking sheet with parchment paper or a silicone mat to prevent sticking and ensure even baking.
- Pat the chicken breasts dry and cut them into strips about 1 inch wide and 3-4 inches long. Pound thicker parts to an even thickness for uniform cooking.
- Set up your breading station: place flour seasoned with salt, pepper, and paprika in one shallow dish; beaten eggs in another; and seasoned panko breadcrumbs in a third.
- Dredge each chicken strip in the flour, shaking off excess, then dip into the beaten eggs, letting any excess drip off. Finally, coat thoroughly in the seasoned panko, pressing gently to help the crumbs adhere.
- Place the coated tenders on the prepared baking sheet or on a wire rack set over it for better air circulation. Lightly spray or drizzle with olive oil to enhance crispiness and promote golden color.
- Bake the tenders for 15-20 minutes, flipping or rotating halfway through, until they are golden brown, crispy, and cooked through. The kitchen will fill with a toasty aroma as they bake.
- Check for doneness: the tenders should be crisp on the outside and opaque inside, with an internal temperature of 75°C (165°F). If needed, bake for an additional 2-3 minutes.
- Once baked, remove the tenders from the oven and let them rest for 2 minutes. Squeeze fresh lemon juice over the hot tenders to brighten their flavor and add a zesty contrast.
- Serve the tenders immediately with your favorite dipping sauces or enjoy them on their own for a crunchy, savory treat.
Pro tips for crispy tenders
- Bolded mini-head: Use a light spray of oil before baking to enhance crispiness and golden color.
- Bolded mini-head: Ensure chicken strips are evenly coated; press breadcrumbs onto the meat for better adhesion.
- Bolded mini-head: For extra crunch, toss breadcrumbs with a teaspoon of cornstarch or crushed cornflakes.
- Bolded mini-head: Bake on a wire rack set over a baking sheet for air circulation and uniformly crispy tenders.
- Bolded mini-head: Keep an eye on the tenders during the last 5 minutes; they can go from perfect to burnt quickly.
- Bolded mini-head: For a smoky flavor, sprinkle a little smoked paprika into the breadcrumb mixture before coating.
- Bolded mini-head: Rest the tenders for 2 minutes after baking; this helps set the crust and keeps the meat juicy.
Common mistakes and how to fix them
- FORGOT to check oven temperature → Keep it accurately at 220°C (425°F).
- DUMPED the coating mixture → Coat thoroughly for even crunch and flavor.
- OVER-TORCHED the tenders → Remove when golden and crispy, not burnt.
- MISSED resting time → Let tenders rest 2 minutes for better texture and juiciness.
Quick fixes and pantry swaps
- When burnt, splash a little vinegar to neutralize the char aroma.
- If tenders stick, patch with a sprinkle of more breadcrumbs and gentle pressing.
- DUMPED the seasoning; add a pinch more salt or spice before baking again.
- When tenders are soggy, shield with extra breadcrumbs and bake 2 minutes longer.
- Splash lemon juice after baking for bright contrast and to mask any residual greasiness.
Prep, store, and reheat tips
- Prepare the chicken tenders: coat and bread them up to a day in advance. Keep covered in the fridge for up to 24 hours. The coating firms up slightly, but still crisps nicely in the oven.
- Store cooked tenders in an airtight container in the fridge for 2-3 days. Reheat in oven at 180°C (350°F) for 8-10 minutes until crispy and heated through, with a pleasant crackle upon bite.
- Frozen tenders: freeze unbaked on a tray, then transfer to a zip-top bag. They’ll keep for up to 3 months. Bake directly from frozen, adding 5-7 minutes to baking time, until golden and hot.
- Reheating tips: avoid microwave reheats if you want that crispy exterior. For the best texture, reheat in the oven or air fryer, watching for that inviting crunch and warm interior.
- Sensory notes: reheated tenders should smell toasted and savory, with a satisfying crackle that echoes the fresh batch. Don’t overheat or they’ll lose their crunch.
Top questions about baked chicken tenders
1. How do I know when my chicken tenders are done?
Look for a golden-brown, crispy crust that crackles when you bite. The internal temp should reach 75°C (165°F).
2. Can I use different breadcrumbs?
Use panko breadcrumbs for extra crunch, and toast them slightly before coating for a richer flavor.
3. How long should I bake the tenders?
Bake at 220°C (425°F) for 15-20 minutes, flipping halfway. They should be crispy and golden.
4. Do I need oil or spray?
Spray lightly with oil before baking to enhance crispiness and browning, without greasiness.
5. Can I freeze these chicken tenders?
Yes, you can freeze unbaked tenders on a tray, then transfer to a bag for up to 3 months. Bake directly from frozen, adding a few extra minutes.
6. What are visual signs of doneness?
Use a meat thermometer to check the internal temperature, and look for a crackly crust and fragrant aroma.
7. Can I make these dairy-free?
Yes, swap out regular eggs for a splash of milk or plant-based milk for the coating to stick.
8. How can I customize the flavor?
For extra flavor, add herbs like thyme or oregano into the breadcrumb mixture, or a pinch of smoked paprika for smoky notes.
9. Any tips for coating the chicken evenly?
Ensure chicken strips are evenly coated and not too thick for even cooking and crispness.
10. How do I prevent soggy tenders?
Avoid overcrowding the pan or baking sheet; give tenders space for air circulation to crisp up properly.
There’s something about those crispy chicken tenders that makes weeknights a little less ordinary. I love how a simple oven bake can turn humble ingredients into something with real texture and flavor, especially when the smell starts filling the house. It’s honest comfort, right there in your own kitchen.
Whenever I make these, I remember they’re more than just a quick dinner — they’re a small reminder that good food doesn’t have to be complicated. Warm, crunchy, and a little messy, they’re perfect for sharing or just enjoying on your own. Sometimes, that’s all you really need.

Hi, I’m Claire Dawson, and I’m the voice behind The Procrastinators Cookbook. Food has always followed me around, even when I was busy putting other things off. Somewhere between long café shifts, half-finished to-do lists, and meals cooked later than planned, I realized that food was the one thing I always came back to.