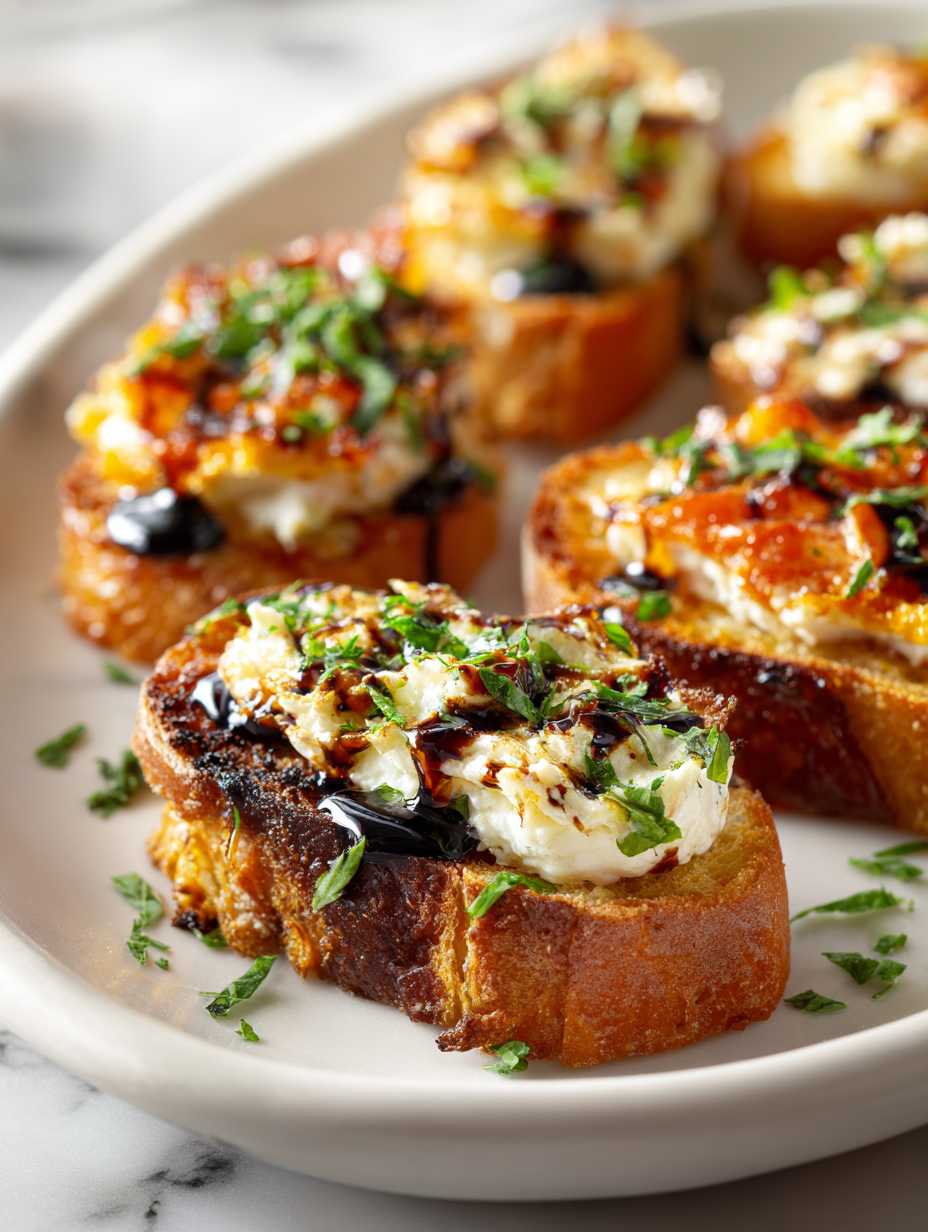
Baking crostini might seem like a small step, but it changes everything about their texture and flavor. Instead of just a quick toast, the oven transforms the bread into a crispy, smoky vessel that holds toppings beautifully. It’s a method I keep coming back to, especially when I want that extra crunch and depth in every bite.
This technique is a bit messy at first—watching the bread slowly crisp and develop those golden edges is oddly satisfying. Plus, the smell of toasted bread mingling with a hint of smoke from the oven makes the kitchen feel welcoming and warm. It’s honestly worth the extra few minutes, especially when you’re serving guests or just craving something a little more special.
Focusing on how baking crostini transforms the texture and flavor, giving it a crispy, smoky crunch that can’t be achieved with just toasting.
The story behind this recipe
- This recipe came from a lazy Sunday afternoon when I had a loaf of sourdough that needed using, but I wanted more than just plain toast. I remembered how my grandmother used to bake bread in her oven, listening to that crackling sound and smelling the smoky aroma. It struck me that the oven could do something similar for crostini, turning simple bread into a snack with a real bite.
- I experimented with different temp and times, and each batch took on a slightly different personality—more charred edges, a softer middle, a deeper smoky flavor. It’s become my go-to method when I want a crunch that’s hearty enough to hold toppings but still light enough to vanish fast. Honestly, I find myself craving that crackle more than most fancy appetizers.
- heading
Key ingredients and tips
- Baguette slices: I like using a rustic sourdough, it’s got that chewy crumb and a nutty flavor. Swap for a baguette if you want a more neutral base that crisps up evenly.
- Olive oil: Drizzle generously; it helps the bread crisp and adds a fruity aroma. If you prefer a milder flavor, try a light vegetable oil, but don’t skip the oil altogether.
- Garlic: Mince it finely or rub it on hot crostini for a punch of sharp, pungent aroma. For a subtler taste, roast the garlic beforehand and spread it like butter.
- Sea salt: I sprinkle flaky sea salt after baking—gives that crisp, briny bite. If you want less salt, go lighter or try smoked salt for an extra smoky note.
- Optional toppings: Think caramelized onions, roasted peppers, or soft cheeses. They add richness and texture, but keep the crostini crisp—add toppings just before serving to prevent sogginess.
- Herbs (like thyme or rosemary): Sprinkle fresh herbs on before baking for fragrant, earthy notes. Dried herbs work too but won’t have quite the same vibrant aroma.
- Lemon zest (if using): Brightens the whole thing with a zing—just a touch can lift the flavors unexpectedly. Skip if lemon isn’t your thing, but it’s a little surprise I love.
Spotlight on Key Ingredients
Olive oil:
- Baguette slices: I like using a rustic sourdough, it’s got that chewy crumb and a nutty flavor. Swap for a baguette if you want a more neutral base that crisps up evenly.
- Drizzle generously; it helps the bread crisp and adds a fruity aroma. If you prefer a milder flavor, try a light vegetable oil, but don’t skip the oil altogether.
- Garlic: Mince it finely or rub it on hot crostini for a punch of sharp, pungent aroma. For a subtler taste, roast the garlic beforehand and spread it like butter.
Sea salt:
- I sprinkle flaky sea salt after baking—gives that crisp, briny bite. If you want less salt, go lighter or try smoked salt for an extra smoky note.
- Optional toppings: Think caramelized onions, roasted peppers, or soft cheeses. They add richness and texture, but keep the crostini crisp—add toppings just before serving to prevent sogginess.
Notes for ingredient swaps
- Bread: I prefer rustic sourdough for its chewy crumb and nutty flavor, but a baguette works fine if you want a lighter, more neutral base.
- Olive oil: I love extra virgin for its fruity aroma, but a neutral vegetable oil can be used if you want a milder taste without losing crispness.
- Garlic: Finely minced for a punch, or roasted and rubbed on warm crostini for a mellow, sweet garlic note—skip if you dislike garlic.
- Sea salt: Flaky sea salt adds crunch and briny flavor, but you can substitute with smoked salt for a deeper smoky bite or regular fine salt for simplicity.
- Toppings: Swap in caramelized onions, roasted peppers, or soft cheeses; keep toppings light to prevent sogginess, adding just before serving.
- Herbs: Fresh thyme or rosemary add earthy aroma, but dried herbs can be used if fresh isn’t available—just use less.
- Lemon zest: Brightens everything with a zing and enhances flavors; skip if you prefer a milder profile or want to keep it classic.
Equipment & Tools
- Baking sheet: To hold the bread slices during baking.
- Parchment paper: Prevents sticking and makes cleanup easier.
- Pastry brush: To evenly coat slices with oil.
- Serrated knife: To cut bread into even slices.
- Cooling rack: To let crostini cool and crisp without sogginess.
Step-by-step guide to baked crostini
- Equipment ready: line a baking sheet with parchment paper, a pastry brush, a sharp serrated knife, and a cooling rack for resting.
- Preheat oven to 200°C (390°F). Slice your baguette into ¼-inch (0.6 cm) thick pieces. Aim for even slices for uniform crisping.
- Brush each slice generously with olive oil using the pastry brush. Cover both sides for maximum crunch and flavor.
- Arrange slices in a single layer on the prepared baking sheet. Ensure they aren’t overlapping to crisp evenly.
- Bake for 10-12 minutes. Check at the 10-minute mark: the edges should be golden and slightly blistered, with a smoky aroma filling the oven.
- If some slices aren’t crispy enough, turn on the broiler for 1-2 minutes. Keep a close eye to avoid burning.
- Once baked, transfer crostini to a cooling rack. Let them rest for 2-3 minutes to firm up and prevent sogginess.
- Optional: rub warm crostini with garlic for an extra punch of aroma. Sprinkle with flaky sea salt or your favorite herbs.
- Finish with toppings like cheese or caramelized onions just before serving to keep their crispness intact.
- Serve immediately or store in an airtight container for up to 2 days. Reheat in a 180°C (355°F) oven for 5 minutes to revive crispness.
Let the crostini rest on the rack for a few minutes. Finish with a sprinkle of sea salt or herbs. Serve warm or at room temperature for best crunch.
How to Know It’s Done
- Edges are golden and slightly blistered, with a smoky scent filling the kitchen.
- Crostini are firm and snap when broken—no soft spots or sogginess.
- Oven heat is consistent; slices bake evenly without burning or undercooking.
Baked Crostini
Ingredients
Equipment
Method
- Preheat your oven to 200°C (390°F). Line a baking sheet with parchment paper and set aside.
- Using a serrated knife, slice the loaf into ¼-inch thick pieces, aiming for even slices that will crisp up uniformly.
- Place the bread slices on the prepared baking sheet in a single layer, making sure they aren’t overlapping.
- Using a pastry brush, generously coat each slice on both sides with olive oil. This helps them crisp and adds flavor.
- If desired, sprinkle fresh herbs like thyme or rosemary on top for added aroma and flavor before baking.
- Bake the crostini in the preheated oven for 10-12 minutes, until edges are golden, blistered, and fragrant with a smoky aroma.
- Once baked, turn on the broiler for 1-2 minutes if some slices need extra crisping—keep a close eye so they don’t burn.
- Transfer the crostini to a cooling rack and let them rest for 2-3 minutes to finish crisping up and to avoid sogginess.
- Rub the warm crostini with minced garlic for a punch of aroma, or sprinkle with flaky sea salt to finish.
- Arrange the crostini on a serving platter and serve immediately, or store in an airtight container for up to 2 days for later enjoyment.
Notes
Pro tips for crisp crostini
- Bolded mini-head: Use a gentle touch when brushing oil—too much can make slices soggy, too little won’t crisp properly.
- Bolded mini-head: Keep slices evenly spaced on the baking sheet—crowding causes uneven crisping and steaming instead of toasting.
- Bolded mini-head: Check the crostini early—edges can go from perfect to burnt quickly under the broiler, so stay close.
- Bolded mini-head: Rotate the baking sheet halfway through baking—this promotes even browning and smoky flavor development.
- Bolded mini-head: For extra smoky flavor, add a pinch of smoked paprika to your olive oil before brushing.
- Bolded mini-head: Cool crostini on a wire rack—this prevents steam from making the bottoms soft and maintains crunch.
- Bolded mini-head: Experiment with different bread types—focaccia or rye can add interesting textures and flavors, just watch the baking time.
Common mistakes and how to fix them
- TOO MUCH HEAT: Over-torched crostini turn bitter; lower oven temp or reduce broiler time.
- DULL KNIFE: Dull blades tear bread; sharpen or use a serrated knife for clean slices.
- MISSED SALT: Underseasoned crostini lack punch; sprinkle generously after baking for flavor.
- INCONSISTENT SLICES: Uneven slices cause uneven baking; use a ruler or steady hand for uniformity.
Quick fixes and pantry swaps
- When crostini burn quickly, splash with a little water and lower oven temperature.
- If slices are soggy, patch with a quick broil—crackling sound means perfect crispness achieved.
- DUMPED too much oil? Blot with paper towel before baking for even crunch.
- Over-torched edges? Shield with foil and keep a close eye for even browning.
- Pantry swap: Use toasted breadcrumbs instead of bread for a different crunch and flavor.
Prep, store, and reheat tips
- Prepare the crostini slices up to a day in advance; store in an airtight container for crispness. The aroma of baked bread is even better the next day.
- Store baked crostini at room temperature for up to 2 days; keep in a single layer to avoid sogginess. Reheat in a 180°C (355°F) oven for 5 minutes until crispy and fragrant.
- Avoid refrigerating as it can make the bread stale and chewy. For longer storage, freeze baked crostini for up to a month—reheat directly from frozen for best texture.
- Reheating restores crunch but may soften slightly; you can broil them for a quick, smoky finish. Listen for that satisfying crackle and check for even browning.
Top questions about baked crostini
1. How do I know when crostini are done?
Look for slices that are golden and slightly blistered, with a smoky aroma filling the kitchen.
2. What texture should baked crostini have?
They should be crispy, snap when broken, and have a fragrant, toasted bread smell.
3. How thick should I slice the bread?
Use a serrated knife for even slices; uneven slices won’t bake evenly and can burn edges.
4. How much oil should I use?
Brush generously with olive oil; too little will result in less crispness, too much can make soggy slices.
5. How should I store leftover crostini?
Store in an airtight container at room temperature for up to 2 days; reheat in oven to revive crispness.
6. When should I add toppings?
Add toppings just before serving; toppings can make crostini soggy if added too early.
7. What oven temperature is best?
Use a preheated oven at 200°C (390°F). Bake slices for 10-12 minutes or until edges are golden.
8. What if they burn?
If they over-brown, lower the oven temp or reduce broiler time; watch closely to prevent burning.
9. Can I add flavor to the crostini?
For extra smoky flavor, add a pinch of smoked paprika to the olive oil before brushing.
10. Can I freeze leftovers?
Yes, you can freeze baked crostini for up to a month; reheat in a 180°C (355°F) oven for best results.
Baked crostini might seem simple, but the way they crack under your bite and the smoky aroma that fills the air makes it anything but. It’s those small, honest moments in the kitchen that remind me cooking is about tactile joy and flavor discovery. Nothing beats the feeling of pulling a batch from the oven, crispy and golden, ready to be topped or enjoyed plain.
In a world that’s constantly rushing, these little toasts offer a pause—a moment to appreciate the process and the simple pleasure of good bread transformed. They’re perfect for spontaneous gatherings or quiet nights when you need a crunchy, comforting bite. Sometimes, it’s the humble things that make the biggest difference in a meal.

Hi, I’m Claire Dawson, and I’m the voice behind The Procrastinators Cookbook. Food has always followed me around, even when I was busy putting other things off. Somewhere between long café shifts, half-finished to-do lists, and meals cooked later than planned, I realized that food was the one thing I always came back to.