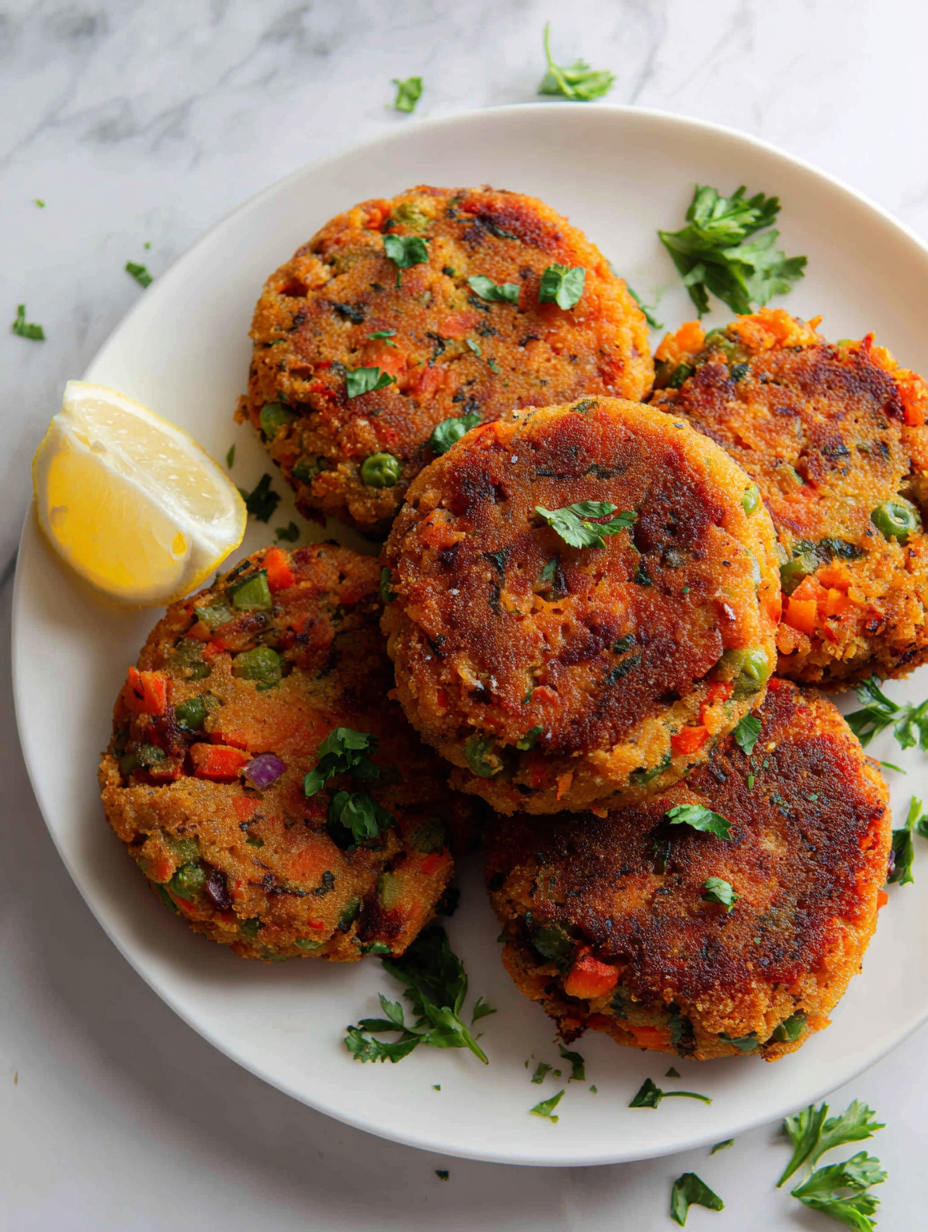
I’ve always loved street food, especially those crispy vegetable cutlets sold by vendors on busy corners. But I started wondering if I could make a baked version that’s just as satisfying—less greasy, more wholesome. The idea of roasting these until golden, rather than frying, felt like a small, manageable way to enjoy that comfort with a little more care for my stomach and the planet. It’s become my go-to for a quick snack or light dinner when I want something familiar but better.
Baking these cutlets is a game changer—it’s straightforward, less messy, and the aroma of roasted vegetables with spices filling the kitchen is unbeatable. Plus, I don’t have to stand over hot oil, which means I can focus more on flavor and less on the splatters. It’s a simple switch that makes all the difference, turning a street food classic into a healthier, more relaxed homemade treat.
This recipe takes a nostalgic street food concept—vegetable cutlets—and elevates it with a wholesome baked twist, making it a guilt-free snack or meal that’s crispy on the outside but tender inside. I love how baking simplifies the process and cuts down on oil, yet still delivers that satisfying crunch. It’s a way to enjoy comfort food without the greasy aftermath, perfect for a busy weeknight or a casual weekend.
The story behind this recipe
- This recipe came about after a rainy day when I was craving something crispy and satisfying but didn’t want to turn on the stove or deal with oil splatters. I remembered my mom making these vegetable cutlets during monsoon seasons, when the air smells fresh and earthy, and the kitchen fills with warm spice aromas. Baking seemed like a natural evolution—less mess, more control, and still that satisfying crunch on the outside.
- I started experimenting with oven-baked versions, trying to keep the tender, flavorful inside and that crisp exterior I loved. Each batch reminded me of the simple joys of childhood street food, but with a healthier, fuss-free twist. Now, these baked cutlets are my go-to for quick lunches, lazy weekends, or whenever I want that nostalgic comfort without the greasy aftermath.
- story_type
Ingredient breakdown
- Potatoes: I use starchy potatoes like Russets for a fluffy interior, but try sweet potatoes for a sweeter, denser cutlet.
- Vegetables: Carrots, peas, and corn add color and sweetness—consider zucchini or bell peppers for a different crunch and flavor profile.
- Binders: Egg binds everything together and creates a firm crust—if you’re vegan, swap with mashed bananas or flaxseed mix, but expect a softer finish.
- Spices: Cumin, coriander, and chili powder give warmth—feel free to tweak the heat level or add fresh herbs like cilantro for brightness.
- Breadcrumbs: Panko work best for crunch, but crushed cornflakes give an extra crispy bite—try toasted oats for a nuttier flavor.
- Oil: Minimal oil for coating, but the baked exterior gets beautifully crisp—use olive oil for a milder taste or sesame for a nutty aroma.
- Lemon juice: Brightens the overall flavor with a zesty punch—add a touch more if you love that citrus sparkle, or skip if you prefer mellow.
Spotlight on key ingredients
Potatoes and vegetables:
- Potatoes: I prefer starchy potatoes like Russets for a fluffy interior that holds shape, but sweet potatoes add sweetness and density if you like a richer bite.
- Vegetables: Carrots, peas, and corn give color and slight sweetness; zucchini or bell peppers can be nice alternatives for a different crunch and flavor.
Notes for ingredient swaps
- Dairy-Free: Use mashed avocado or vegan cheese instead of eggs for binding, though expect a softer texture.
- Gluten-Free: Swap regular breadcrumbs with crushed rice crackers or gluten-free panko for crunch without gluten.
- Vegan: Replace eggs with flaxseed meal mixed with water or mashed bananas to keep the mixture cohesive.
- Low-Sodium: Use less salt and opt for herbs and spices for flavor instead of salt, enhancing aroma without the saltiness.
- Extra Crunch: Coating the cutlets with crushed cornflakes or toasted oats boosts crunch and adds a nutty aroma.
- Sweet Potatoes: Substitute with sweet potatoes for a richer, slightly sweeter taste and denser bite.
- Vegetables: Add zucchini or bell peppers instead of carrots and peas for a different crunch and flavor profile.
Equipment & Tools
- Mixing bowl: Combine and mix ingredients thoroughly.
- Potato masher: Mash potatoes to a smooth, fluffy consistency.
- Baking sheet: Hold the cutlets for baking in the oven.
- Parchment paper: Prevent sticking and facilitate easy cleanup.
- Spatula: Flip and handle the patties gently.
Step-by-step guide to baked cutlets
- Equipment & Tools: Gather a mixing bowl, potato masher, baking sheet, parchment paper, and a spatula. The bowl is for mixing, masher for texture, sheet for baking, paper to prevent sticking, spatula for flipping.
- Preheat oven to 200°C (390°F). Line your baking sheet with parchment for easy cleanup and even crisping.
- Boil 2 large potatoes in salted water until tender, about 15 minutes. Test with a fork; it should slide in easily.
- Drain potatoes and mash until smooth but still fluffy. Let cool slightly while you prepare the vegetables.
- Finely chop 1 cup mixed vegetables (carrots, peas, corn). Stir into mashed potatoes with 1 teaspoon cumin, ½ teaspoon chili powder, and salt to taste.
- Add 1 beaten egg or vegan binder to the mixture. Mix well until cohesive. If too loose, sprinkle in a bit of breadcrumbs.
- Shape mixture into 8-10 small, flat patties with your hands or a cookie cutter. Keep them about 1.5 cm thick for even baking.
- Place patties on the prepared baking sheet. Brush tops lightly with olive oil for extra crunch and golden color.
- Bake in the oven for 20-25 minutes. Flip halfway through, around the 12-minute mark, to ensure even browning.
- Check for doneness: they should be golden, crispy on the outside, and firm but tender inside. If not, bake a few minutes longer.
- Remove from oven, let rest for 5 minutes. Serve warm with a squeeze of lemon or your favorite chutney.
Let the baked cutlets rest for 5 minutes to set their shape. Serve warm, garnished with fresh herbs or a squeeze of lemon. For extra crispness, reheat in a hot oven for 5 minutes before serving.
How to Know It’s Done
- Golden brown exterior, crispy edges.
- Center is firm but not hard, with a soft inside.
- A slight crackle when pressed, indicating crispness.
Baked Vegetable Cutlets
Ingredients
Equipment
Method
- Gather all your tools: a mixing bowl, potato masher, baking sheet lined with parchment, and a spatula. Preheat your oven to 200°C (390°F).
- Peel and cut the potatoes into chunks, then boil them in salted water until they are very tender, about 15 minutes. The potatoes should be soft enough to mash easily.
- Drain the potatoes and transfer them to a mixing bowl. Mash thoroughly until smooth and fluffy, feeling the texture become creamy and light.
- Finely chop the mixed vegetables—carrots, peas, and corn—and stir them into the mashed potatoes. Add cumin, chili powder, and a pinch of salt to boost flavor.
- Pour in the beaten egg (or vegan binder) and mix everything well until the mixture is cohesive and easy to shape. If it feels too loose, sprinkle in a little more breadcrumbs.
- Shape the mixture into 8-10 small, flat patties about 1.5 cm thick. Keep the shape firm but gentle, pressing gently to ensure they hold together.
- Place the patties on the prepared baking sheet lined with parchment paper. Brush the tops lightly with olive oil to help them turn golden and crispy during baking.
- Bake in the preheated oven for 20-25 minutes. Flip the cutlets halfway through, around the 12-minute mark, to promote even browning and crispness.
- Check for doneness: they should be golden brown, crispy on the outside, and tender inside. If they need more time, bake for a few additional minutes until perfect.
- Remove from the oven and let the cutlets rest for about 5 minutes. This helps them set and makes handling easier. Serve warm with a squeeze of lemon or your favorite chutney for extra flavor.
Tips for perfect baked cutlets
- Bolded mini-head: Use a gentle hand when mixing to keep the vegetables from breaking down, preserving texture.
- Bolded mini-head: Chill the mixture for 10 minutes before shaping—this helps it hold together better during baking.
- Bolded mini-head: Brush the cutlets lightly with oil before baking for a golden, crispy exterior that shimmers enticingly.
- Bolded mini-head: Flip the patties halfway through baking to ensure even browning and crispness on both sides.
- Bolded mini-head: For extra crunch, sprinkle breadcrumbs or crushed cornflakes on top before the final bake.
- Bolded mini-head: Let the baked cutlets rest for a few minutes after baking—this firms them up and makes flipping easier.
- Bolded mini-head: Use a hot oven (around 200°C/390°F) to get that satisfying crispy crust without overcooking the inside.
Common mistakes and how to fix them
- FORGOT to drain excess moisture → Pat dry vegetables before mixing.
- DUMPED too much oil → Use a light brushing or spray for a crisp finish.
- OVER-TORCHED the cutlets → Reduce oven temp to 180°C (350°F) if browning too quickly.
- MISSED flipping at halfway → Flip patties at 10 minutes for even browning.
Quick fixes and pantry swaps
- If the mixture is too wet, splash in more breadcrumbs to absorb excess moisture.
- When patties fall apart, patch with a little extra egg or binder and reshape gently.
- Splash a few drops of water or lemon juice if the cutlets taste flat or dull.
- Shield over-browned edges by lowering oven temperature slightly or tenting with foil.
- When in doubt, rescue with a quick 5-second spray of cooking oil before re-baking.
Prep, store, and reheat tips
- Prepare the vegetable mixture and shape into patties a day ahead; keep covered in the fridge for up to 24 hours, preserving freshness and flavor.
- Store baked cutlets in an airtight container in the fridge for 2-3 days; reheat in a warm oven until crispy and heated through, about 10 minutes, with a slight shimmer of oil on top.
- Freezing baked cutlets is possible: wrap individually and freeze for up to 2 months. Thaw in the fridge overnight, then reheat in oven for a crispy exterior.
- Reheating may soften texture slightly; for best results, re-crisp in the oven at 180°C (350°F) for 5-7 minutes until golden and fragrant.
Top questions about baked vegetable cutlets
1. Can I use sweet potatoes instead of regular potatoes?
Use potatoes like Russets for a fluffy inside, but sweet potatoes can add sweetness and denser texture. They behave well during baking, giving you that tender, moist interior.
2. Can I substitute other vegetables for carrots and peas?
Yes, you can swap in zucchini or bell peppers for a different crunch and flavor. Just chop finely and pat dry to avoid excess moisture.
3. What if I want to make these vegan?
Eggs help bind the mixture and give a slight crispness. For vegan options, try mashed bananas or flaxseed mixed with water, but expect a softer crust.
4. Can I make this gluten-free?
Breadcrumbs give a crispy coating. For gluten-free, crushed rice crackers or toasted oats work well and add their own toasty aroma.
5. What oven temperature is best?
Baking at 200°C (390°F) ensures a crispy exterior without burning. Flip the cutlets at the halfway mark for even browning.
6. How should I reheat leftovers?
To reheat, warm in a preheated oven at 180°C (350°F) until crispy, about 10 minutes. The aroma of toasted breadcrumbs and spices should come back strongly.
7. My mixture is too wet, what do I do?
If the mixture feels too loose, add more breadcrumbs or a little more egg to help it hold shape during baking.
8. How do I keep the cutlets tender?
Use a gentle touch when mixing to keep the vegetables intact. Overmixing can make the cutlets dense and less crispy.
9. They are browning too fast, what’s wrong?
If the cutlets brown too quickly, tent with foil or lower the oven temperature slightly to prevent burning while remaining crispy.
10. Should I chill the mixture first?
Chill the mixture for 10 minutes before shaping. It firms up, making it easier to form uniform patties that hold their shape.
Making these baked vegetable cutlets is a small act of rebellion against greasy takeout. The comforting aroma of spices and roasted veggies fills my kitchen, grounding me in a moment of simple pleasure. It’s a reminder that healthier can still be satisfying, even when craving something familiar.
Every time I bake these, I feel a little more connected to the quiet joy of creating nourishing food without the fuss or mess. They’re perfect for busy days or when I want a snack that’s honest, straightforward, and a little bit nostalgic. In the end, it’s just good to have a go-to that balances flavor, ease, and a touch of homemade pride.

Hi, I’m Claire Dawson, and I’m the voice behind The Procrastinators Cookbook. Food has always followed me around, even when I was busy putting other things off. Somewhere between long café shifts, half-finished to-do lists, and meals cooked later than planned, I realized that food was the one thing I always came back to.