Switching from deep-fried to baked spring rolls might seem trivial, but it’s a game changer for weeknight snacking. I love how this method keeps that crispy, golden crunch without the greasy aftermath. Plus, it’s a lot easier to get dinner on the table without firing up the oil kettle.
Baking these rolls isn’t just about health — it’s about bringing a familiar comfort into a more manageable, less messy form. I’ve made these for kids who shy away from fried foods, and somehow, they still get that satisfying crunch. It’s a little rebellion in the kitchen, swapping frying for something simpler but just as delicious.
This recipe is all about turning the usually fried, greasy spring rolls into a healthier, oven-baked version without sacrificing crispiness or flavor. I love how baking makes this snack more accessible on busy nights, plus it’s a sneaky way to get kids to eat more veggies.
The story behind this recipe
- I first made these baked spring rolls during a busy week when I needed something quick, healthy, and satisfying. I was tired of the greasy fried versions but still craved that crunch and burst of fresh flavor. Baking seemed like a sneaky way to keep the essence without the mess.
- One afternoon, I tossed together leftover veggies and some shrimp, wrapped them in rice paper, and slid them into the oven. The smell of toasted sesame and garlic filled my kitchen, and I knew I’d cracked a new way to enjoy this classic snack. Now, I keep this recipe in rotation for busy nights or when I want something wholesome without the fuss.
- heading
- story_type
Ingredient breakdown
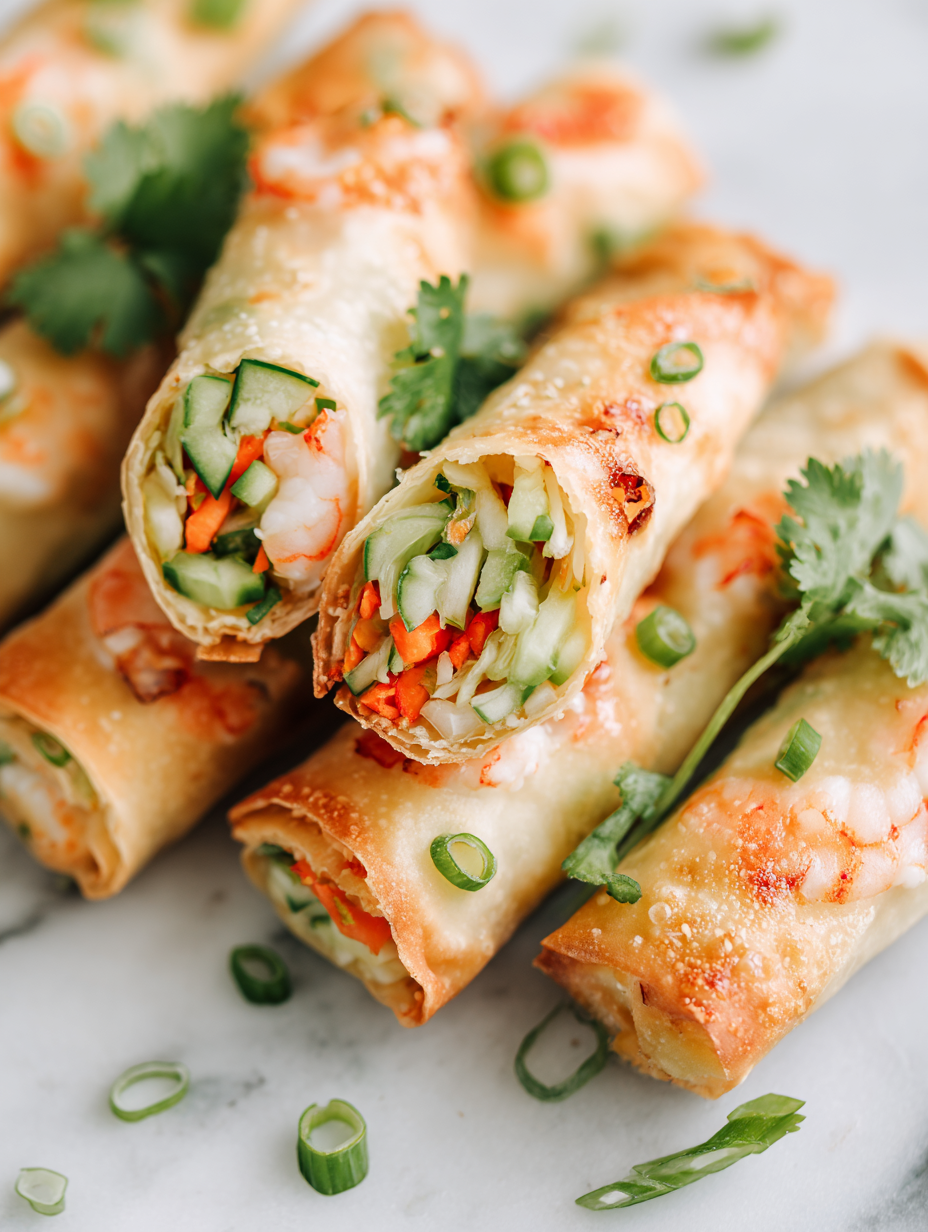
- Spring roll wrappers: I prefer the thin rice paper for a delicate, slightly chewy bite. If you want more crunch, try thicker wrappers, but watch them carefully so they don’t tear.
- Vegetable filling: I love a mix of shredded cabbage, carrots, and a splash of ginger. For extra flavor, add a dash of soy sauce — it’s bright and savory, like a little burst of umami in every bite.
- Protein options: Shrimp is my go-to, offering a sweet, briny pop. If you’re vegetarian, try tofu — it soaks up flavors and stays tender without drying out during baking.
- Seasoning: A pinch of sesame oil brings a toasted, nutty aroma that makes these feel special. If you’re out, a drizzle of olive oil works, but you’ll miss that smoky depth.
- Oil spray: Use a fine mist to coat the rolls evenly. It’s the key to getting that golden, crispy finish without excess grease, and it makes the kitchen smell toasty and inviting.
- Optional herbs: Fresh cilantro or mint adds a bright, herbal punch. Add just before baking so they don’t wilt — that fresh scent really perks up the filling.
- Dipping sauce: A quick soy-sesame dip brightens the whole experience. I like to keep it simple with soy, rice vinegar, and a touch of honey — sweet, tangy, and addictive.
Spotlight on key ingredients
Spring roll wrappers:
- I prefer the thin rice paper for a delicate, slightly chewy bite. If you want more crunch, try thicker wrappers, but watch them carefully so they don’t tear.
- Vegetable filling: I love a mix of shredded cabbage, carrots, and a splash of ginger. For extra flavor, add a dash of soy sauce — it’s bright and savory, like a little burst of umami in every bite.
Protein (shrimp or tofu):
- Shrimp: I use fresh, briny shrimp for a sweet, oceanic punch. If you’re vegetarian, tofu is a great swap — tender and absorbing flavors beautifully during baking.
- Seasoning: A splash of sesame oil adds a toasted, nutty aroma that makes these special. If out, a drizzle of olive oil works, but you’ll miss that smoky depth.
Notes for ingredient swaps
- Dairy-Free: Use coconut aminos instead of soy sauce for a subtly sweeter, tropical note without dairy or gluten.
- Vegan: Swap shrimp for chopped, marinated tempeh — it crisps up nicely and adds a nutty flavor.
- Gluten-Free: Rice paper wrappers are naturally gluten-free, perfect if you’re avoiding wheat but still crave that chewy bite.
- Nut-Free: Skip any nut oils or added nuts in the filling; focus on fresh herbs and ginger to keep it vibrant.
- Vegetarian: Tofu works great here, especially if pressed and cubed; it absorbs flavors and stays tender during baking.
- Extra Crunch: Try adding crushed toasted rice crackers or crispy shallots into the filling for an unexpected texture burst.
- Herb Variations: Fresh basil or Thai basil can replace cilantro for a different aromatic punch, especially if you love a spicy kick.
Equipment & Tools
- Baking sheet: To hold the rolls during baking
- Parchment paper: To prevent sticking and promote even crisping
- Brush or misting bottle: To lightly oil the rolls for crispiness
- Sharp knife: For prepping ingredients and sealing wrappers
- Mixing bowls: To combine filling ingredients
Step-by-step guide to baked spring rolls
- Gather all your equipment: a baking sheet, parchment paper, a brush or misting bottle, and a sharp knife for prepping. Preheat the oven to 200°C (390°F).
- Prepare the filling: in a bowl, combine shredded cabbage, grated carrots, chopped shrimp or tofu, minced garlic, grated ginger, a splash of soy sauce, and a teaspoon of sesame oil. Mix well and set aside.
- Lay out a spring roll wrapper on a clean surface. Spoon about 2 tablespoons of filling near one corner. Fold the corner over the filling, then fold in the sides, and roll tightly, sealing the edge with a bit of water.
- Place the rolled spring rolls seam-side down on the parchment-lined baking sheet. Spray or brush lightly with oil to encourage crisping.
- Bake in the preheated oven for 15–20 minutes. After 10 minutes, flip the rolls to ensure even browning. Look for a golden, crispy exterior and a fragrant aroma.
- Remove from oven once they’re evenly golden and crisp. Let rest for 2 minutes on a wire rack to avoid sogginess.
- Serve hot with your preferred dipping sauce, like soy-sesame or sweet chili. The texture should be crunchy, the filling hot and fragrant, and the wrapper perfectly crisp.
Allow the baked rolls to rest for 2 minutes on a wire rack to maintain crispness. Plate with dipping sauces and serve immediately while hot and crunchy.
How to Know It’s Done
- Golden-brown and crispy exterior after baking.
- Filling is hot and steaming when bitten into.
- Wrapper is firm and not soggy, with a slight chew.
Baked Spring Rolls
Ingredients
Equipment
Method
- Preheat your oven to 200°C (390°F) and line a baking sheet with parchment paper. Gather all your ingredients and prepare your filling by combining shredded cabbage, grated carrots, chopped shrimp or tofu, minced garlic, grated ginger, soy sauce, and sesame oil in a mixing bowl. Mix well until evenly coated.
- Fill a clean, flat surface with water and gently dip a rice paper wrapper until it becomes soft and pliable—about 10 seconds. Lay it flat on a clean plate or cutting board.
- Spoon about 2 tablespoons of the filling near one corner of the wrapper. Fold that corner over the filling, then fold in the sides, creating a tight roll. Seal the edge with a light dab of water to keep it closed.
- Place each rolled spring roll seam-side down on the prepared baking sheet. Repeat the process with the remaining wrappers and filling, arranging them with space between.
- Lightly spray or brush the tops of the rolls with oil spray to help them crisp up during baking. If you’re using herbs, sprinkle chopped cilantro or mint over the rolls now for a fresh burst of flavor.
- Bake the rolls in the preheated oven for 15–20 minutes, flipping them halfway through. Look for a golden brown, crispy exterior and a fragrant aroma as they bake.
- Once baked, remove the rolls from the oven and let them rest on a wire rack for 2 minutes. This helps them stay crisp and prevents sogginess.
- Serve your baked spring rolls hot with a dipping sauce like soy-sesame or sweet chili for an extra punch of flavor. The exterior should be crispy and golden, with a hot, flavorful filling inside.
Pro tips for perfect baked spring rolls
- Bolded mini-head: Use a light mist of oil → Just a fine spray helps achieve that crisp, golden exterior without greasiness.
- Bolded mini-head: Keep wrappers moist → Dampen slightly if they crack or dry out while filling to prevent tearing.
- Bolded mini-head: Flip halfway through → Turn rolls after 10 minutes to promote even browning and crispiness.
- Bolded mini-head: Check for golden hue → Remove once they’re uniformly golden and smell toasty, not burnt.
- Bolded mini-head: Rest before serving → Let baked rolls sit for 2 minutes on a rack to keep them crispy and prevent sogginess.
- Bolded mini-head: Use parchment to prevent sticking → Lining your baking sheet helps release rolls easily and keeps them crisp.
- Bolded mini-head: Adjust baking time for crunch → If not crispy enough, bake 2-3 minutes longer, watching carefully to avoid over-torquing.
Common mistakes and how to fix them
- FORGOT to preheat the oven → Always preheat to ensure even crisping.
- DUMPED too much oil → Use a light spray to avoid soggy rolls.
- OVER-TORCHED the wrapper → Keep an eye on the oven, check at 15 minutes.
- MISSED sealing the edges → Use water to seal for secure rolling and prevent spilling.
Quick fixes for baked spring rolls
- If rolls crack open, gently press edges together and seal with a dab of water.
- When rolls stick, lightly spray the baking sheet with oil before placing them down.
- Splash a little water on the wrapper if it feels dry or cracks while filling.
- Patch over any tears with a tiny piece of wrapper and a dab of water before baking.
- Shield rolls from over-browning by tenting with foil if the tops turn too dark before crisping.
Prep, store, and reheat tips
- Prepare the filling and assemble the rolls ahead of time; keep them covered in the fridge for up to 24 hours, which helps meld flavors and makes last-minute baking quicker. The filling stays fresh, but avoid letting it sit too long to prevent sogginess.
- Store baked spring rolls in an airtight container in the fridge for up to 2 days. Reheat in a 180°C (350°F) oven for about 5-7 minutes until crispy and hot, watching for that golden sheen and listening for a gentle crackle.
- For longer storage, freeze the unbaked rolls on a baking sheet, then transfer to a bag. Keep frozen for up to 1 month. Bake directly from frozen, adding 3-5 minutes to the baking time, until crisp and fragrant.
- Reheating baked rolls makes them lose some of their initial crunch but still tasty. To restore crispiness, reheat in the oven and spray lightly with oil if needed. The smell of toasted wrapper and filling should re-emerge, signaling they’re ready.
Top questions about baked spring rolls
1. How long should I bake the spring rolls?
Use a hot oven at 200°C (390°F) for crispy results. Keep an eye on them after 15 minutes to prevent over-browning.
2. Do I need to oil the rolls before baking?
Spray or lightly brush with oil before baking. This helps achieve a golden, crispy exterior without excess greasiness.
3. How dry should the filling be?
Fillings should be moist but not soggy. Drain excess liquid from vegetables and protein for best results.
4. How do I prevent the filling from leaking?
Seal edges with a little water to prevent filling from spilling out during baking. Make sure the roll is tightly wrapped.
5. How should I store and reheat leftovers?
Baked spring rolls can be stored in the fridge for up to 2 days. Reheat in a 180°C (350°F) oven for 5–7 minutes until crispy.
6. Should I flip the rolls during baking?
For extra crunch, flip the rolls halfway through baking. Keep an eye on them to avoid burning.
7. Can I line my baking sheet?
Use parchment paper to prevent sticking and promote even crisping on the baking sheet.
8. Can I make these vegetarian?
Vegetarian options like tofu work well. Marinate or season tofu beforehand for added flavor and moisture.
9. How do I get them extra crispy?
Adjust baking time if you want more crispiness. Usually, 15–20 minutes does the trick, but oven variances matter.
10. What type of wrappers should I use?
Choose rice paper for a delicate, chewy bite. You can use thicker wrappers for more crunch, but watch them carefully.
Baked spring rolls feel like a quiet victory—crisp, hot, and just a little healthier than their fried counterparts. There’s a simple pleasure in biting into that golden crunch, knowing you’ve skipped the oil and kept the flavor. They’re perfect for a casual weeknight or an easy appetizer that doesn’t ask for much fuss.
Sometimes, it’s those little tweaks—baking instead of frying—that remind me how much joy can come from simple adjustments. No matter the occasion, these rolls bring a satisfying crunch and a fresh burst of flavor that keeps me coming back for more, without the guilt.

Hi, I’m Claire Dawson, and I’m the voice behind The Procrastinators Cookbook. Food has always followed me around, even when I was busy putting other things off. Somewhere between long café shifts, half-finished to-do lists, and meals cooked later than planned, I realized that food was the one thing I always came back to.