Cheese balls are one of those snacks that instantly take me back to childhood birthday parties or family gatherings. There’s a simplicity to them that feels like a warm hug—crispy on the outside, gooey and cheesy inside. Making them from scratch brings a rush of nostalgia, but also a chance to tweak flavors and textures to suit grown-up tastes.
What I love about this recipe is how adaptable it is. You can keep it classic with just cheddar and cream cheese, or add a little heat with cayenne or herbs for a fresh twist. It’s one of those dishes that feels like comfort food but also invites creativity. Plus, they’re perfect for sharing—because what’s better than a plate of cheesy, crispy bites that everyone can dive into?
Focusing on how cheese balls can be a nostalgic comfort food that sparks childhood memories, yet also a versatile snack for grown-up gatherings.
Nostalgic bites with a twist
- These cheese balls remind me of lazy weekend afternoons, just the smell of melting cheese filling the kitchen.
- I get a little proud every time I see friends reaching for seconds—nothing beats a well-made snack.
- Sometimes, I toss in a pinch of smoked paprika just to add that smoky, vibrant note that surprises everyone.
- There’s a chaotic joy in rolling these by hand; it’s messy but oddly satisfying to get that perfect round shape.
- Making these cheese balls is like a small act of rebellion—because who says snacks can’t be both nostalgic and a little fancy?
The story behind this recipe
- This recipe came from a messy kitchen experiment during a rainy weekend. I was craving something cheesy and crispy, but wanted to avoid the usual store-bought options that often feel too processed. The first batch was a total disaster—too greasy, too flat—but it sparked the idea to refine the technique and flavors. Now, these cheese balls are a go-to whenever I need a snack that’s both satisfying and fun to make with friends, especially when the weather keeps us indoors.
- There’s something about shaping these by hand that makes me feel a little rebellious—like I’m reclaiming a childhood joy but with a grown-up twist. Plus, the process of rolling and chilling adds a satisfying rhythm to kitchen time, making the final bite even more rewarding. They remind me that good snacks don’t need to be complicated, just honest and a little playful.
- heading
- story_type
Cheese Balls Origin & Trivia
- Cheese balls gained popularity in American snack culture during the mid-20th century, often served at parties and potlucks.
- They may have roots in European cheese and bread snacks, adapted by American hosts for casual gatherings.
- The classic cheese ball became a symbol of festive holiday spreads in the 1960s, thanks to its easy make-ahead nature and shareability.
- Originally, cheese balls were often coated with nuts or herbs, adding texture and visual appeal to the cheesy center.
- Despite their simple ingredients, cheese balls have become a nostalgic comfort food, evoking memories of family celebrations and childhood.
Key ingredients and tips
- Cream cheese: I love how it adds that smooth, oozy texture inside. If you want a firmer bite, try Greek yogurt to cut richness.
- Cheddar cheese: Sharp cheddar melts beautifully and gives a lovely tang. Swap with Monterey Jack for a milder, buttery flavor.
- Breadcrumbs: They give the outside crunch I crave. Panko breadcrumbs make it extra crispy, but regular work fine if that’s all you have.
- Herbs & spices: I toss in a little garlic powder and paprika for depth. Fresh herbs like chives brighten the flavor—skip if you’re short on time.
- Oil for frying: I prefer vegetable or canola for that neutral, crisp finish. If you want less mess, bake these at 180°C (350°F) instead.
- Optional add-ins: A dash of hot sauce or cayenne can turn these into a spicy surprise. Just a few drops for a kick—be careful not to overpower.
- Chilling time: Let the shaped balls rest in the fridge for at least 30 minutes. It helps them hold shape and makes frying easier without falling apart.
Spotlight on key ingredients
Cream cheese:
- I love how it adds that smooth, oozy texture inside. If you want a firmer bite, try Greek yogurt to cut richness.
- Cheddar cheese: Sharp cheddar melts beautifully and gives a lovely tang. Swap with Monterey Jack for a milder, buttery flavor.
Breadcrumbs and spices:
- Breadcrumbs: They give the outside crunch I crave. Panko breadcrumbs make it extra crispy, but regular work fine if you have no panko.
- Herbs & spices: I toss in a little garlic powder and paprika for depth. Fresh herbs like chives brighten the flavor—skip if you’re short on time.
Notes for ingredient swaps
- Dairy-Free: Use vegan cream cheese and shredded plant-based cheese. The texture stays creamy, but the flavor is a bit milder and less tangy.
- Gluten-Free: Swap breadcrumbs for crushed gluten-free cereal or almond flour. Keep in mind, the crunch will be slightly different but still satisfying.
- Spicy Kick: Add a dash of cayenne or hot sauce to the mixture. It’ll deliver a fiery punch without overwhelming the cheese flavor.
- Cheddar Variations: Use smoked gouda or pepper jack for a different flavor profile. They melt just as well and add unique smoky or spicy notes.
- Herb Boost: Mix in fresh chopped chives, parsley, or dill. Fresh herbs brightens the flavor and adds a fresh, garden-like aroma.
- Baking Instead of Frying: Bake at 180°C (350°F) for 15-20 minutes. They won’t be as crispy as fried, but still delicious and less greasy.
- Cheese Options: Swap with mozzarella or fontina for a milder, creamier melt. They create a softer, gooey center that’s equally comforting.
Equipment & Tools
- Mixing bowls: Combine ingredients and chill the mixture.
- Microwave or softening tool: Soften cream cheese for easier mixing.
- Deep frying pan or pot: Cook the cheese balls until crispy.
- Slotted spoon: Remove fried cheese balls from hot oil.
- Paper towels: Drain excess oil and keep the cheese balls crispy.
Step-by-step guide to cheese balls
- Gather all ingredients: cream cheese, sharp cheddar, breadcrumbs, spices, and oil. Have a baking sheet and mixing bowls ready.
- In a large bowl, soften 8 oz cream cheese in the microwave for about 20 seconds until just pliable. Mix in 1 cup shredded cheddar, 1 teaspoon garlic powder, 1 teaspoon paprika, and a pinch of salt.
- Use a spoon or spatula to combine everything until smooth. Taste and adjust seasoning if needed—think spicy, cheesy, and bright.
- Chill the mixture in the fridge for 15-20 minutes to firm up. This makes rolling easier and helps the shapes hold.
- Preheat your oil to 180°C (350°F) in a deep pan or pot. Line a plate with paper towels for draining. Have a small bowl of breadcrumbs ready.
- Once chilled, scoop out about a tablespoon of the mixture and roll between your palms into a tight ball, about 2-3 cm diameter. Repeat until all mixture is used.
- Roll each ball in breadcrumbs until coated evenly. For extra crunch, press gently to ensure adhesion.
- Fry the cheese balls in hot oil for 2-3 minutes. They should turn golden brown and crackle as they cook. Use a slotted spoon to remove and drain.
- If the balls are not browning evenly, adjust heat slightly. If too greasy, drain longer on paper towels.
- Allow the cheese balls to rest for 2 minutes before serving. Serve hot with your favorite dip or just as is.
Let the cooked cheese balls rest for 2 minutes. Serve immediately with dipping sauces or on their own, hot and crispy.
How to Know It’s Done
- Golden, crispy exterior with crackling sound during frying.
- Internal temperature reaches about 65°C (149°F) when tested with a probe.
- Cheese inside is gooey but not runny, with a firm outside coating.
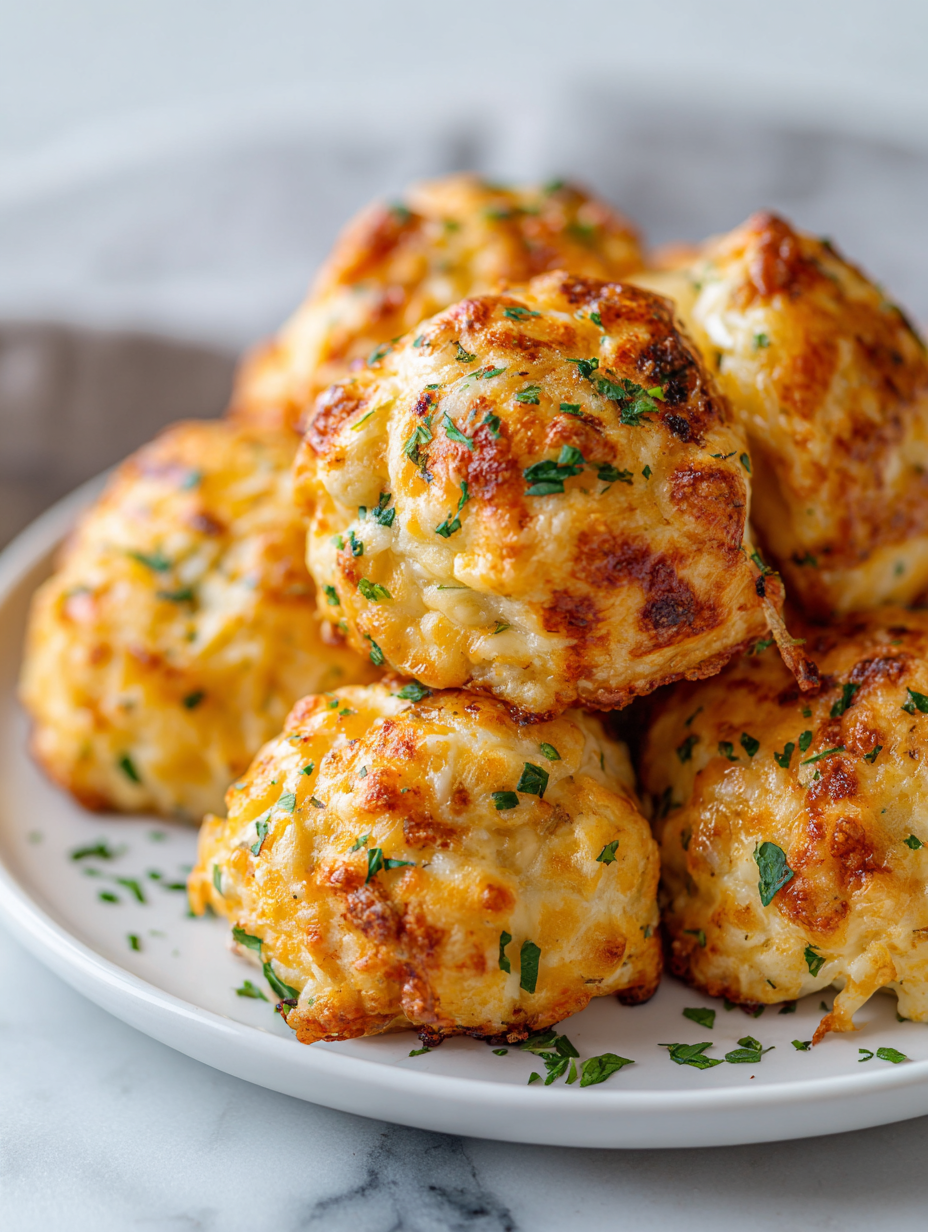
Cheese Balls
Ingredients
Equipment
Method
- Place the softened cream cheese in a large mixing bowl and stir until smooth and creamy, filling the bowl with a rich, inviting aroma.
- Add the shredded cheddar cheese, garlic powder, and paprika to the cream cheese, then fold everything together until well combined and slightly stretchy, with a cheesy, savory scent.
- Chill the mixture in the fridge for about 15-20 minutes, allowing it to firm up and become easier to work with.
- Once chilled, scoop out about a tablespoon of the cheese mixture, then gently roll it between your palms to form a smooth, round ball roughly 2-3 centimeters in diameter. Place each formed ball on a plate or tray.
- Spread the breadcrumbs on a shallow plate, then roll each cheese ball in the breadcrumbs until evenly coated, pressing gently to help the crumbs stick and create a crispy exterior.
- Heat vegetable or canola oil in a deep pan or pot to about 180°C (350°F), or until a small piece of bread sizzles and turns golden within a few seconds.
- Carefully drop a few breadcrumb-coated cheese balls into the hot oil, frying for about 2-3 minutes until they turn a deep golden brown and crackle softly, indicating a crispy exterior.
- Use a slotted spoon to remove the fried cheese balls from the oil and let them drain on paper towels to remove excess oil and keep them crispy.
- Repeat the frying process with the remaining cheese balls, maintaining the oil temperature for even cooking.
- Allow the cheese balls to rest for a couple of minutes, then serve them hot with your favorite dipping sauce or enjoy them as they are, crispy and cheesy inside.
Pro tips for perfect cheese balls
- Bold coating: Use panko breadcrumbs for an extra crispy exterior that crackles beautifully when fried.
- Chill thoroughly: Rest the shaped cheese balls in the fridge for at least 30 minutes to help them hold shape during cooking.
- Oil temp: Keep oil at 180°C (350°F) for even frying and a golden, crunchy crust without burning.
- Avoid overcrowding: Fry in small batches to prevent temperature drops and ensure crispiness across all balls.
- Use a thermometer: Check oil temperature with a digital probe for precise control, avoiding greasy or undercooked bites.
- Test a fry: Drop in one ball first; if it crackles and turns golden in 2-3 minutes, you’re ready to go.
- Drain well: Use a slotted spoon to remove and place on paper towels immediately to keep them crispy and avoid sogginess.
Common mistakes and how to fix them
- FORGOT to check oil temperature → It stays too cold, balls won’t crisp properly.
- DUMPED ingredients too quickly → Slow addition helps control texture and mixing consistency.
- OVER-TORCHED the first batch → Reduce heat and cook in smaller batches to avoid burning.
- MISSED resting time for dough → Resting helps cheese balls hold shape during frying or baking.
Quick Fixes for Cheese Balls
- When oil shimmers, splash a tiny drop of water to check for readiness.
- If cheese balls are sticking, patch with a light dusting of extra breadcrumbs.
- Splash a little lemon juice or vinegar to brighten flavors if too dull.
- DUMPED too much flour or breadcrumbs? Shake off excess before frying for even crispness.
- When in doubt, a five-second rescue: reheat on a baking sheet at 180°C (350°F) for crisping.
Prep, store, and reheat tips
- Prepare the cheese mixture and shape into balls up to 24 hours in advance; keep covered in the fridge for freshness.
- Fried or baked cheese balls can be stored in an airtight container in the fridge for up to 2 days. Reheat in an oven at 180°C (350°F) for 5-7 minutes until crispy and hot—listen for that crackling sound.
- For longer storage, freeze the unbaked or cooked cheese balls for up to 1 month. Thaw in the fridge overnight before reheating or frying again.
- Reheating will revive the crunch and gooey center, but the texture might soften slightly. Serve immediately after reheating for best sensory experience.
Top questions about cheese balls
1. How do I know when the cheese mixture is ready to shape?
You want the cheese mixture to be firm enough to roll, but soft enough to mold easily. Chilling helps achieve the right consistency.
2. What temperature should the oil be for frying?
Fry in oil heated to about 180°C (350°F). If the oil is too cold, the balls will be greasy; too hot, and they’ll burn outside before melting inside.
3. Can I use regular breadcrumbs instead of Panko?
Use panko breadcrumbs for a crunchier exterior. Regular breadcrumbs work fine, but Panko gives that extra crispy crackle.
4. Can I bake cheese balls instead of frying?
Yes, you can bake them at 180°C (350°F) for 15-20 minutes. They’ll be less crispy but still delicious and less greasy.
5. How long do cheese balls last in the fridge?
Absolutely. Keep them in an airtight container in the fridge for up to 2 days. Reheat in a hot oven for best crispness.
6. Can I freeze cheese balls?
Yes, freezing is fine. Shape and freeze unbaked or cooked cheese balls for up to a month. Thaw before reheating or frying.
7. Can I prepare cheese balls in advance?
Make the mixture ahead, shape into balls, and refrigerate up to 24 hours before frying or baking. This helps them hold shape.
8. What if my cheese balls fall apart during cooking?
If the cheese balls are sticking together or falling apart, add a little more breadcrumbs or chill the mixture longer.
9. How do I get the best flavor in my cheese balls?
Use high-quality cheese and fresh spices for the best flavor. Adjust seasoning to taste before shaping.
10. How do I test if the oil is hot enough?
When frying, drop a small piece of bread into the oil. If it sizzles and turns golden, the oil is ready.
These cheese balls are more than just a snack; they’re a little piece of nostalgia with a crispy, cheesy punch. Making them from scratch reminds me how satisfying simple ingredients can be, especially when shaped with care and a bit of chaos.
Whenever I serve these, I see that familiar gleam of joy—whether at a casual get-together or a cozy night in. They’re imperfect, messy, but always gone too quickly. That’s the real magic, I think, in a bite-sized comfort food that’s also a tiny act of creativity and fun.

Hi, I’m Claire Dawson, and I’m the voice behind The Procrastinators Cookbook. Food has always followed me around, even when I was busy putting other things off. Somewhere between long café shifts, half-finished to-do lists, and meals cooked later than planned, I realized that food was the one thing I always came back to.