Making chicken lollipops is a tactile, almost meditative process. There’s something satisfying about shaping each piece by hand, feeling the texture of the chicken and working it into those perfect little drumstick shapes. It’s messy, yes, but in a way that feels like a small craft project in the kitchen, not just another fried chicken recipe.
This dish is about embracing imperfection—craggy edges, uneven coating, a little bit of chaos—and loving the process as much as the crispy, juicy results. It’s a scrappy, hands-on way to turn simple ingredients into something fun and a little bit rebellious, perfect for snack nights or casual gatherings where everyone wants to dig in with their fingers.
Focusing on the messy, hands-on process of shaping and frying chicken lollipops, highlighting the tactile satisfaction and imperfect charm that makes this dish feel like a culinary craft project rather than just a recipe.
The tactile joy of shaping
- Shaping these chicken lollipops feels like a tiny rebellion—messy, satisfying, and a little rebellious.
- Getting that perfect crispy coat always makes me proud, even if my edges aren’t perfect.
- There’s a nostalgic joy in hand-rolling each piece, reminding me of childhood snacks and carefree weekends.
- I love how this dish turns a simple chicken piece into something playful and shareable, chaos and all.
- Frying these up always sparks a little chaos in the kitchen, but the smell of fried chicken makes it all worthwhile.
The story behind this recipe
- I first stumbled upon chicken lollipops at a chaotic street food stall during a trip abroad. The way they held that crispy, juicy chicken—almost like edible art—stuck with me. It was raw, imperfect, and totally addictive, and I knew I had to try making my own at home.
- There’s something about manually shaping each piece that turns cooking into a small act of rebellion. It’s messy, tactile, and oddly satisfying—like crafting tiny sculptures that you get to eat afterward. This recipe became my go-to for casual nights when I want comfort that’s a little bit playful.
- heading: ‘The story behind this recipe’
Trivia and origins of chicken lollipops
- Chicken lollipops likely originated from Chinese-American cuisine, where they’re known as ‘chicken drumettes’ shaped into a fun, finger-friendly form.
- The playful presentation of chicken lollipops makes them a popular street food in many Asian countries, especially during festivals and casual gatherings.
- This dish evolved as a way to make fried chicken more appealing and shareable, turning a simple drumstick into a fun, snackable finger food.
Component insights
- Chicken drumettes: I love using fresh drumettes—meaty, juicy, and perfect for shaping. If yours are lean, add a splash of oil to keep them moist.
- Breadcrumbs: I prefer panko for that extra crunch, but regular breadcrumbs work fine. Toast them lightly if you want more flavor.
- Garlic powder: It adds a savory punch that wakes up the chicken. Feel free to adjust the amount if you like it milder or bolder.
- Hot sauce: I use a splash of spicy sauce in the batter—gives that smoky, oozy heat. Skip if you want milder lollipops, but don’t skip the flavor.
- Egg wash: It’s the glue that keeps the coating sticking. Make sure it’s well whisked and slightly frothy—this is key to that crispy exterior.
- Oil for frying: Use a neutral oil like vegetable or canola. Keep it hot—around 180°C (355°F)—so the coating crisps up instantly and doesn’t soak.
- Seasoned salt: A pinch in the flour or batter elevates everything. I like a mix of sea salt and a little smoked paprika for depth.
Spotlight on key ingredients
Chicken drumettes:
- I love using fresh drumettes—meaty, juicy, and perfect for shaping. If yours are lean, add a splash of oil to keep them moist.
- They behave differently during frying—staying juicy inside while developing a crispy exterior, especially if slightly chilled before frying.
Breadcrumbs:
- I prefer panko for that extra crunch, but regular breadcrumbs work fine. Toast them lightly if you want more flavor.
- They puff up and turn golden quickly, providing that satisfying crunch with every bite, especially if you press them onto the shaped chicken firmly.
Notes for ingredient swaps
- Fresh chicken drumettes: I prefer fresh, juicy pieces—if yours are a bit lean, add a splash of oil when shaping. Swap for boneless chicken strips if you want a quicker prep.
- Breadcrumbs: Panko gives the crunch I love, but regular breadcrumbs work. Toast them lightly if you want a richer flavor.
- Hot sauce: Use your favorite spicy sauce—smoky chipotle or tangy sriracha. For milder bites, skip or reduce the hot sauce in the batter.
- Egg wash: Egg is essential for sticking, but if you’re allergic or out, a bit of buttermilk or milk works—though the coating might be slightly less crisp.
- Oil for frying: Neutral oils like vegetable or canola are best. If you only have peanut oil, it adds a subtle nutty note, but avoid strongly flavored oils that overpower.
- Seasoned salt: A pinch of smoked paprika or garlic salt in the coating boosts flavor. Regular sea salt can also do the trick if you prefer a cleaner taste.
- Additional flavoring: Feel free to add a dash of five-spice or curry powder to the breadcrumb mix for an unexpected twist.
Equipment & Tools
- Sharp boning knife: Trim excess fat and shape the chicken.
- Mixing bowls: Prepare batter and breadcrumb mixture.
- Deep-fryer or heavy-bottomed pot: Fry the chicken evenly and safely.
- Thermometer: Monitor oil and internal chicken temperature.
- Slotted spoon or tongs: Gently lower and retrieve fried lollipops.
- Parchment paper: Prevent sticking and drain excess oil.
Step-by-step guide to chicken lollipops
- Equip your workspace: a sharp boning knife for trimming, a sturdy cutting board, a mixing bowl for the batter, and a deep-fryer or heavy-bottomed pot with a thermometer. Have paper towels for draining and a plate for shaping.
- Trim the chicken drumettes: remove any excess fat or skin, leaving a clean, manageable piece. Pat dry thoroughly—moisture is the enemy of crispiness.
- Shape the lollipops: hold a drumette by the bone end, and using your fingers, push the meat down towards the thicker end, creating a ‘lollipop’ shape. Repeat for all pieces. If they crack, don’t stress—patch with a little batter.
- Prepare the batter: whisk together egg, hot sauce, and a pinch of salt in the mixing bowl. In another dish, combine breadcrumbs, garlic powder, and a touch of seasoning.
- Coat the chicken: dip each lollipop into the batter, letting excess drip off. Then roll in the breadcrumb mixture, pressing gently to adhere. Place on a tray lined with parchment as you go.
- Heat the oil: fill your fryer or pot with enough oil to submerge the lollipops—around 180°C (355°F). Wait for the shimmer and crackling when you drop a breadcrumb in.
- Fry the lollipops: carefully lower a batch into the hot oil, avoiding overcrowding. Fry for about 6-8 minutes, turning occasionally, until golden brown and crispy. They should jiggle slightly when done.
- Check doneness: probe the thickest part—internal temp should hit 75°C (165°F). The coating should be deeply golden and crunchy. The meat should be juicy and slightly firm.
- Drain and rest: lift with tongs, drain on paper towels, and let rest for 2 minutes. This helps the juices settle and keeps the coating crisp.
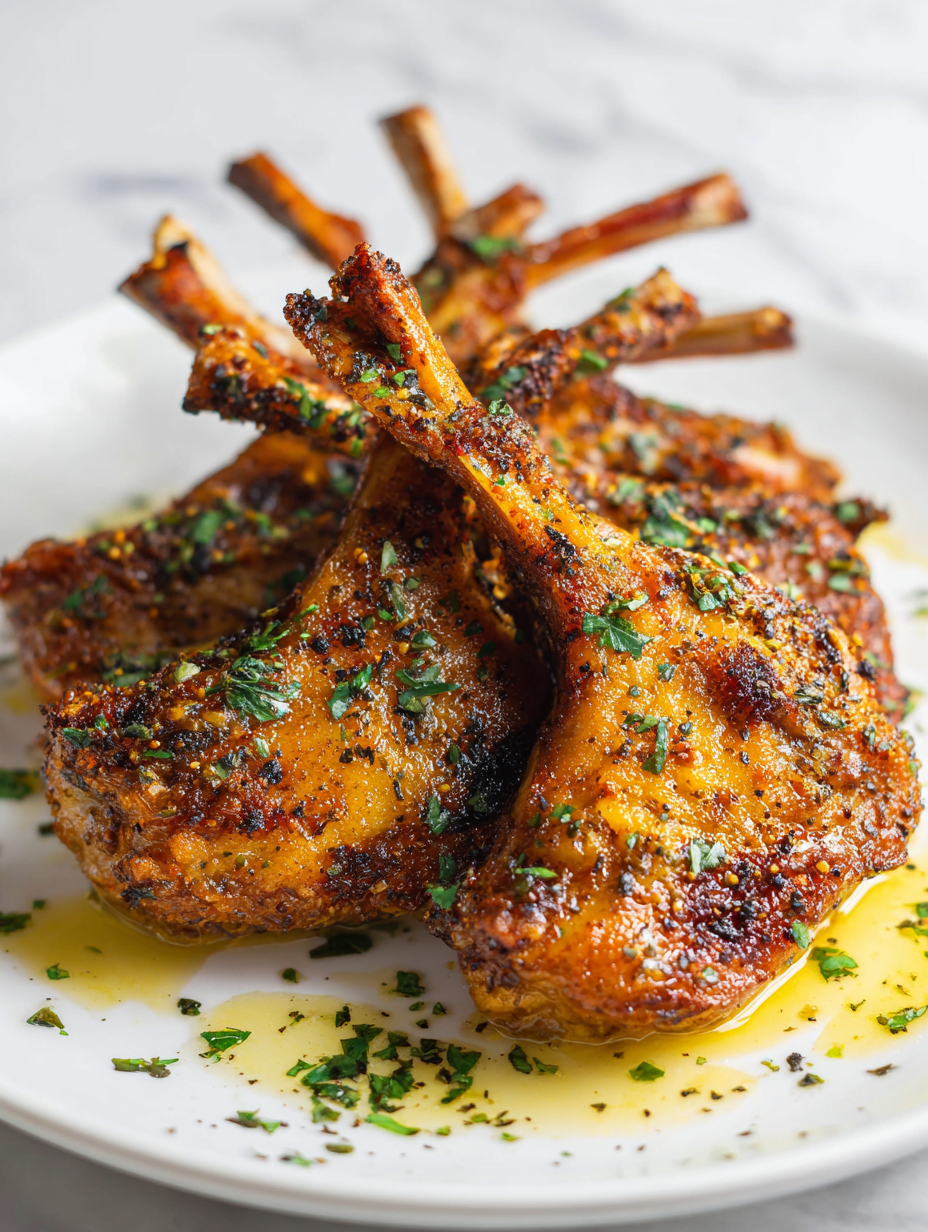
- Plate and serve: arrange on a platter, sprinkle with a little flaky sea salt or chopped herbs if desired. Serve hot with your favorite dipping sauce.
Let the fried chicken lollipops rest on paper towels for 2 minutes. Serve immediately, hot and crispy. Garnish with herbs or a sprinkle of flaky salt if desired.
How to Know It’s Done
- Golden, crispy coating with no sogginess.
- Internal temperature reaches 75°C (165°F).
- Chicken feels firm but juicy when gently pressed.
Chicken Lollipops
Ingredients
Equipment
Method
- Trim each chicken drumette by removing excess fat and skin, then pat them dry thoroughly with paper towels. This ensures a crisp coating.
- Hold each drumette by the bone end and push the meat down towards the thicker end, shaping it into a lollipop form. Repeat for all pieces, creating a playful, finger-friendly shape.
- In a mixing bowl, whisk the beaten egg with hot sauce and a pinch of seasoned salt until frothy. This will help the coating stick better.
- In another dish, combine panko breadcrumbs, garlic powder, and seasoned salt. Lightly toast the breadcrumbs if you prefer extra flavor.
- Dip each shaped lollipop into the egg wash, ensuring it’s well coated, then roll it in the breadcrumb mixture, pressing gently to adhere the crunchy coating. Place on a parchment-lined tray as you go.
- Heat the neutral oil in your deep-fryer or heavy-bottomed pot to 180°C (355°F). Use a thermometer to monitor the temperature, watching for shimmering and gentle crackling.
- Carefully lower a few chicken lollipops into the hot oil, avoiding overcrowding, and fry for 6-8 minutes until they’re deep golden brown and crispy, turning occasionally for even browning.
- Use tongs or a slotted spoon to remove the fried chicken from the oil, letting excess oil drip off onto a paper towel-lined plate. Rest for 2 minutes to finish cooking and let the juices settle.
- Repeat the frying process with remaining chicken, maintaining oil temperature and not overcrowding the pot. Once all are cooked, arrange them on a serving platter.
- Serve hot with your favorite dipping sauces and enjoy the crispy, juicy mess of these fun, rebellious chicken lollipops.
Notes
Pro tips for perfect chicken lollipops
- coating: Press breadcrumbs firmly onto the shaped chicken to ensure a crunchy, even coat.
- Cold chicken: Chill the shaped lollipops for 15 minutes before frying; it helps the coating stay intact.
- Oil temperature: Keep at a steady 180°C (355°F) for crisp, non-greasy results—use a thermometer for accuracy.
- Avoid overcrowding: Fry in small batches to prevent temperature drops, which can lead to soggy coating.
- Crackle test: Drop a breadcrumb into hot oil—if it crackles immediately, the oil’s ready for frying.
- Rest before serving: Let fried lollipops rest for 2 minutes on paper towels—this keeps them crispy and juicy.
- Flavor punch: Brush with hot sauce or glaze right after frying for an extra burst of flavor and shine.
Common mistakes and how to fix them
- FORGOT to dry chicken thoroughly → Results in soggy coating. Pat dry for crispness.
- DUMPED hot oil into water → Causes dangerous splatters. Always lower chicken gently into hot oil.
- OVER-TORCHED the coating → Turns bitter. Adjust heat and monitor color closely.
- MISSED the internal temp → Juicy and safe chicken needs 75°C (165°F). Use a probe.
Quick fixes and pantry swaps
- When oil shimmers, splash a breadcrumb — if it crackles instantly, you’re ready to fry.
- Splash cold water on hot oil if it splatters — cover immediately and let it settle.
- Dumped in too much oil? Patch by removing excess and reducing heat to prevent burning.
- Over-torched coating? Shield with a lid or reduce heat for a gentler, golden finish.
- Splash a tiny bit of vinegar or lemon juice in the batter if it’s too thick or dulls the oil shimmer.
Prep, store, and reheat tips
- Shape the chicken lollipops up to a day in advance, then refrigerate uncovered to maintain crispness. The cold helps the coating stay adhered during frying.
- Store cooked leftovers in an airtight container in the fridge for up to 2 days. Reheat in a hot oven at 180°C (355°F) for 10 minutes until crispy again—listen for that satisfying crackle.
- Raw shaped chicken can be frozen for up to a month. Thaw overnight in the fridge and fry straight from frozen, adding a couple of extra minutes for crispiness.
- Reheating fried lollipops can sometimes soften the coating. To revive crispiness, reheat in a hot oven or air fryer, watching for a golden, crackly exterior.
Top questions about chicken lollipops
1. How do I choose the best chicken for lollipops?
Look for plump, fresh drumettes with a good amount of meat on the bone. They should feel firm and moist, not slimy or dry. Freshness really shows when you shape them into lollipops—avoid overly lean or dry pieces.
2. Should I dry the chicken before coating?
Ensure the chicken is thoroughly dried after washing or trimming. Excess moisture causes splattering and soggy coating during frying. Pat them dry with paper towels, especially around the bone and meat junction.
3. How do I know when the oil is hot enough?
Yes, hot oil should shimmer and produce a crackling sound when you add a breadcrumb. It should stay steady at around 180°C (355°F). If the oil is too hot, the coating will burn; too cold, and the chicken will be greasy.
4. How many chicken lollipops can I fry at once?
Fry in small batches—about 4-6 lollipops at a time. Overcrowding drops the oil temperature, making the coating soggy. Maintain a steady temperature and turn the pieces gently for even crisping.
5. How do I know when the chicken is cooked?
Check the internal temperature with a probe—75°C (165°F) is safe and juicy. The coating should be a deep golden brown, and the chicken should feel firm but springy when pressed lightly.
6. Should I rest the chicken after frying?
Let the fried lollipops rest on paper towels for about 2 minutes. This drains excess oil and helps the coating stay crispy. Serve immediately for the best crunch and juiciness.
7. Can I make chicken lollipops ahead of time?
You can prepare shaped chicken the day before. Keep them uncovered in the fridge to prevent sogginess. Reheat in a hot oven or air fryer to restore crispness, listening for that satisfying crackle.
8. Can I freeze chicken lollipops?
Yes, you can freeze shaped raw chicken for up to a month. Thaw thoroughly in the fridge and fry straight from frozen, adding a couple of extra minutes to cook through and crisp up.
9. What do I do if the oil splatters or burns?
If oil splatters excessively, splash cold water into the pan—immediately cover or lower the heat. To rescue burnt coating, shield with a lid, reduce heat, and add a splash of vinegar or lemon for brightness.
10. Any tips for maintaining oil temperature?
Use a thermometer to keep the oil steady at 180°C (355°F). For a crisp coating, make sure the oil is hot enough before frying and avoid overcrowding. Patience during frying yields better crunch and juiciness.
Frying up these chicken lollipops is a messy, satisfying ritual that always reminds me why I love cooking with my hands. The smell of crispy, seasoned chicken filling the kitchen makes everything else fade away for a moment.
This dish isn’t just about the crunchy coating or juicy meat; it’s about embracing the chaos and having fun. Perfect for casual nights when comfort and a little bit of rebellion are what you’re after.

Hi, I’m Claire Dawson, and I’m the voice behind The Procrastinators Cookbook. Food has always followed me around, even when I was busy putting other things off. Somewhere between long café shifts, half-finished to-do lists, and meals cooked later than planned, I realized that food was the one thing I always came back to.