Making homemade chicken nuggets might seem like a trip down memory lane, but honestly, it’s a chance to reclaim that crispy, golden magic from childhood without the overly processed stuff. I’ll admit, I used to buy the frozen bag and call it a day, but once I started experimenting in my own kitchen, everything changed — the smell of seasoned chicken frying up, the crunch, that perfect tender inside.
This recipe is straightforward enough for a busy weeknight, but it’s also a little nostalgic indulgence. I like to keep it honest: no weird additives, just good chicken, honest spices, and a crispy coating that holds up to dipping. It’s the kind of thing that makes you smile mid-meal and wonder why you ever bought the store-bought version in the first place.
Focusing on a nostalgic homemade chicken nuggets recipe that captures the crispy, golden charm of childhood favorites, but with a practical, honest kitchen twist that makes it achievable for busy weeknights.
A nostalgic twist on crispy favorites
- Making these chicken nuggets takes me back to my childhood kitchen, the smell of frying chicken filling the air just like then.
- I feel a quiet pride when I see my kids devour these crispy bites, knowing I made them from scratch, no shortcuts.
- There’s a little chaos in the kitchen during the breading process, but it’s part of the fun and makes the meal feel special.
- Every time I fry these, I’m reminded that simple ingredients, when treated right, create real comfort food.
- I get a kick out of customizing spices—adding a touch more paprika or a dash of cayenne to make them uniquely mine.
The story behind this recipe
- Making these chicken nuggets is a small act of rebellion against the overly processed snacks we rely on. I remember the first time I tried to recreate that crispy, juicy bite at home — I was tired of bland frozen options and wanted something honest, straightforward, and tasty enough to serve without fuss.
- There’s a little chaos in the kitchen during the breading and frying, which is part of the charm. But the moment those nuggets hit the hot oil and crackle, I know I’ve got something special — a crispy, golden reminder of childhood, made with real chicken and simple ingredients.
- The process became a ritual for me, a way to reclaim comfort food with a bit of kitchen honesty. It’s not about perfection, but about capturing that nostalgic crunch and tender inside, fresh and free of additives. These nuggets remind me that good food doesn’t have to be complicated or store-bought; it just needs a little love and honest ingredients.
Trivia and historical tidbits
- Chicken nuggets as we know them gained popularity in the mid-20th century, especially in the US as a fast-food staple.
- The first commercial chicken nuggets were invented in the 1950s by Robert C. Baker, a Cornell University professor, as a convenient chicken product.
- Despite their modern image, homemade chicken nuggets have roots in traditional breaded fried chicken, adapted for quick, kid-friendly bites.
- Fast-food chains popularized the crispy, golden appearance, but many home cooks prefer making them fresh to control ingredients.
- Nostalgic for many, these bites evoke memories of childhood lunches, school cafeterias, and quick family dinners.
Key ingredients and their tricks
- Chicken breasts: I prefer skinless, boneless breasts—they stay juicy and cook evenly. If you want leaner, go for thighs, but watch the moisture level.
- Breadcrumbs: I use panko for extra crunch, but crushed saltines or even crushed cornflakes work well if you want a different texture and flavor.
- Egg wash: The binding magic. A simple beaten egg with a splash of milk keeps the coating attached. If you’re out of milk, a little water works, but it’s not quite the same.
- Spices: Paprika adds that smoky warmth, but I often toss in a pinch of cayenne for heat or garlic powder for depth. Adjust to your taste.
- Oil: I fry these in vegetable or canola oil—nothing fancy, but make sure it’s hot enough (around 180°C/350°F) to crisp without burning. Watch the crackle and color.
- Flour: Just plain all-purpose flour for a light coating underneath the breadcrumbs. If you want extra crispness, add a pinch of cornstarch.
- Optional herbs: Fresh parsley or thyme can brighten the flavor. I usually skip for simplicity, but it’s a nice touch if you’re feeling fancy.
Spotlight on key ingredients
Chicken breasts:
- I prefer skinless, boneless breasts—they stay juicy and cook evenly. If you want leaner, go for thighs, but watch the moisture level.
- Breadcrumbs: I use panko for extra crunch, but crushed saltines or even crushed cornflakes work well if you want a different texture and flavor.
- Egg wash: The binding magic. A simple beaten egg with a splash of milk keeps the coating attached. If you’re out of milk, a little water works, but it’s not quite the same.
Breadcrumbs:
- I use panko for extra crunch, but crushed saltines or even crushed cornflakes work well if you want a different texture and flavor.
- Egg wash: The binding magic. A simple beaten egg with a splash of milk keeps the coating attached. If you’re out of milk, a little water works, but it’s not quite the same.
Notes for ingredient swaps
- Dairy-Free: Swap milk in the egg wash with almond or oat milk. It won’t change the binding much, but might alter the richness slightly.
- Gluten-Free: Use crushed rice crackers or gluten-free panko instead of regular breadcrumbs for a crispy coating that’s safe for gluten sensitivities.
- Low-Sodium: Choose unsalted breadcrumbs and use a pinch less salt in your seasoning. The nuggets will still be flavorful, just a bit milder.
- Spicy Kick: Add a dash of cayenne or hot sauce to your egg wash for extra heat. It’s a quick way to turn up the spice without changing the core recipe.
- Herb Variations: Mix dried herbs like thyme or oregano into your breadcrumb mixture for a more fragrant, garden-fresh bite.
- Oil Choices: If you don’t want to deep fry, try baking at 220°C (430°F) on a lined tray, but expect a different crunch and texture.
- Sweet Touch: For a slightly different flavor, sprinkle a bit of cinnamon or paprika into the breadcrumbs—unexpected but good with a squeeze of lemon.
Equipment & Tools
- Deep fryer or heavy-bottomed pot: To maintain consistent frying temperature and ensure even cooking.
- Thermometer: To monitor oil temperature accurately.
- Tongs: To safely lower and turn nuggets in hot oil.
- Wire rack: To drain excess oil and keep nuggets crispy.
- Shallow dishes: For breading stations—flour, egg, and breadcrumbs.
Step-by-step guide to chicken nuggets
- Gather all equipment: a deep fryer or large, heavy-bottomed pot, a thermometer, tongs, a wire rack, and a shallow dish for breading.
- Cut chicken breasts into bite-sized pieces, about 2.5 cm (1 inch) thick, ensuring uniform size for even cooking.
- Set up your breading station: in one shallow dish, place flour; in another, beaten eggs with a splash of milk; in a third, panko breadcrumbs seasoned with salt, pepper, and paprika.
- Heat oil in your fryer or pot to 180°C (350°F). Use the thermometer to keep it steady; the oil should shimmer and crackle at the edges.
- Dredge each chicken piece in flour, tapping off excess, then dip into egg wash, and finally coat thoroughly with breadcrumbs. Shake off excess before frying.
- Carefully lower a few pieces at a time into hot oil, avoiding overcrowding. Fry for about 4-5 minutes, turning occasionally, until golden and crispy.
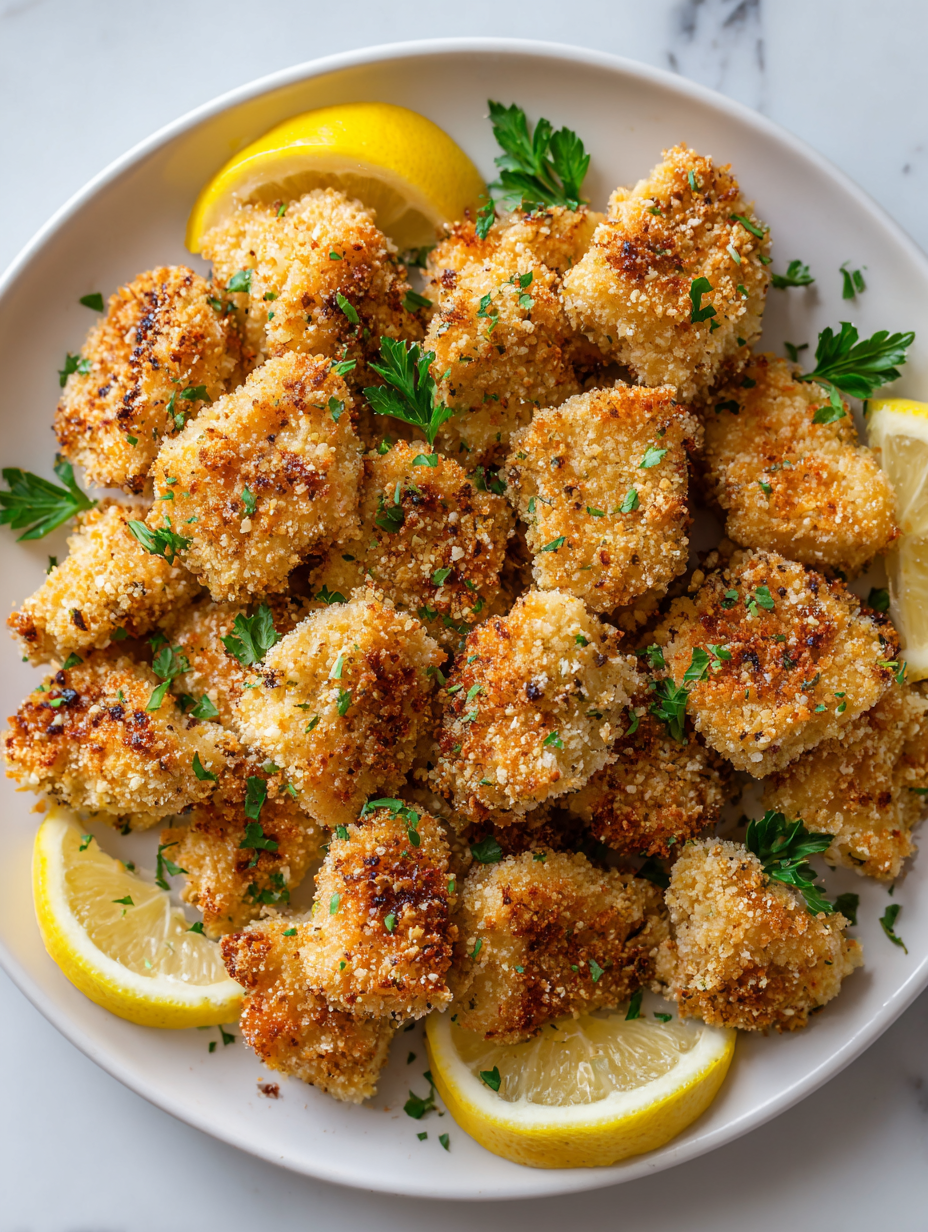
- Check for doneness: the nuggets should be a deep golden brown, with a crackling exterior and cooked through inside (internal temp around 75°C/165°F).
- Remove nuggets with tongs and place on a wire rack set over paper towels to drain excess oil. Do not stack; let them cool slightly.
- Allow nuggets to rest for 2-3 minutes so the crust crisps up further and the juices settle. Serve hot with your favorite dipping sauces.
Let cooked nuggets rest on the wire rack for a few minutes to crisp up. Serve immediately with dips or on a plate. Keep warm in a low oven if needed, but best enjoyed fresh.
How to Know It’s Done
- Nuggets are deep golden and crispy on the outside.
- Internal temperature reaches 75°C (165°F).
- Coating is firm and crackly, not soggy or pale.
Homemade Crispy Chicken Nuggets
Ingredients
Equipment
Method
- Start by cutting your chicken breasts into small, uniform bite-sized pieces, about 2.5 cm (1 inch) thick, to ensure even cooking.
- Set up your breading station with three shallow dishes: one with flour, one with beaten eggs mixed with a splash of milk, and one with seasoned panko breadcrumbs combined with paprika, cayenne, salt, and pepper.
- Heat your oil in a deep fryer or heavy-bottomed pot to 180°C (350°F). Use a thermometer to maintain this temperature for perfect crispiness.
- Dredge each chicken piece first in the flour, tapping off any excess, then dip into the egg wash, and finally coat thoroughly in the seasoned panko breadcrumbs. Press gently to help the crumbs adhere well.
- Carefully lower a few breaded pieces into the hot oil using tongs, making sure not to overcrowd the pan. Fry in small batches for about 4-5 minutes, turning occasionally, until they turn a deep golden brown and are crispy.
- Use tongs to remove the nuggets from the oil once they’re golden and crispy, and place them on a wire rack set over paper towels to drain excess oil. Let them rest for 2-3 minutes to firm up and finish crisping.
- Repeat the frying process with the remaining chicken pieces, maintaining the oil temperature and avoiding overcrowding for the best crunch.
- Once all nuggets are cooked and rested, serve them hot with your favorite dipping sauces, enjoying the crispy, juicy bites that take you back to childhood.
Pro tips for crispy nuggets
- Bolded mini-head: Use a gentle press when breading to help the crumbs adhere better and create a more uniform crust.
- Bolded mini-head: Keep oil at a steady 180°C (350°F); too hot and the coating burns, too cool and the nuggets get greasy.
- Bolded mini-head: Fry in small batches—crowding drops the oil temperature and results in soggy nuggets.
- Bolded mini-head: For extra crunch, add a pinch of cornstarch to your flour or breadcrumbs mixture.
- Bolded mini-head: Rest cooked nuggets on a wire rack for a few minutes—this keeps the crust crispy and prevents sogginess.
Common mistakes and how to fix them
- FORGOT to preheat oil → Ensure oil reaches 180°C before frying.
- DUMPED too many nuggets at once → Fry in small batches for even cooking and crispness.
- OVER-TORCHED the coating → Reduce heat slightly if coating darkens too fast.
- MISSED resting time → Let fried nuggets rest 2 minutes to crisp better and avoid sogginess.
Quick kitchen fixes
- If oil shimmers but doesn’t crackle, raise the heat slightly and wait until it crackles loudly.
- When nuggets turn pale before golden, lower the heat to prevent burning and cook more slowly.
- Splash a bit of water into hot oil to calm splatters—be careful and stand back for a few seconds.
- Patch soggy spots by quickly re-frying in hot oil for 30 seconds to crisp them up again.
- Shield delicate breading with a piece of parchment if it starts to burn too quickly, then adjust heat.
Prep, store, and reheat tips
- Prepping chicken: Cut the chicken into nuggets and keep refrigerated for up to 24 hours. The raw smell should be mild, and chicken should feel firm to touch.
- Breading station: Assemble flour, eggs, and breadcrumbs ahead. Cover and store in the fridge for up to a day; the mixture stays fresh and ready.
- Fried nuggets: Once cooked, let the nuggets cool completely. Store in an airtight container in the fridge for up to 3 days; they’ll stay crispy if kept dry.
- Freezing: Spread cooked, cooled nuggets on a tray, freeze until solid, then transfer to a sealed bag. They’ll keep for 1-2 months, with no freezer burn if wrapped well.
- Reheating: Oven at 180°C (350°F) for 10-12 minutes, or air fry for a quick revive—look for a shimmer and crunch, not sogginess. Avoid microwaving, as it softens the coating.
Top questions about chicken nuggets
1. Can I use chicken thighs instead of breasts?
Use skinless, boneless chicken breasts for the juiciest nuggets. Thighs can work but may be a bit fattier and softer.
2. What kind of breadcrumbs should I use?
Panko breadcrumbs give the best crunch, but crushed saltines or cornflakes can add a different crispy texture.
3. How hot should the oil be?
Ensure the oil hits 180°C (350°F) before frying. Use a thermometer for accuracy to avoid soggy or burnt nuggets.
4. Can I bake these instead of frying?
Bake at 220°C (430°F) if you prefer oven-baked nuggets—expect a slightly less crispy crust but still tasty.
5. How long can I store cooked chicken nuggets?
Store cooked nuggets in an airtight container in the fridge for up to 3 days. Reheat in the oven or air fryer for best crispness.
6. How can I make the nuggets spicy?
Add a pinch of cayenne or hot sauce to the egg wash for a spicy kick. Adjust to your heat tolerance.
7. Why should I use a wire rack after frying?
Use a wire rack to drain excess oil after frying. This keeps the coating crispy and prevents sogginess.
8. What if the coating burns before the chicken is cooked?
If the coating browns too fast, lower the heat slightly to prevent burning while the inside cooks through.
9. Should I rest the nuggets after frying?
Rest cooked nuggets for a couple of minutes to allow the crust to firm up and juices to settle.
10. How can I add more flavor to the coating?
For extra flavor, mix dried herbs like thyme or oregano into your breadcrumb mixture before coating.
Cooking these chicken nuggets gives me a little flash of childhood—crispy, hot, and so satisfying. It’s honest comfort food made simple, with no shortcuts, just a bit of kitchen love.
It’s funny how something so straightforward can reconnect us to those messy, joyful moments in the kitchen. These nuggets are a reminder that good food doesn’t have to be complicated, just real and flavorful.

Hi, I’m Claire Dawson, and I’m the voice behind The Procrastinators Cookbook. Food has always followed me around, even when I was busy putting other things off. Somewhere between long café shifts, half-finished to-do lists, and meals cooked later than planned, I realized that food was the one thing I always came back to.