Chicken popcorn is one of those snacks that takes me straight back to childhood fairs and movie nights. There’s a playful crunch and a tender, juicy bite inside each piece that’s just irresistible. Making it at home feels like a small rebellion—reclaiming that nostalgic joy without the grease and artificial flavors.
What I love about this recipe is how forgiving it is—perfect for when you want something fun but also crave a bit of control over ingredients. Plus, it’s surprisingly quick to throw together, making it a perfect snack for spontaneous cravings or a busy weekend movie marathon. It’s comfort food that’s a little bit cheeky, and honestly, it’s better than any store-bought version I’ve ever had.
Focusing on the nostalgic joy of recreating childhood fairground snacks with a homemade twist, emphasizing the playful crunch and comforting familiarity of chicken popcorn.
Reclaiming Childhood Snack Joy
- Making chicken popcorn at home takes me back to summer fairs and lazy weekends, a small way to relive childhood joy.
- I love how this recipe turns a simple chicken strip into a crunchy, addictive snack that’s perfect for sharing or solo indulgence.
- There’s a nostalgic thrill in coating each piece with seasoned breadcrumbs—like recreating a fairground treat but with my own twist.
Reclaiming Childhood Snack Joy
- This chicken popcorn recipe came from a messy weekend craving for something crispy and fun, but with a homemade touch. I remember the first time I tried to make it — I was trying to capture that perfect crunch and juicy burst that makes childhood fairground snacks so addictive. Turns out, it’s all about the coating and a little patience in frying; simplicity really wins here.
- What keeps me coming back to this recipe is how it balances nostalgia with practical ease. It’s one of those snacks that feels indulgent but actually comes together quickly—no fancy ingredients, just honest comfort food. Plus, it’s a hit with kids and adults alike, perfect for sharing or just sneaking bites while watching a silly movie.
- heading
- story_type
Trivia & Historical Tidbits
- Chicken popcorn’s roots trace back to American fairgrounds and movie theaters, where it’s a beloved snack for its crunch and ease of sharing.
- This snack gained popularity in the 1980s as a fun, portable treat, often sold from street vendors or fair booths amid the chaos of young crowds.
- Despite its simple ingredients, mastering the perfect coating and fry technique makes all the difference—it’s more about technique than just ingredients.
Ingredient breakdown: key components
- Chicken breast: I prefer skinless, boneless chicken for a lean, tender bite; you can use thighs if you like a juicier result. The key is to cut uniform pieces so they cook evenly and stay crispy.
- Breadcrumbs: I like panko for its airy crunch, but regular seasoned breadcrumbs work fine if you want more flavor. Toast them lightly beforehand for extra crispness and a nutty aroma.
- Egg wash: A simple beaten egg helps the coating adhere well. For an extra crispy crust, add a splash of water or milk—just enough to loosen it up.
- Seasonings: I keep it simple with salt, pepper, and a hint of paprika for color and a smoky kick. Feel free to add garlic powder or cayenne if you like a bit more punch—just remember, less is more.
- Oil for frying: Use neutral oil with a high smoke point like vegetable or canola. Keep it hot—around 180°C (350°F)—and watch for crackling, which means it’s ready to fry those crispy bites.
- Optional flour: Lightly dusting the chicken pieces in flour before the egg wash helps the coating stick better and results in a crunchier exterior. Skip if you prefer a lighter, less breaded finish.
- Cooking spray (if baking): If you want a healthier version, spray the coated chicken with a bit of oil and bake at 200°C (400°F) until golden—about 15-20 minutes. Expect slightly less crunch but still satisfying.
Spotlight on key ingredients
Breadcrumbs:
- Chicken breast: I prefer skinless, boneless chicken for a lean, tender bite; you can use thighs if you like a juicier result. The key is to cut uniform pieces so they cook evenly and stay crispy.
- I like panko for its airy crunch, but regular seasoned breadcrumbs work fine if you want more flavor. Toast them lightly beforehand for extra crispness and a nutty aroma.
- Egg wash: A simple beaten egg helps the coating adhere well. For an extra crispy crust, add a splash of water or milk—just enough to loosen it up.
Oil for frying:
- Use neutral oil with a high smoke point like vegetable or canola. Keep it hot—around 180°C (350°F)—and watch for crackling, which means it’s ready to fry those crispy bites.
- Optional flour: Lightly dusting the chicken pieces in flour before the egg wash helps the coating stick better and results in a crunchier exterior. Skip if you prefer a lighter, less breaded finish.
Notes for ingredient swaps
- Chicken breast: I prefer skinless, boneless chicken for a lean, tender bite; you can use thighs if you like a juicier result. The key is to cut uniform pieces so they cook evenly and stay crispy.
- Breadcrumbs: I like panko for its airy crunch, but regular seasoned breadcrumbs work fine if you want more flavor. Toast them lightly beforehand for extra crispness and a nutty aroma.
- Egg wash: A simple beaten egg helps the coating adhere well. For an extra crispy crust, add a splash of water or milk—just enough to loosen it up.
- Seasonings: I keep it simple with salt, pepper, and a hint of paprika for color and a smoky kick. Feel free to add garlic powder or cayenne if you like a bit more punch—just remember, less is more.
- Oil for frying: Use neutral oil with a high smoke point like vegetable or canola. Keep it hot—around 180°C (350°F)—and watch for crackling, which means it’s ready to fry those crispy bites.
- Optional flour: Lightly dusting the chicken pieces in flour before the egg wash helps the coating stick better and results in a crunchier exterior. Skip if you prefer a lighter, less breaded finish.
- Cooking spray (if baking): If you want a healthier version, spray the coated chicken with a bit of oil and bake at 200°C (400°F) until golden—about 15-20 minutes. Expect slightly less crunch but still satisfying.
Equipment & Tools
- Deep-fryer or heavy-bottomed pot: For safe, even frying.
- Thermometer: To monitor oil temperature.
- Wire rack: Drain excess oil and keep crispy.
- Shallow bowls: Set up breading stations.
- Slotted spoon: Lift chicken from hot oil.
Step-by-step guide to chicken popcorn
- Equipment & Tools: Gather a deep-fryer or heavy-bottomed pot, a thermometer, a wire rack, and a large mixing bowl. The fryer is for even heat, thermometer for precise oil temp, wire rack for draining, bowl for coating mix.
- Cut chicken breasts into bite-sized pieces, about 2 cm (0.8 inches). Pat dry — moisture is enemy of crispness. Set aside.
- In a bowl, beat one egg. Add a splash of water or milk for looseness. Set up a breading station: flour, seasoned breadcrumb mix, and egg wash in separate shallow dishes.
- Dredge chicken pieces in flour, shaking off excess. Dip into egg wash, then coat thoroughly in breadcrumbs. For extra crunch, press coating onto each piece.
- Heat oil in your fryer or pot to 180°C (350°F). Use thermometer to monitor. The oil should shimmer and crackle lightly when ready.
- Fry chicken in batches (about 8-10 pieces at a time). Do not overcrowd. Cook for 3-4 minutes until golden and crispy, turning as needed. Check for even browning.
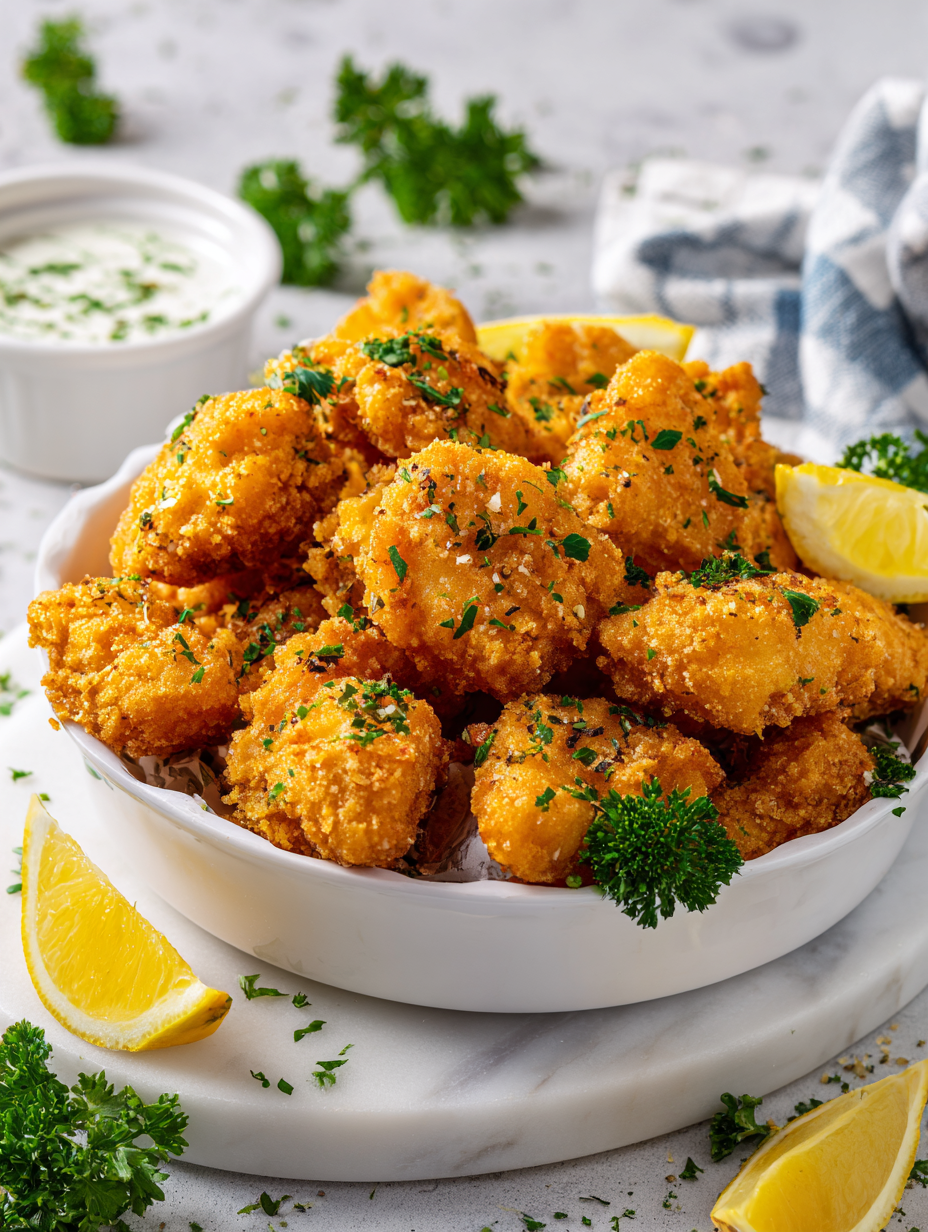
- Use a slotted spoon to transfer fried chicken onto wire rack. Let drain and cool slightly. Watch for a bubbly, crispy exterior and a juicy interior.
- Rest for 2-3 minutes before serving. Serve hot with your favorite dips or on their own. The coating should crackle when bitten into, juicy inside.
- Checkpoints & How to Know It’s Done: The coating is golden brown and crispy, internal chicken temp reaches 75°C (165°F), and the texture is firm yet tender.
Let the chicken popcorn rest on the wire rack for a couple of minutes. Serve immediately for maximum crunch and juiciness. For presentation, toss lightly with a pinch of salt or your favorite seasoning if desired.
How to Know It’s Done
- Golden, crispy exterior with a crackle when bitten.
- Internal temperature of chicken reaches 75°C (165°F).
- Juicy, tender interior with no pink remaining.
Homemade Chicken Popcorn
Ingredients
Equipment
Method
- Start by cutting the chicken breasts into small, uniform bite-sized pieces, about 2 cm (0.8 inches). Pat them dry with paper towels to remove excess moisture, which helps achieve a crisp coating.
- Set up your breading station: in one shallow bowl, place the flour seasoned with salt, pepper, and paprika; in another, beat the egg with a splash of water or milk; and in the third, spread out the panko breadcrumbs.
- Dredge each chicken piece in the seasoned flour, shaking off any excess. Then, dip it into the egg wash, ensuring it’s coated thoroughly. Finally, press the chicken into the panko breadcrumbs, pressing gently to help the coating adhere well.
- Heat your oil in a deep-fryer or heavy-bottomed pot to 180°C (350°F). Use a thermometer to monitor the temperature—this ensures a crispy, golden exterior without burning.
- Carefully place the coated chicken pieces into the hot oil, working in small batches to avoid overcrowding. Fry for about 3-4 minutes, turning occasionally, until they turn a beautiful golden brown and are crispy all over.
- Use a slotted spoon to lift the fried chicken popcorn from the oil, and transfer them onto a wire rack set over paper towels to drain excess oil. Rest for a couple of minutes to help the coating set and stay crispy.
- Repeat the frying process with remaining chicken pieces until all are cooked through and crispy. Keep an eye on the oil temperature to maintain even, golden results.
- Serve your homemade chicken popcorn hot, straight from the fryer, with your favorite dips or just as they are. The coating should crackle with each bite, revealing tender, juicy chicken inside.
Pro tips for crispy chicken popcorn
- Bolded mini-head: Use panko breadcrumbs; their airy texture makes each bite extra crunchy and satisfying.
- Bolded mini-head: Keep oil at a steady 180°C (350°F); use a thermometer to avoid soggy or burnt chicken.
- Bolded mini-head: Dredge chicken in flour first; this step helps the coating stick better and stay crispy longer.
- Bolded mini-head: For an even coating, press breadcrumbs firmly onto each piece before frying.
- Bolded mini-head: Do not overcrowd the pan; fry in small batches to maintain oil temperature and crispiness.
- Bolded mini-head: Rest fried chicken on a wire rack; it prevents sogginess by allowing excess oil to drain.
- Bolded mini-head: Serve immediately; the coating is at its crispiest right after frying, crackling with each bite.
Common mistakes and how to fix them
- FORGOT to monitor oil temperature → Use a thermometer for consistent crispness.
- DUMPED chicken into cold oil → Ensure oil is hot enough before frying to prevent sogginess.
- OVER-TORCHED coating → Keep an eye on color; golden is perfect, avoid burning.
- MISSED resting time → Let chicken rest briefly after frying to retain crunch and juices.
Quick fixes and pantry swaps
- If oil shimmers and crackles, it’s ready for frying.
- Splash a tiny bit of water if oil splatters excessively.
- Patch a soggy batch by re-crisping in a hot oven for 5 minutes.
- Shield burnt coating with a paper towel and lower heat immediately.
- When out of panko, crushed cornflakes make a crunchy substitute with a nutty aroma.
Prep, store, and reheat tips
- You can prep the chicken pieces and coat them up to a day in advance; keep covered in the fridge. The coating stays crispy longer when stored separately.
- Store fried chicken popcorn in an airtight container in the fridge for up to 2 days. Reheat in an oven at 180°C (350°F) until warmed through and crispy, about 10 minutes. The smell of fried goodness will be tempting again.
- For longer storage, freeze fried chicken in a single layer on a baking sheet, then transfer to a zip-top bag. Keep for up to 1 month. Reheat directly from frozen in the oven, checking for crispness.
- Reheating will soften the coating slightly; for best texture, re-crisp in the oven or air fryer. Expect a crackle and a warm, juicy interior when done.
Top questions about chicken popcorn
1. How do I choose the best chicken for popcorn?
Look for chicken pieces that are firm and pinkish, with no slimy texture. They should feel springy and smell fresh, not sour.
2. Can I use different breadcrumbs?
Use panko breadcrumbs for extra crunch, or regular seasoned breadcrumbs if you want more flavor. Toast them lightly for added crispness.
3. What’s the right oil temperature?
Maintain oil at around 180°C (350°F). If it’s too hot, the coating burns; too low, the chicken turns soggy. Use a thermometer for accuracy.
4. How many pieces should I fry at once?
Fry in small batches—about 8-10 pieces—so the oil stays hot and the chicken gets evenly crispy. Overcrowding cools the oil and makes it soggy.
5. How do I know when chicken popcorn is cooked?
The chicken is done when the coating is golden and crispy, the internal temp hits 75°C (165°F), and the juices run clear when cut.
6. Can I bake instead of fry?
Yes! Bake coated chicken at 200°C (400°F) for 15-20 minutes. It’s less crispy but still tasty and healthier. Expect a lighter crunch.
7. How should I store and reheat leftovers?
Store leftovers in an airtight container in the fridge for up to 2 days. Reheat in the oven at 180°C (350°F) until crispy again, about 10 minutes.
8. How do I re-crisp chicken popcorn?
If the coating isn’t crispy after reheating, pop it back in a hot oven or air fryer for a few minutes. This restores crunch and crackle.
9. What oil is best for frying?
Use neutral oils like vegetable or canola for frying. They have high smoke points and won’t add unwanted flavors. Keep oil hot for the best crunch.
10. What if the oil splatters too much?
If the oil splatters excessively, lower the heat slightly. Splash a tiny bit of water in the oil if it’s too hot and crackling loudly.
Making chicken popcorn at home isn’t just about recreating a snack; it’s about capturing that perfect crunch and juicy bite without the chaos of fairgrounds. Each crispy piece is a small victory, a reminder that simple ingredients can deliver big comfort. This dish feels right for now—easy, nostalgic, and just a little indulgent.
Whenever I make it, I’m reminded how satisfying it is to turn something familiar into a fresh, homemade treat. It’s a messy, joyful process that always leaves me craving the next batch—hot, crackling, and just a little bit addictive.

Hi, I’m Claire Dawson, and I’m the voice behind The Procrastinators Cookbook. Food has always followed me around, even when I was busy putting other things off. Somewhere between long café shifts, half-finished to-do lists, and meals cooked later than planned, I realized that food was the one thing I always came back to.