Chicken wings often get a bad rap for being either overly greasy or disappointingly soggy, but I’ve found that with a little attention to detail, they can be transformed into something much more interesting. This recipe focuses on achieving that perfect balance between crispy skin and tender, juicy meat—something I’ve been chasing for years in my own kitchen.
What makes this approach different isn’t just the seasoning or sauce, but how I handle the wings before they hit the heat. I like to think of it as a small ritual—patting them dry, giving them a quick salt rub, and baking at just the right temperature to set that initial crisp. The result is a wing that crackles when you bite into it, with that satisfying contrast that keeps people coming back for more.
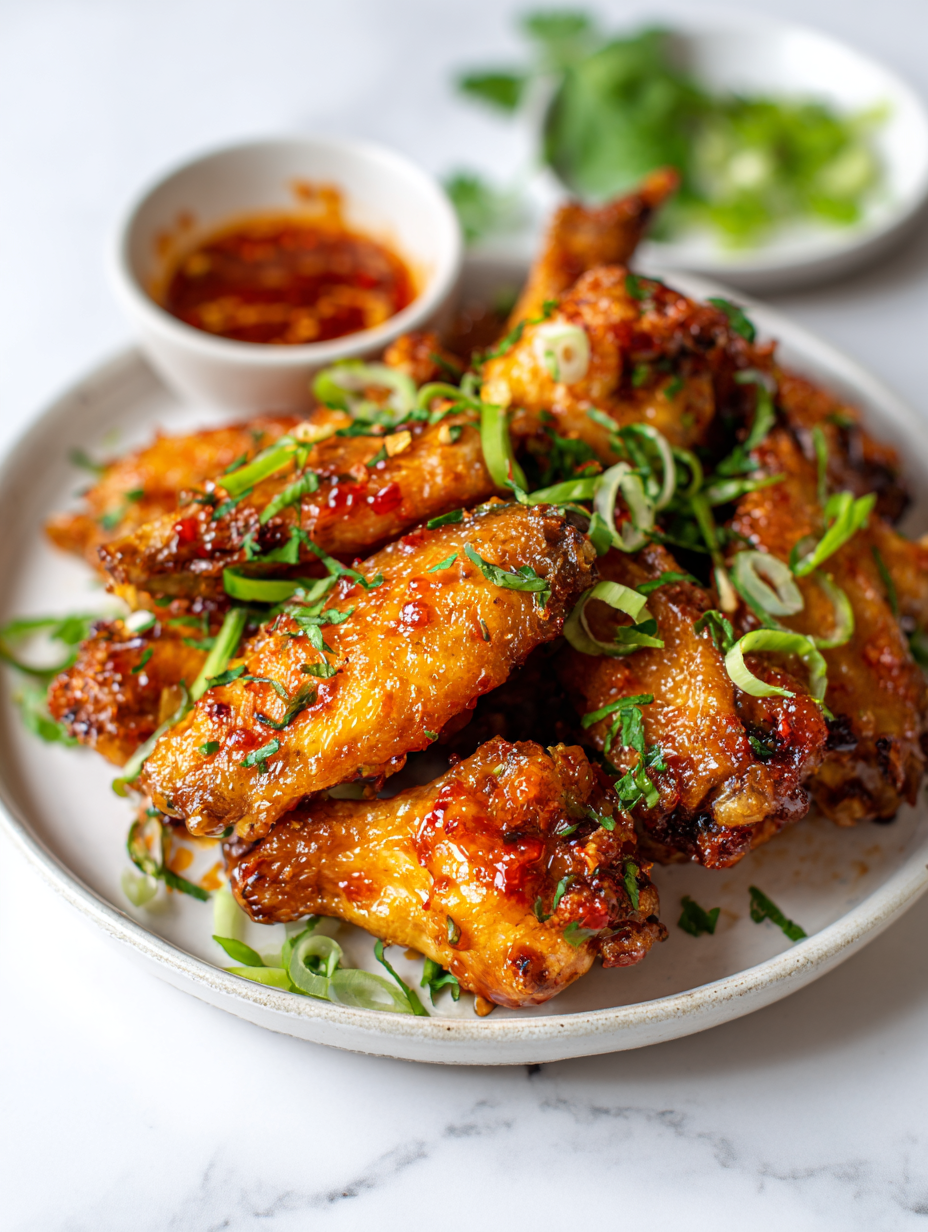
Focusing on the art of balancing crispy skin with tender meat, this recipe emphasizes the importance of achieving the perfect texture contrast that elevates ordinary chicken wings into a memorable snack.
The secret to crispy perfection
- Cooking these wings always reminds me of lazy Sunday afternoons with friends, the air filled with smoky, spicy aromas.
- I used to dread making wings because they’d often turn out greasy and limp, but mastering this crisp method changed everything for me.
- There’s a strange satisfaction in hearing that first crack when biting into a perfectly crispy wing, like a little victory in every bite.
- Sharing these wings during game nights feels like a small ritual—an easy way to bring everyone together around simple, honest food.
- Honestly, I love how a good batch of wings can turn a regular evening into something a bit more special, even if it’s just for myself.
The story behind this recipe
- This recipe came about after a messy weekend of experimenting with different spice blends and cooking techniques. I wanted wings that balanced that addictive crunch with a meat that’s still juicy inside, without frying everything to a greasy mess. It’s a little bit of a quest, really, trying to get that perfect crispy skin that doesn’t fall apart too easily.
- One night, I remembered a batch I made for a small gathering—standing at the stove, smelling the charred bits and feeling that crackle under my teeth. That moment of crispy perfection made me realize it’s all about the prep—patting dry, the right oven temp, and a quick broil at the end to finish. Now I keep coming back to that method, tweaking it here and there, always chasing that satisfying crunch.
- heading: ‘The story behind this recipe’
Chicken Wings Origin & Trivia
- Chicken wings as a bar snack originated in Buffalo, New York, in the 1960s, gaining fame for their crispy skin and spicy sauce.
- The popularity of wings skyrocketed during the 1980s, turning them into a staple at sporting events and casual gatherings nationwide.
- In some regions, wings are traditionally baked, not fried, reflecting a more health-conscious approach while still aiming for that crispy finish.
- The term ‘buffalo wings’ is actually a trademark of the Anchor Bar in Buffalo, which claims to have invented them.
- Despite their American roots, chicken wings have become a global phenomenon, with countless variations adapted to local flavors and spices.
Ingredient breakdown: key components
- Chicken wings: I opt for fresh, meaty wings with plenty of skin for that crispy contrast—look for plump, firm pieces with a bit of fat for flavor.
- Baking powder: I use aluminum-free to help the skin crisp up without any metallic taste—don’t skip this step, it’s key for crunch.
- Salt: I salt the wings generously before cooking—this helps draw out moisture and enhances the seasoning, especially when salted early.
- Hot sauce: I prefer a tangy, vinegary hot sauce like Frank’s—brightens the flavor and adds a subtle smoky zing, but feel free to swap for a milder or sweeter variety.
- Butter: I melt good-quality unsalted butter for the glaze—its richness balances the heat and adds a silky texture, but coconut oil is a decent dairy-free alternative.
- Garlic powder: I use it for depth—smells fragrant and toasty when cooked, but fresh minced garlic can be used if you want a sharper bite.
- Vinegar: I splash in a little apple cider vinegar at the end for brightness—cuts through the richness and makes the sauce pop, but lemon juice works just as well.
Spotlight on key ingredients
Chicken wings:
- I look for plump, meaty wings with plenty of skin—those give the best crunch and flavor. Fresh is best, but frozen works if fully thawed and patted dry.
- Baking powder: I use aluminum-free to help the skin crisp without metallic aftertaste. It’s the secret for that crackly texture you crave—don’t skip it, even if it feels odd.
Hot sauce and vinegar:
- Hot sauce: I reach for a tangy, vinegary type like Frank’s—brightens everything and adds a smoky zing. The sauce should cling and shimmer when tossed, not pool or slip off.
- Vinegar: I splash in a little apple cider vinegar at the end—brightens the glaze, cuts sweetness, and heightens the heat. Lemon juice can work in a pinch, for that fresh citrus bite.
Notes for ingredient swaps
- Dairy-Free: Swap butter for coconut oil or a neutral vegetable oil. You lose some richness but gain a subtle tropical aroma.
- Hot Sauce: Use sriracha or a milder chili sauce if you prefer less heat, though the tang might be slightly different.
- Vinegar: Apple cider vinegar can be replaced with lemon juice for a brighter, citrusy punch in the glaze.
- Baking Powder: Aluminum-free baking powder helps achieve crispness without metallic taste—skip if you prefer a softer skin.
- Sweetener: Honey or maple syrup can replace hot sauce for a sweeter, less tangy flavor—watch for caramelization during baking.
- Herbs & Spices: Add a dash of smoked paprika or cumin for extra depth—use sparingly, as they can overpower the sauce.
- Chicken: For a leaner option, use skinless wings but expect less crispness—consider a quick dry rub for flavor.
Equipment & Tools
- Baking sheet with wire rack: Allows hot air to circulate, ensuring even crisping.
- Mixing bowls: For tossing wings with dry and sauce ingredients.
- Tongs: For turning and tossing wings without piercing the skin.
- Pastry brush: To apply any additional glaze or sauce evenly.
Step-by-step guide to crispy wings
- Equipment & Tools: Gather a baking sheet, wire rack, mixing bowls, tongs, and a pastry brush. The wire rack helps air circulate for crispness, and the baking sheet catches drips.
- Pat the chicken wings dry with paper towels—this is key for crisp skin. Let them sit out for 10 minutes to air dry if you have time.
- In a large bowl, toss wings with baking powder (about 1 teaspoon per pound) and a generous sprinkle of salt. Mix well, ensuring even coating.
- Arrange wings on the wire rack in a single layer—skin side up—leave space between each. Preheat oven to 220°C (430°F).
- Bake for 45-50 minutes. Check at the 30-minute mark—wings should be golden and skin crisping. If not, give them a few more minutes, watching for browning.
- In the last 5 minutes, prepare the sauce: melt butter, stir in hot sauce, garlic powder, and a splash of vinegar. Simmer briefly until fragrant.
- When wings are crisp and cooked through, remove from oven. Toss them in the sauce using tongs, ensuring even coverage. Return to rack for 2 minutes to set the glaze.
- Resting & Finishing: Let wings rest for 3-5 minutes. Plate immediately, drizzle with any remaining sauce, and serve hot with your favorite sides.
- Checkpoints & How to Know It’s Done: Wings are golden and crispy, internal temp reaches 75°C (165°F), and meat is tender but not falling apart. The skin should crackle when bitten.
Let the wings rest for 3-5 minutes to lock in juices and settle the glaze. Serve immediately for maximum crunch and flavor.
How to Know It’s Done
- Golden, crispy skin with crackle sound when bitten.
- Internal temperature at least 75°C (165°F).
- Meat feels tender and juicy, not rubbery or dry.
Crispy Oven-Baked Chicken Wings with Spicy Sauce
Ingredients
Equipment
Method
- Preheat your oven to 220°C (430°F) and set up a baking sheet with a wire rack on top. Pat the chicken wings dry with paper towels to remove excess moisture, which helps achieve crispiness. Let them air dry for about 10 minutes if possible.
- In a large mixing bowl, sprinkle the baking powder and salt evenly over the wings. Toss them thoroughly using tongs until each piece is well coated; this step is key for creating that crackly, oven-fried texture.
- Arrange the wings in a single layer on the wire rack, skin side up, leaving space between each piece to allow hot air to circulate. Place the tray in the preheated oven and bake for 45 to 50 minutes, or until the wings are golden brown and crispy.
- While the wings are baking, prepare the spicy sauce. Melt the butter in a small saucepan over low heat, then stir in hot sauce, garlic powder, and apple cider vinegar. Simmer gently until fragrant and slightly thickened, about 2-3 minutes.
- Once the wings are cooked and crispy, remove them from the oven. Transfer them to a large bowl and pour the hot sauce mixture over the wings. Toss gently with tongs until each wing is evenly coated and shiny with sauce.
- Use the tongs to transfer the coated wings back onto the wire rack. Broil for an additional 2-3 minutes if you want the skin to re-crisp slightly and develop a slight char for extra flavor.
- Remove the wings from the oven and let them rest for 3-5 minutes; this helps juices settle and enhances the texture. Serve immediately with your favorite sides and enjoy that satisfying crunch in every bite.
Notes
Pro tips for crispy wings
- Dry wings thoroughly—any moisture will steam, not crisp, so pat with paper towels and air dry if possible.
- Use baking powder generously—this is the secret to that ultra-crackly, oven-baked skin that mimics fried texture.
- Space wings well on the rack—air circulation is key to even crisping without sogginess.
- Keep an eye on the oven—start checking at 45 minutes; wings can go from perfect to burnt quickly.
- Toss wings in sauce while hot—this helps the glaze cling and develop a shiny, flavorful coating.
- Rest wings briefly after baking—5 minutes allows juices to redistribute, keeping meat tender and moist.
- Finish with a quick broil if needed—just 2-3 minutes, to re-crisp the skin and add a touch of char for flavor.
Common mistakes and how to fix them
- FORGOT to dry wings thoroughly → Pat wings dry for maximum crispness.
- DUMPED sauce directly on hot wings → Toss wings in sauce for even coating.
- OVER-TORCHED the wings → Watch closely near the end to prevent burning.
- UNDERESTIMATED resting time → Rest wings 3-5 minutes for better flavor and texture.
Quick fixes for crispy wings
- If wings aren’t crispy, splash a little extra baking powder and return to oven for 5 minutes.
- When sauce is too tangy, patch with a touch of honey or maple syrup to balance flavors.
- Splash hot sauce if sauce lacks punch—fumes should shimmer and smell fiery but inviting.
- DUMPED wings in sauce while cold? Reheat in oven for 5 minutes to revive that crackle and aroma.
- Shield wings from uneven crisping by rotating the baking sheet halfway through baking.
Prep, store, and reheat tips
- Prep the wings by patting them dry and tossing with baking powder and salt—do this step a few hours ahead to deepen the dryness and enhance crispness during baking.
- Store raw wings in an airtight container in the fridge for up to 24 hours; keep them uncovered if you want slightly drier skin for extra crunch.
- Cooked wings can be refrigerated in an airtight container for up to 3 days; reheat in a hot oven or air fryer until sizzling and crispy—listen for that crackle.
- Reheating wings in the oven at 200°C (390°F) for about 10 minutes works best—avoid microwave which turns skin limp and rubbery.
- For best flavor, serve wings immediately after reheating; the texture will be crispy, but the sauce might mellow slightly over time, so re-toss if needed to refresh the glaze.
Top questions about chicken wings
1. How do I pick the best chicken wings?
Look for wings that are plump, firm, and have a good layer of skin. Fresh wings are best, but frozen can work if fully thawed and dried thoroughly.
2. Why use baking powder on wings?
Using baking powder helps create a crispy skin by drawing out moisture. Make sure it’s aluminum-free to avoid metallic taste.
3. How do I ensure wings get crispy?
Pat the wings dry with paper towels, then let them sit out for 10 minutes. Moisture is the enemy of crispness.
4. What’s the ideal oven temperature for wings?
Bake at 220°C (430°F) for about 45-50 minutes until golden and crackling. Check at 30 minutes to prevent burning.
5. Should I toss wings in sauce hot or cold?
Toss the wings in hot sauce when they’re hot out of the oven to help the sauce cling and develop shine.
6. How long should I rest the wings?
Rest the wings for 3-5 minutes before serving. This helps juices redistribute and keeps the meat tender.
7. How do I know when wings are done?
Use an internal thermometer to ensure they reach 75°C (165°F). The skin should be crispy, and the meat tender.
8. How should I reheat leftover wings?
Reheat in a hot oven or air fryer at around 200°C (390°F) for 10 minutes. Listen for crackling and smell for aroma.
9. Can I microwave leftover wings?
Avoid microwaving, which makes the skin chewy. Reheating in the oven keeps the crispy texture.
10. Can I customize the sauce?
Adjust hot sauce by adding honey for sweetness or vinegar for brightness. You can also swap with sriracha for a different heat level.
These wings are a reminder that simple techniques can turn a familiar dish into something a little more special. The crackle, the tender inside, that smoky, tangy glaze—each bite brings a satisfying mix of textures and flavors that makes you want more.
Whenever I make these, I think about how good food is often about patience and small details. It’s not just a recipe, but a little ritual that keeps me coming back. Sometimes, that’s all you need to make an ordinary evening feel a little more memorable.

Hi, I’m Claire Dawson, and I’m the voice behind The Procrastinators Cookbook. Food has always followed me around, even when I was busy putting other things off. Somewhere between long café shifts, half-finished to-do lists, and meals cooked later than planned, I realized that food was the one thing I always came back to.