Mini fritters might seem simple, but getting that perfect crispy edge while keeping the interior tender is a small kitchen victory. I love how these little bites make me feel like a pro, even on a busy weeknight. Plus, they’re endlessly adaptable—whatever veggies, herbs, or cheeses you have on hand can turn into a snack or a quick appetizer.
There’s something delightfully nostalgic about fritters. Maybe it’s the crackle of the batter hitting hot oil or the way they smell like childhood kitchens. Making them from scratch isn’t just about the end result; it’s about the messy, satisfying process of mixing, scooping, and frying. It’s honest, imperfect, and always worth the effort.
Focusing on the art of making perfect mini fritters that are crispy on the outside and tender inside, using simple pantry staples and techniques that turn humble ingredients into a snack worth savoring.
The humble joy of crispy bites
- These fritters remind me of lazy Sunday mornings at my grandma’s, aromatic with herbs and a slight smoky edge.
- I get a rush every time I hear that satisfying crackle as the batter hits the hot oil, like a tiny celebration.
- Nothing beats the pride of turning humble odds and ends into crispy, golden bites that disappear so fast.
- Frying these feels chaotic but rewarding, especially when I see the perfect puff and color emerge from the pan.
- Sharing these with friends sparks spontaneous laughter and makes me feel connected, even on the busiest nights.
Story Behind This Recipe
- These mini fritters came about one rainy afternoon when I was rummaging through the fridge, looking for something quick and satisfying. I found a lonely zucchini, a few sad herbs, and some cheese that needed using up. Instead of letting them go to waste, I threw everything together into a batter, hoping for the best. The smell that wafted up was unexpectedly inviting—crisp on the outside, tender within, just like I remembered from childhood snack stalls.
- It struck me then how little it takes to turn simple ingredients into something truly comforting. These fritters became my go-to for busy nights when I wanted a snack that felt special but came together fast. They’re imperfect, spontaneous, and so versatile—perfect for using what’s left in the fridge while still satisfying that craving for something crispy and warm.
- heading
- Story Behind This Recipe
Fascinating Fritter Trivia
- Mini fritters have roots in street food cultures worldwide, where tiny, crispy bites were perfect for quick snacks.
- Historically, fritters were a way to make humble ingredients stretch further, turning leftovers into flavorful morsels.
- In many cultures, these small fried treats are linked to festive occasions, symbolizing sharing and abundance.
Key Ingredients Breakdown
- All-purpose flour: I like how it creates a light, tender batter that crisps beautifully. Feel free to swap in chickpea flour for a nuttier flavor and a gluten-free option.
- Vegetables (zucchini, carrots): I squeeze out excess moisture to prevent sogginess—use a clean towel to pat them dry. Raw, they add a fresh bite and a bit of juiciness.
- Cheese (cheddar, feta): Melty, savory, with a slight tang. If you want a milder taste, mozzarella is a good swap; for a sharper punch, go for aged cheddar.
- Eggs: They bind everything together and give the fritters structure. If you’re vegan, a flaxseed meal mixed with water can mimic the binding power.
- Oil (vegetable, canola): I prefer neutral oils that heat quickly and stay stable—safflower is a good substitute. Watch for that shimmering crackle when the oil’s hot enough.
- Herbs (parsley, dill): Fresh herbs give a burst of brightness. Dried herbs can work, but use half the amount—they’re more concentrated and less vibrant.
- Seasoning (salt, pepper): Essential for flavor. Feel free to add a pinch of smoked paprika or chili flakes for a smoky or spicy kick, depending on your mood.
Spotlight on key ingredients
Zucchini:
- I love how zucchini’s moisture helps keep the fritters tender inside, but I always squeeze out excess water to prevent sogginess.
- Cheese (feta, cheddar): It adds a savory punch and melts into the batter, creating a gooey, flavorful bite that contrasts with the crispy exterior.
Flour & Oil:
- All-purpose flour: I rely on it for a light, crisp crust, but swapping in chickpea flour gives a nuttier flavor and makes them gluten-free.
- Oil (vegetable, neutral): It’s key for that crackling, golden crust. When it shimmers and crackles, you know it’s ready for the batter.
Notes for ingredient swaps
- Dairy-Free: Swap cheese for mashed avocado or nutritional yeast for a creamy, savory boost without dairy.
- Gluten-Free: Use rice flour or chickpea flour instead of all-purpose flour for a nutty flavor and gluten-free option.
- Vegetable Choices: Replace zucchini with finely chopped spinach or kale, which cook quickly and add color.
- Herb Variations: Fresh basil or cilantro can replace parsley or dill, bringing a different aromatic punch.
- Oil Options: Try toasted sesame oil for a nutty aroma, but use sparingly to avoid overpowering the fritters.
- Egg Alternatives: Mashed banana or applesauce can work in a pinch, but may add sweetness; flaxseed meal mixed with water is a good vegan binder.
- Seasoning Tweaks: Add a pinch of smoked paprika or cumin for a smoky, earthy flavor, or chili flakes for heat.
Equipment & Tools
- Medium mixing bowl: For combining ingredients into the batter.
- Whisk: To mix ingredients thoroughly and evenly.
- Spatula: For scooping and turning fritters in the pan.
- Small cookie scoop or tablespoon: To portion out even-sized fritters.
- Non-stick skillet or frying pan: To fry the fritters evenly without sticking.
- Kitchen paper towels: To drain excess oil after frying.
Step-by-step guide to mini fritters
- Gather your equipment: a medium mixing bowl, a whisk, a spatula, a small cookie scoop or tablespoon, and a non-stick skillet or frying pan.
- Prepare your ingredients: grate about 1 cup of zucchini and carrot, then squeeze out excess moisture with a clean towel. Finely chop 2 tablespoons of herbs like parsley or dill. Grate ½ cup of cheese. Crack 1 large egg into the bowl.
- Make the batter: add 1 cup of all-purpose flour, a pinch of salt, pepper, and any seasonings you like. Mix everything until just combined. The batter should be thick but scoopable — if too runny, add a touch more flour.
- Heat the oil: pour about ½ inch of vegetable or canola oil into your skillet. Heat over medium heat until shimmering and a pinch of batter sizzles upon contact (~180°C / 350°F).
- Cook the fritters: using your cookie scoop or tablespoon, drop small dollops of batter into the hot oil, spacing them apart. Flatten slightly with the back of your spatula. Fry for 2-3 minutes until golden brown and crisp.
- Flip and finish: carefully turn each fritter with tongs or a spatula. Cook for another 2-3 minutes until evenly golden and cooked through. If they brown too quickly, lower the heat slightly.
- Drain and rest: transfer fritters to a paper towel-lined plate. Let them rest for 1-2 minutes. This helps set the crust and keeps them crispy.
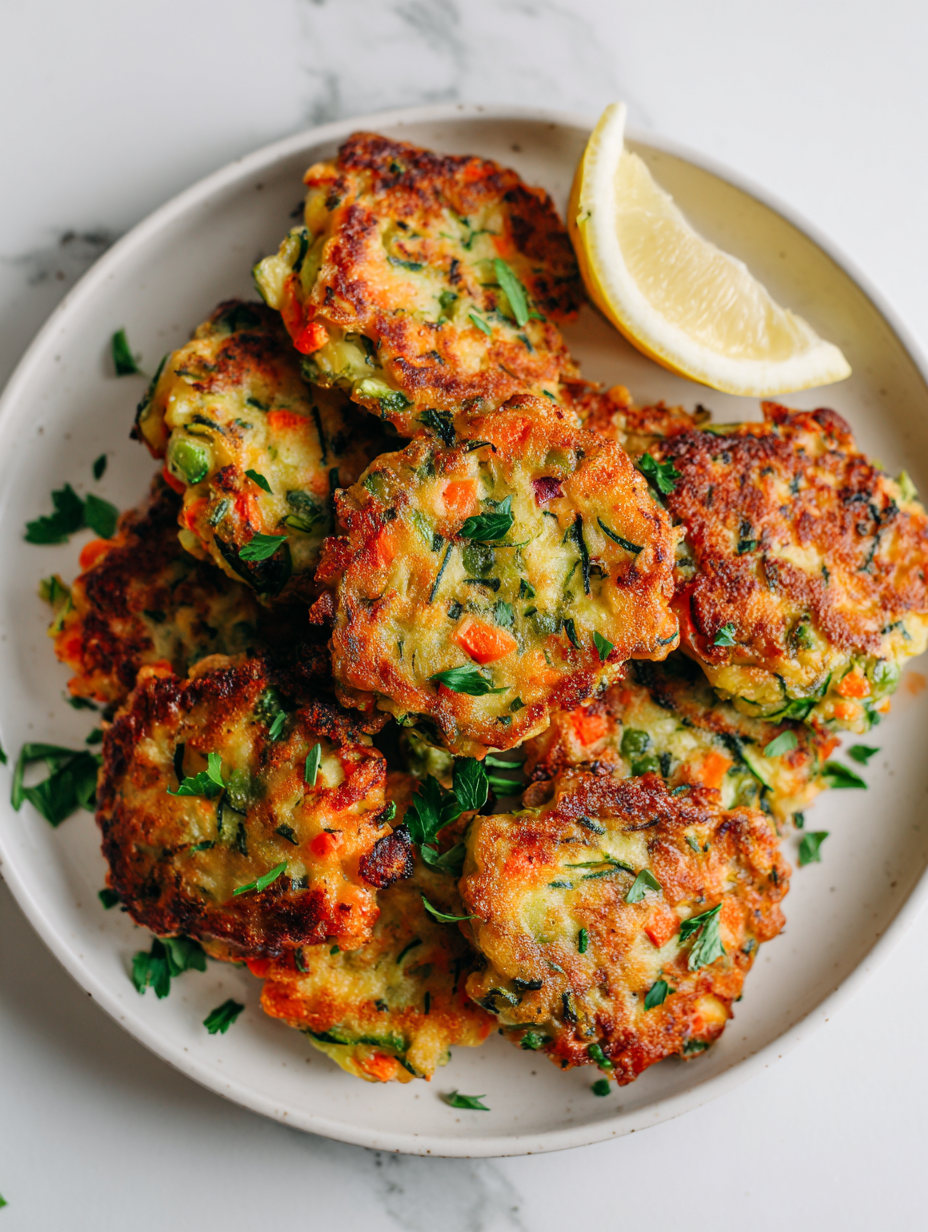
- Serve immediately: arrange on a plate, maybe drizzle with a squeeze of lemon or a dollop of sour cream. They’re best hot and crispy, with that inviting crackle on the outside.
Let the fritters rest briefly on paper towels to drain excess oil. Serve immediately while hot and crispy, optionally garnished with herbs or a squeeze of lemon for added brightness.
How to Know It’s Done
- Color: fritters should be golden brown and crispy on the outside.
- Texture: interior should be tender, not doughy or raw.
- Appearance: fritters should hold their shape and not spread out excessively in the pan.
Mini Vegetable Fritters
Ingredients
Equipment
Method
- Begin by grating the zucchini and carrot, then place them in a clean towel and squeeze out as much excess moisture as possible. This step is key to achieving crispy fritters.
- In a medium mixing bowl, whisk the egg until smooth. Add the grated vegetables, chopped herbs, grated cheese, flour, salt, and pepper. Fold everything together gently until well combined and the batter is thick but scoopable.
- Heat the vegetable oil in a non-stick skillet over medium heat until shimmering and a small drop of batter sizzles immediately.
- Using a small cookie scoop or tablespoon, carefully drop dollops of batter into the hot oil, spacing them evenly. Gently flatten each with the back of your spatula for even cooking.
- Fry the fritters for about 2-3 minutes on each side, until they turn golden brown and crispy around the edges, and the aroma of frying herbs fills the air.
- Use tongs or a spatula to flip the fritters carefully and cook the other side until equally crispy and golden.
- Transfer the cooked fritters onto paper towels to drain excess oil and let them rest for a minute to set their crisp exterior.
- Serve the mini fritters hot, garnished with extra herbs or a squeeze of lemon if desired. Enjoy the crackling, tender bites immediately for the best experience.
Pro tips for crispy, tender fritters
- Maintain consistent oil temperature: Keep it around 180°C (350°F); use a thermometer or test with a small drop of batter—if it sizzles immediately, you’re ready.
- Don’t overcrowd the pan: Fry in small batches to keep oil temperature stable and ensure crispy, evenly cooked fritters.
- Use a cookie scoop: For uniform size and even cooking, a small scoop helps portion the batter quickly and neatly.
- Flip carefully: Gently turn fritters once the edges are golden and crispy, about 2-3 minutes in, to avoid breaking them apart.
- Drain excess oil: Rest cooked fritters on paper towels immediately to keep them crispy and prevent greasy bites.
- Adjust seasoning: Taste the batter before frying; a pinch more salt or herbs can elevate the flavor just right.
- Serve promptly: These are best enjoyed hot, when the crust crackles and the inside is tender—reheat gently if needed.
Common mistakes and how to fix them
- FORGOT to squeeze excess moisture from vegetables → Pat dry thoroughly before mixing.
- DUMPED too much oil in the pan → Use enough oil to cover bottom lightly, not flood.
- OVER-TORCHED the fritters → Lower heat if they brown too quickly, cook until golden.
- MISSED the resting step → Rest on paper towels for a minute to keep fritters crispy.
Quick fixes for perfect fritters
- If oil shimmers and crackles, it’s ready—rescue with a small batter drop test.
- When fritters stick or break, increase oil temp slightly or gently reshape with a spatula.
- Splash a little water in hot oil—sound should crackle; if not, wait until temperature rises.
- Patch soggy fritters by re-frying briefly for extra crispness.
- Shield delicate fritters from cold air—serve immediately or keep warm in a low oven.
Prep, store, and reheat tips
- Prepare the batter ahead: mix ingredients and refrigerate for up to 2 hours; the chilled batter crisps better during frying and is easier to handle.
- Squeeze out moisture from vegetables in advance: store drained vegetables in an airtight container, keeping them dry for crispier fritters.
- Store cooked fritters in the fridge: place on a paper towel-lined container, cover loosely, and refrigerate for up to 24 hours. Reheat until hot and crispy, with a gentle crackle returning in the oil.
- Reheating tips: warm in a hot skillet over medium-high heat (~180°C / 350°F), flipping as needed. Expect a slight loss of crispness but still satisfying with proper reheating.
- Shelf life: raw batter lasts 1-2 days in the fridge; cooked fritters are best enjoyed fresh but can be stored up to 1 day with crispness intact if reheated properly.
Top questions about mini fritters
1. How can I tell when the fritters are cooked?
Use a toothpick or small spatula to check if they’re golden and crispy on the outside before flipping. If they resist sticking, they’re ready to turn.
2. What’s the best oil temperature for frying?
A gentle crackle in the oil means it’s hot enough. If batter sizzles immediately, you’re good to go.
3. Why are my fritters greasy?
If they turn out too greasy, let them rest on paper towels longer and keep the oil at a steady temp.
4. My batter is too runny, what do I do?
Add a pinch more flour if the batter feels too loose or runny. It should be scoopable but not sticky.
5. How much herbs should I add?
Use fresh herbs or dried ones sparingly. Too much can make the batter soggy or overpower the delicate flavor.
6. Can I make these gluten-free?
Yes, swap in gluten-free flours like chickpea or rice flour. Expect a slightly nuttier or lighter texture.
7. Why are my fritters soggy inside?
Drain excess moisture from vegetables thoroughly—use a clean towel to squeeze out water before mixing to prevent sogginess.
8. How do I reheat leftover fritters?
Reheat in a hot skillet over medium heat until crispy again, about 2-3 minutes per side, for best results.
9. Why do my fritters turn out unevenly cooked?
Fry in small batches to maintain oil temperature and get evenly crispy, crackling exteriors.
10. How do I handle sticky batter?
If batter sticks to your hands, lightly oil your fingers or use a spoon or scoop for portioning.
These mini fritters are quick to make but pack a nostalgic punch, reminding me of simple family weekends. The aroma of sizzling batter and the satisfying crunch evoke memories of carefree afternoons. They’re a humble, honest snack that feels especially comforting right now.
Sharing these crispy bites brings a little chaos and joy into my kitchen, and I love how adaptable they are. No matter what leftovers I toss in, they turn into something special—crisp, tender, and just the right amount of messy. It’s about those imperfect, satisfying moments that make cooking feel real.

Hi, I’m Claire Dawson, and I’m the voice behind The Procrastinators Cookbook. Food has always followed me around, even when I was busy putting other things off. Somewhere between long café shifts, half-finished to-do lists, and meals cooked later than planned, I realized that food was the one thing I always came back to.