Mini sliders are my go-to for any gathering that demands a touch of sophistication in tiny form. There’s something about balancing the juiciness inside with a crisp, golden bun that keeps bites lively and satisfying. It’s a lesson in technique—how a gentle touch can turn a simple burger into something memorable.
I love how these mini bites invite everyone to customize, share, and indulge without the usual heaviness of a full-sized burger. It’s like a culinary puzzle—how to keep that perfect, oozy center while maintaining a sturdy, toasted bun. Every time I make them, I find new ways to tweak the toppings or seasoning for that just-right flavor.
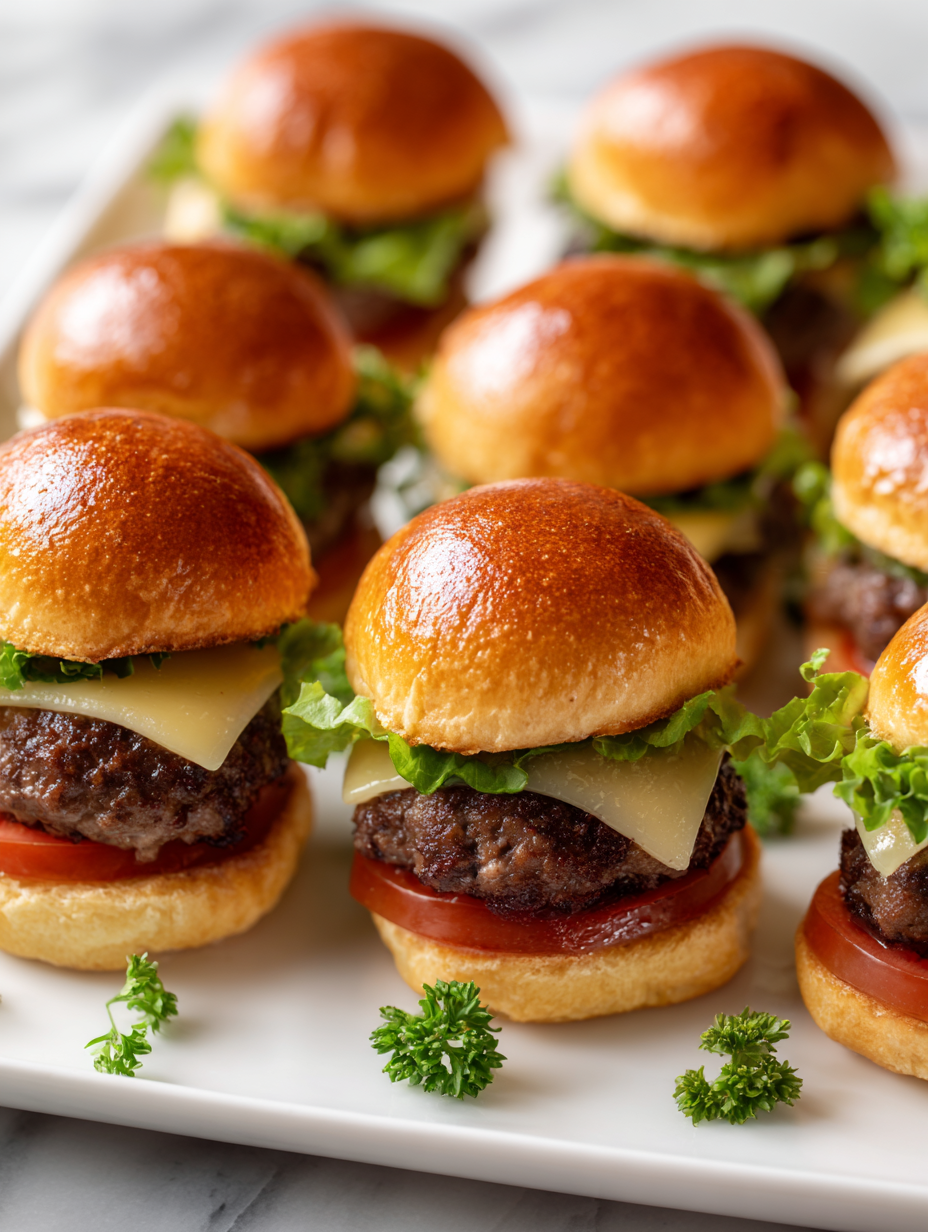
Focusing on the art of balancing juiciness and crispiness in each tiny bite, this recipe elevates a simple slider to a textural masterpiece, highlighting the importance of technique and ingredient choice in creating the perfect bite-sized burger.
The secret to perfect mini bites
- Making these sliders always brings back summer barbecues at my grandparents’ place, filled with chaos and laughter.
- I used to think tiny burgers couldn’t be satisfying, but these little guys prove me wrong every time.
- There’s a strange pride in crafting the perfect bite—getting that balance of juiciness and crunch just right.
The story behind this recipe
Making these mini sliders is a nod to my childhood summers, where weekend barbecues turned into chaotic, laughter-filled feasts. I remember sneaking bites of crispy edges and gooey cheese while everyone else was busy chatting or flipping burgers. These tiny sandwiches became my secret pleasure, a way to enjoy a full flavor punch without the fuss of a big plate. Over the years, I’ve tweaked the ingredients and technique, but the joy of crafting perfect, juicy bites remains the same.
Mini Sliders Trivia & Origins
- Mini sliders gained popularity in the 1980s as a party food, thanks to fast-food chains experimenting with bite-sized versions.
- They originated from American diner culture, where small, manageable bites were ideal during social gatherings and casual eating.
- The concept of sliders is believed to be linked to the term ‘sliding’ a burger patty onto a bun, emphasizing ease and speed.
- Historically, sliders became a staple at tailgates and barbecues for their portability and crowd-pleasing nature.
- Today, mini sliders are a canvas for culinary creativity, often featuring gourmet toppings and unique flavor combos.
Breakdown of Key Ingredients
- Ground beef: I prefer 80/20 for juicy, flavorful bites—skip leaner options unless you want dry sliders.
- Mini buns: Soft, slightly sweet, with a golden crust—look for fresh ones or toast your own for extra crunch.
- Cheese slices: Melty, sharp cheddar works beautifully, but don’t shy away from spicy pepper jack for a kick.
- Onions: Caramelized until sweet and golden—adds depth, but raw red onions give a sharp bite if you’re in a rush.
- Pickles: Bright, vinegary crunch—use homemade or high-quality store-bought for that satisfying snap.
- Condiments: Ketchup, mustard, or a smear of aioli—keep it simple, but a touch of smoky chipotle mayo is a game changer.
- Seasonings: Salt, pepper, and a splash of Worcestershire—season the beef generously for that savory punch.
Spotlight on key ingredients
Ground beef:
- I prefer 80/20 for juicy, flavorful bites—skip leaner options unless you want dry sliders.
- Mini buns: Soft, slightly sweet, with a golden crust—look for fresh ones or toast your own for extra crunch.
- Cheese slices: Melty, sharp cheddar works beautifully, but don’t shy away from spicy pepper jack for a kick.
Pickles:
- Onions: Caramelized until sweet and golden—adds depth, but raw red onions give a sharp bite if you’re in a rush.
- Bright, vinegary crunch—use homemade or high-quality store-bought for that satisfying snap.
Notes for ingredient swaps
- Beef: I prefer 80/20 for juiciness—try leaner if you want less fat, but expect a drier bite.
- Mini buns: Soft, slightly sweet—sub with lettuce wraps or gluten-free rolls for different textures.
- Cheese: Sharp cheddar melts beautifully—swap for spicy pepper jack or smoky gouda for variety.
- Onions: Caramelized for sweetness—raw red onions add a sharp crunch if quick is your goal.
- Pickles: Bright, vinegary crunch—try bread-and-butter or omit if you want a cleaner flavor.
- Condiments: Ketchup, mustard, aioli—experiment with sriracha mayo or chimichurri for a flavor boost.
- Seasonings: Salt, pepper, Worcestershire—add garlic powder or smoked paprika for extra depth.
Equipment & Tools
- Small cast-iron skillet or heavy pan: Provides even heat for a perfect sear
- Spatula: Flips and handles the patties
- Sharp knife: Splits buns and trims toppings
- Baking sheet: To toast buns evenly
Step-by-step guide to mini sliders
- Equipment & Tools: Gather a small cast-iron skillet or heavy-bottomed pan, a spatula, a sharp knife, and a baking sheet. The skillet is key for that perfect sear, while the baking sheet helps with toasting buns.
- Prepare the Patties: Divide 1 lb (450 g) of ground beef (80/20) into four equal portions. Gently roll each into a ball, then flatten to about 1.5 cm (0.6 inch) thick. Season generously with salt and pepper.
- Preheat the Pan: Place the skillet over medium-high heat, about 180°C (350°F). Let it heat until just beginning to shimmer—this ensures a good sear.
- Sear the Patties: Place the beef patties in the hot skillet. Cook for 2-3 minutes until the edges are brown and crispy. Flip and cook another 2-3 minutes for medium rare, longer if you prefer more done. a) If they stick, give them a little more time to release. b) If they’re browning unevenly, adjust heat slightly.
- Toast the Buns: While the patties cook, split the mini buns and toast cut-side down on a baking sheet in the oven at 180°C (350°F) for about 3-4 minutes until golden and crisp. Keep an eye on them so they don’t burn.
- Assemble the Sliders: Once the patties are cooked, place each on a toasted bun. Add cheese slices if desired, then top with caramelized onions or pickles. Cover with the top bun.
- Rest & Finish: Let the sliders sit for 1-2 minutes to settle. Serve immediately with your favorite condiments and sides.
- Checkpoints & How to Know It’s Done: The patties should be browned and slightly crispy on the edges. Internal temperature should reach 60°C (140°F) for medium rare, 70°C (160°F) for medium. The buns should be golden and toasted, and cheese melted if added.
Let the sliders rest for 1-2 minutes off the heat. Serve hot, stacked or arranged neatly, with extra condiments on the side for dipping or topping.
How to Know It’s Done
- Patties are browned and crispy on the edges.
- Internal temperature reaches at least 60°C (140°F).
- Buns are golden and toasted, cheese is melted if used.
Mini Sliders
Ingredients
Equipment
Method
- Chop the small onion finely and set aside. Preheat your skillet over medium-high heat until it shimmers, and toast the cut sides of the mini buns for about 3-4 minutes until golden and crispy. Remove and set aside.
- Divide the ground beef into four equal portions, gently shape each into a ball, then flatten into about 1.5 cm thick patties. Season generously with salt and pepper on both sides.
- Place the skillet back over medium-high heat. Carefully place the patties into the hot pan, listening for a sizzle. Cook for 2-3 minutes until the edges are crispy and browned.
- Flip the patties using a spatula and cook for another 2-3 minutes until the other side is browned and the interior is cooked to your desired doneness. During the last minute, place a slice of cheese on each patty to melt.
- While the patties finish cooking, add the finely chopped onions to the skillet and cook, stirring occasionally, for about 8-10 minutes until golden and caramelized. The onions should smell sweet and look deep golden.
- Remove the beef patties from the skillet and let them rest for a minute. Place the toasted buns on a serving plate. Assemble each slider by placing a patty with melted cheese on the bottom bun, topping with caramelized onions, a pickle slice, and your choice of condiments. Cover with the top bun.
- Serve the mini sliders immediately while hot, with extra condiments on the side for dipping or topping. Enjoy the crispy, juicy bites that balance flavor and texture perfectly!
Tips & Tricks for Perfect Mini Sliders
- Bolded Mini-Head: Use a touch of oil in the pan—creates a crisp, golden crust on the patties.
- Bolded Mini-Head: Chill the beef mixture briefly—helps the patties hold together better during searing.
- Bolded Mini-Head: Toast buns cut-side down—brings out nutty flavors and prevents sogginess.
- Bolded Mini-Head: Don’t overcrowd the pan—allows proper searing and prevents steaming the meat.
- Bolded Mini-Head: Add cheese in the last minute—melts evenly without overcooking the patties.
- Bolded Mini-Head: Rest the sliders briefly—locks in juices and keeps them from falling apart when assembled.
- Bolded Mini-Head: Use a small spatula to flip—smooths the surface and prevents breaking the patties.
Common mistakes and how to fix them
- FORGOT to check patty temperature → Use a probe for perfect doneness.
- DUMPED all spices in one go → Season in layers for better flavor.
- OVER-TORCHED buns → Toast buns just until golden, watch closely.
- MISSED resting time → Rest sliders 1-2 minutes before serving.
Quick fixes and pantry swaps
- If/When patties are sticking, give them an extra 30 seconds to release naturally.
- Splash a little water on toasted buns if they start to dry out or burn.
- Patch over a crackling pan with a bit of oil to prevent sticking and preserve heat.
- Shield overflowing toppings with a piece of foil for a quick clean-up.
- Rescue a dry slider by adding a dab of warm aioli or melted cheese on top.
Prep, store, and reheat tips
- Prepare the beef patties and shape them ahead of time. Keep wrapped in the fridge for up to 24 hours for easy assembly later.
- Toast the buns in advance and store in an airtight container at room temperature for up to a day, or freeze for longer storage.
- Caramelize onions a day ahead; store in an airtight container in the fridge. Reheat until warm and fragrant, adding a splash of water if they dry out.
- Assemble sliders just before serving to maintain crisp buns and juicy patties, but you can prep toppings like pickles and condiments ahead.
- Reheat assembled sliders gently in a covered skillet or oven at 150°C (300°F) for 5–7 minutes. The smell of warmed meat and melted cheese is your cue they’re ready.
Top questions about mini sliders
1. How do I tell when the patties are done?
Use a meat thermometer to check for 70°C (160°F) for fully cooked, juicy sliders.
2. How can I make the buns crunchier?
If the buns aren’t crisp enough, toast them a little longer or broil for a quick minute.
3. Can I use leaner ground meat?
Choose 80/20 ground beef for juicy, flavorful bites—leaner meat may dry out quickly.
4. Can I make the patties ahead and freeze them?
Yes, you can freeze uncooked patties for up to a month, then thaw before searing.
5. How do I reheat sliders without drying them out?
To keep sliders warm, wrap in foil and reheat at 150°C (300°F) for 5-7 minutes.
6. How do I flip the patties without breaking them?
Use a small spatula to flip the patties gently; avoid pressing down to keep them juicy.
7. When should I add cheese to melt properly?
Add cheese during the last minute of cooking to melt evenly without overcooking the beef.
8. How do I get perfectly caramelized onions?
Caramelize onions slowly over medium heat until golden and fragrant, about 15-20 minutes.
9. How should I store leftover buns and toppings?
Use freshly toasted buns for the best texture and flavor—store leftovers in an airtight container.
10. What if the patties stick to the pan?
If the patties are sticking, give them an extra 30 seconds to naturally release from the pan.
These mini sliders are more than just party bites; they’re a quick way to bring everyone together with something satisfying and familiar. The balance of crispy edges and juicy centers makes each bite memorable, especially when shared around a cluttered picnic table or crowded kitchen counter.
In a world rushing past, sometimes it’s the simplest, most honest flavors that stick with us. Making these sliders reminds me to slow down, savor the process, and enjoy the chaos of good food and good company.

Hi, I’m Claire Dawson, and I’m the voice behind The Procrastinators Cookbook. Food has always followed me around, even when I was busy putting other things off. Somewhere between long café shifts, half-finished to-do lists, and meals cooked later than planned, I realized that food was the one thing I always came back to.