Making homemade mozzarella sticks is more than just a snack; it’s a little mindful ritual that takes me back to childhood afternoons spent in the kitchen, breading and frying with eager hands. The tactile act of rolling cheese in seasoned breadcrumbs feels like a small escape, a moment to slow down and focus on each step. It’s a quiet, almost meditative process that turns a simple comfort food into a mindful kitchen practice.
There’s something satisfying about watching that gooey cheese melt and bubble inside a crispy shell, crackling softly as it hits the hot oil. It’s a messy endeavor sometimes, but the reward—the warm, stretchy cheese with a smoky, seasoned bite—is worth every splatter. These sticks aren’t just quick bites; they’re little acts of self-care, turning a familiar flavor into a mindful, tactile experience that reconnects me with the joy of cooking.
Focusing on how making homemade mozzarella sticks can be a meditative act, turning a simple snack into a mindful kitchen ritual that reconnects you with childhood comforts and the tactile joy of breading and frying.
A mindful take on childhood comfort
- Breading mozzarella feels like a nostalgic hug, sticky fingers and all, bringing back childhood kitchen chaos.
- Frying these sticks is pure chaos—oil splatters, cheese oozes, but that crackling sound makes it all worth it.
- Seeing that melted cheese stretch beyond the shell, I feel a small pride every single time, like I’ve nailed it again.
- The smell of toasted breadcrumbs and bubbling cheese is my reminder that simple, honest cooking is my kind of therapy.
- There’s a quiet joy in perfecting the crispiness—each batch a tiny victory in the kitchen.
A mindful take on childhood comfort
- This recipe was born out of a lazy Sunday craving that turned into a small kitchen experiment. I wanted crispy, cheesy bites that felt indulgent but weren’t complicated to make on a whim. Honestly, I was also tired of store-bought sticks that lack that gooey stretch and fresh flavor. So, I started playing with breading techniques and cheese types, trying to get that perfect balance of crunch and melt.
- Each batch reminds me of late nights in college kitchens, where simple comfort food became a way to unwind after long days. Making them from scratch feels like a little act of rebellion against the commercial, fast-food version—more satisfying and a bit more personal. It’s a recipe that’s become part of my weekend ritual, a small way to reclaim comfort food with a bit of craft.
- heading
- story_type
History and Fun Facts
- Mozzarella sticks gained popularity in American bar menus during the 1970s, blending Italian cheese with American bar food flair.
- The crispy coating technique was adapted from traditional breaded fried foods, but the gooey cheese inside makes these uniquely satisfying.
- They’re believed to have roots in Italian-American cuisine, where fried cheese snacks have long been enjoyed, but the modern version was streamlined for mass appeal.
- Some food historians suggest that the popularity of mozzarella sticks paralleled the rise of snack-focused fast food and casual dining in the US.
- Homemade versions often surpass store-bought for melting quality and freshness, turning snack time into a small kitchen craft.
Key ingredients and tips
- Mozzarella cheese: I prefer a block of mozzarella for that gooey, stretchy melt—buy the freshest you can find, it makes all the difference in texture.
- Breadcrumbs: I use a mix of panko and seasoned breadcrumbs for extra crunch and flavor—try your favorite blend or add a dash of paprika for smoky notes.
- Egg wash: Beaten eggs with a splash of milk—this helps the breading stick, but if you’re out of milk, a bit of water works fine too.
- Flour: A light dusting of plain flour helps the breading adhere better—skip it if you’re feeling lazy, but expect less crunch.
- Oil: Neutral oil like canola or vegetable—make sure it’s deep enough for frying and hot (around 180°C/356°F) to get that crispy shell without burning the breading.
- Optional herbs/spices: I sometimes add garlic powder or Italian seasoning to the breadcrumb mix—play around, but don’t overpower the cheese’s natural flavor.
- Dipping sauce: A simple marinara or spicy aioli—serve these hot, and the sauce should be warm and inviting to contrast that cheesy stretch.
Spotlight on Key Ingredients
Mozzarella cheese:
- I prefer a block for that gooey, stretchy melt—use the freshest, it makes all the difference in texture.
- Cheese behaves differently during frying, so patience with the bubbling and melting is key—don’t rush the process.
Breadcrumbs:
- I like a mix of panko and seasoned breadcrumbs for crunch and flavor—try adding a pinch of smoked paprika for depth.
- Breadcrumbs toast slightly in the oven before coating for an extra nutty aroma and better adherence during frying.
Notes for ingredient swaps
- Dairy-Free: Use shredded dairy-free cheese or a firm tofu slice—won’t melt quite like mozzarella but still satisfying.
- Gluten-Free: Substitute panko with crushed gluten-free crackers or toasted rice cereal—adds crunch without wheat.
- Low-Sodium: Opt for unsalted breadcrumbs and cheese, then season generously with herbs and spices—control salt to taste.
- Vegan: Use vegan cheese that melts well, like cashew-based or soy-based options—expect a different stretch but good flavor.
- Nut-Free: Stick with plain breadcrumbs; avoid almond or nut-based coatings—keep it safe for nut allergies.
- Extra Crunch: Mix in crushed cornflakes or crispy rice cereal with breadcrumbs—amplifies the crunch factor.
- Herb Variations: Add dried oregano, basil, or chili flakes to breadcrumbs—customize flavor profiles easily.
Equipment & Tools
- Deep-fryer or heavy-bottomed pot: For consistent, high-temperature frying
- Thermometer: To monitor oil temperature
- Three shallow bowls: For breading stations
- Baking sheet with parchment: To place breaded sticks and freeze
- Slotted spoon: To lift and drain fried sticks
- Paper towels: Absorb excess oil
Step-by-step guide to mozzarella sticks
- Gather your equipment: deep-fryer or heavy-bottomed pot, thermometer, three shallow bowls, and a baking sheet lined with parchment.
- Cut the mozzarella into 1/2-inch sticks, about 4 inches long. Freeze for at least 30 minutes to firm up; this prevents melting too quickly during frying.
- Set up your breading station: Bowl 1 with flour, Bowl 2 with beaten eggs and a splash of milk, Bowl 3 with seasoned panko breadcrumbs.
- Prepare the oil: heat to 180°C (356°F) in your deep-fryer or pot. Use enough oil to fully submerge the sticks, about 2-3 inches deep.
- Dredge each mozzarella stick: coat first in flour, tap off excess, then dip in egg wash, letting excess drip off. Finally, roll in breadcrumb mixture, pressing lightly to adhere.
- Place breaded sticks on the parchment-lined sheet. Repeat with remaining sticks. Freeze again for 10 minutes; this helps set the coating.
- Fry in batches: gently lower sticks into hot oil, avoiding overcrowding. Fry for 2-3 minutes, until golden brown and crispy. Shake gently to prevent sticking.
- Check doneness: the coating should be deep amber, and cheese should be bubbling inside. If cheese oozes out excessively, reduce heat slightly next batch.
- Remove with a slotted spoon: drain on paper towels to absorb excess oil. Rest for 1-2 minutes; this helps set the shell and prevents cheese from escaping.
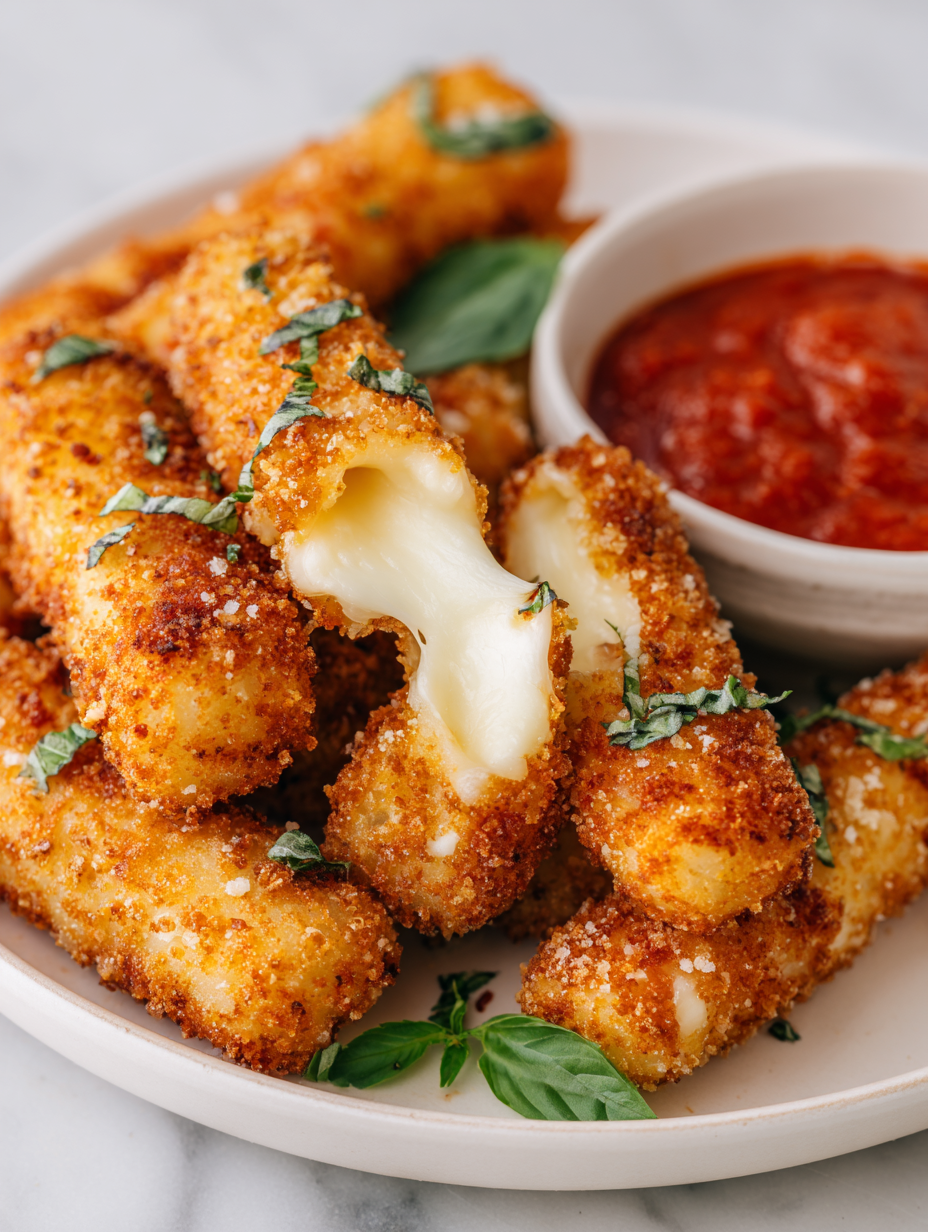
- Serve immediately with your preferred dipping sauce—warm, gooey, crispy, and just a touch smoky from the fried breadcrumbs.
Let fried sticks rest on paper towels for 1-2 minutes before serving. Serve hot with dipping sauces. For best texture, eat immediately while crispy and cheese is gooey.
How to Know It’s Done
- Breading is golden and crispy, firm to touch.
- Cheese inside is bubbling and gooey without escaping the coating.
- Oil temperature stays steady around 180°C (356°F) during frying.
Homemade Mozzarella Sticks
Ingredients
Equipment
Method
- Cut the mozzarella cheese into 1/2-inch thick sticks, about 4 inches long. Place them on a baking sheet and freeze for at least 30 minutes to firm up the cheese, which helps prevent melting during frying.
- Set up your breading station: place flour in one shallow bowl, beaten eggs with milk in another, and seasoned breadcrumbs mixed with panko in a third. This organized setup makes breading smooth and efficient.
- Heat your oil in a deep-fryer or heavy-bottomed pot until it reaches 180°C (356°F). Use a thermometer to keep track; a steady temperature ensures crispy coating and prevents burning.
- Dredge each frozen cheese stick: first coat in flour, tap off excess. Dip into the egg mixture, allowing any excess to drip off. Then, roll thoroughly in the breadcrumb mixture, pressing lightly so the coating adheres well. Place the breaded sticks on a parchment-lined sheet.
- Repeat the breading process for each stick, then freeze again for about 10 minutes. This extra chill helps set the coating and prevents cheese from oozing out during frying.
- Carefully lower a batch of breaded sticks into the hot oil using a slotted spoon. Fry for 2-3 minutes, gently shaking the pan to ensure even browning. The sticks should turn a deep golden brown and sound crispy.
- Once golden and crispy, lift the sticks out with a slotted spoon and place them on paper towels to drain excess oil. Rest for 1-2 minutes to allow the cheese to settle and avoid oozing when bitten.
- Serve your hot, crispy mozzarella sticks immediately with warm marinara or spicy aioli for dipping. The gooey cheese inside and crunchy shell make each bite satisfying and indulgent.
Notes
Pro tips for perfect mozzarella sticks
- BREADING TECHNIQUE: Double coat the cheese sticks for an extra crispy shell—dip, freeze, then bread again.
- OIL TEMPERATURE: Keep the oil steady at 180°C (356°F); use a thermometer and adjust heat as needed.
- FROZEN BEFORE FRYING: Ensure cheese sticks are well frozen before frying to prevent melting too quickly.
- CRISPY COATING: Toast breadcrumbs lightly before breading for enhanced crunch and flavor depth.
- FRY IN BATCHES: Avoid overcrowding to maintain oil temperature and ensure even crispiness.
- SERVE IMMEDIATELY: Serve hot right out of the fryer for best gooey cheese and crispy shell experience.
- SAUCES READY: Warm marinara or spicy aioli for dipping—contrast the hot, crispy sticks with a cool, tangy dip.
Common mistakes and how to fix them
- FORGOT to pre-freeze cheese sticks, causing excessive melting during frying.
- DUMPED in too much oil; use enough to fully submerge for even cooking.
- OVER-TORCHED breading, resulting in bitter flavor; reduce heat if browning too quickly.
- UNDER-COOKED cheese, check for bubbling and gooey texture before removing.
Quick fixes and pantry swaps
- If cheese oozes out, lower the heat slightly to prevent burning the coating.
- When breading feels uneven, pat gently to re-adhere for a crisp shell.
- Splash a little water on breadcrumbs if they seem too dry—helps them stick better.
- Patch soggy sticks by re-frying them briefly at higher heat for extra crunch.
- Shield from splatters by using a splatter guard—keeps oil shimmering and your stovetop clean.
Prep, store, and reheat tips
- Prep the cheese sticks: Cut and freeze them at least 30 minutes before frying for a firm interior that won’t melt too quickly.
- Bread the sticks ahead of time: Coat, freeze for 10 minutes, then store in an airtight container for up to 2 days in the fridge or 1 month in the freezer.
- Store fried mozzarella sticks: Keep leftovers in an airtight container in the fridge for up to 2 days; reheat until crispy and cheese is bubbling.
- Reheating tips: Bake at 180°C (350°F) on a baking sheet for 10-12 minutes or until hot and crispy; avoid microwave which makes them soggy and limp.
Top questions about mozzarella sticks
1. How do I keep the cheese from melting out during frying?
Use a block of fresh mozzarella for the best stretch and melt. Pre-freeze the sticks for 30 minutes before frying to prevent melting too quickly and to keep the coating intact.
2. What temperature should the oil be for frying mozzarella sticks?
Aim for oil around 180°C (356°F). If the oil is too hot, the coating will burn before the cheese melts; too cool, and the sticks will be greasy and soggy.
3. Can I use different breadcrumbs or coatings?
Use panko breadcrumbs for extra crunch, and season them with herbs or spices to add flavor. Toast breadcrumbs lightly before breading for improved adhesion and flavor.
4. Do I need to freeze the sticks before frying?
Yes, freeze the breaded sticks for at least 10 minutes before frying. This step helps set the coating and prevents cheese from oozing out too early.
5. How should I reheat leftover mozzarella sticks?
Serve immediately after frying for the best gooey cheese and crispy shell. Reheat leftovers in an oven at 180°C (350°F) for 10-12 minutes to restore crispiness.
6. How do I fry mozzarella sticks without splattering?
Use a slotted spoon to carefully lower the sticks into hot oil to prevent splashes. Fry in small batches to maintain oil temperature and ensure even crispiness.
7. What type of oil is best for frying mozzarella sticks?
Choose a neutral oil like canola or vegetable oil for frying. It has a high smoke point and won’t interfere with the flavor of the cheese or breadcrumbs.
8. Why is my breading burning or not crispy enough?
If the coating browns too quickly, lower the heat slightly. If it’s not crisp enough, increase heat slightly or fry in smaller batches.
9. Can I bake instead of fry mozzarella sticks?
Yes, you can bake mozzarella sticks at 200°C (392°F) for about 15-20 minutes until golden and crispy, but frying gives a more authentic crunch.
10. Are there dairy-free options for mozzarella sticks?
For a dairy-free version, try using firm tofu or dairy-free cheese slices. The texture will differ, but it still offers a satisfying cheesy bite.
Making these mozzarella sticks at home isn’t just about the snack, it’s about reclaiming a moment of simple joy. The smell of melting cheese and crispy breadcrumbs coming together feels like a quiet victory in the kitchen. It’s a small, imperfect ritual that reminds me of childhood and the comfort of familiar flavors.
When I serve them hot and crispy, with that gooey cheese pulling apart, I feel a little more grounded. These sticks aren’t just food—they’re a way to slow down, focus, and enjoy a messy, cheesy moment that reconnects me with what really matters in the kitchen.

Hi, I’m Claire Dawson, and I’m the voice behind The Procrastinators Cookbook. Food has always followed me around, even when I was busy putting other things off. Somewhere between long café shifts, half-finished to-do lists, and meals cooked later than planned, I realized that food was the one thing I always came back to.