Making sausage rolls might seem straightforward, but getting that flaky exterior paired with juicy, flavorful sausage inside takes a bit of finesse. It’s about handling the dough gently, so it doesn’t tear, and choosing the right sausage for that perfect balance of spice and richness.
I’ve always loved the process—rolling out the dough, feeling it crackle just right, then wrapping it around the seasoned sausage. It’s a bit chaotic, but when they come out golden and crispy, with that irresistible aroma, it’s all worth it. These aren’t just snacks; they’re little bites of comfort that remind me of lazy weekend mornings and family gatherings.
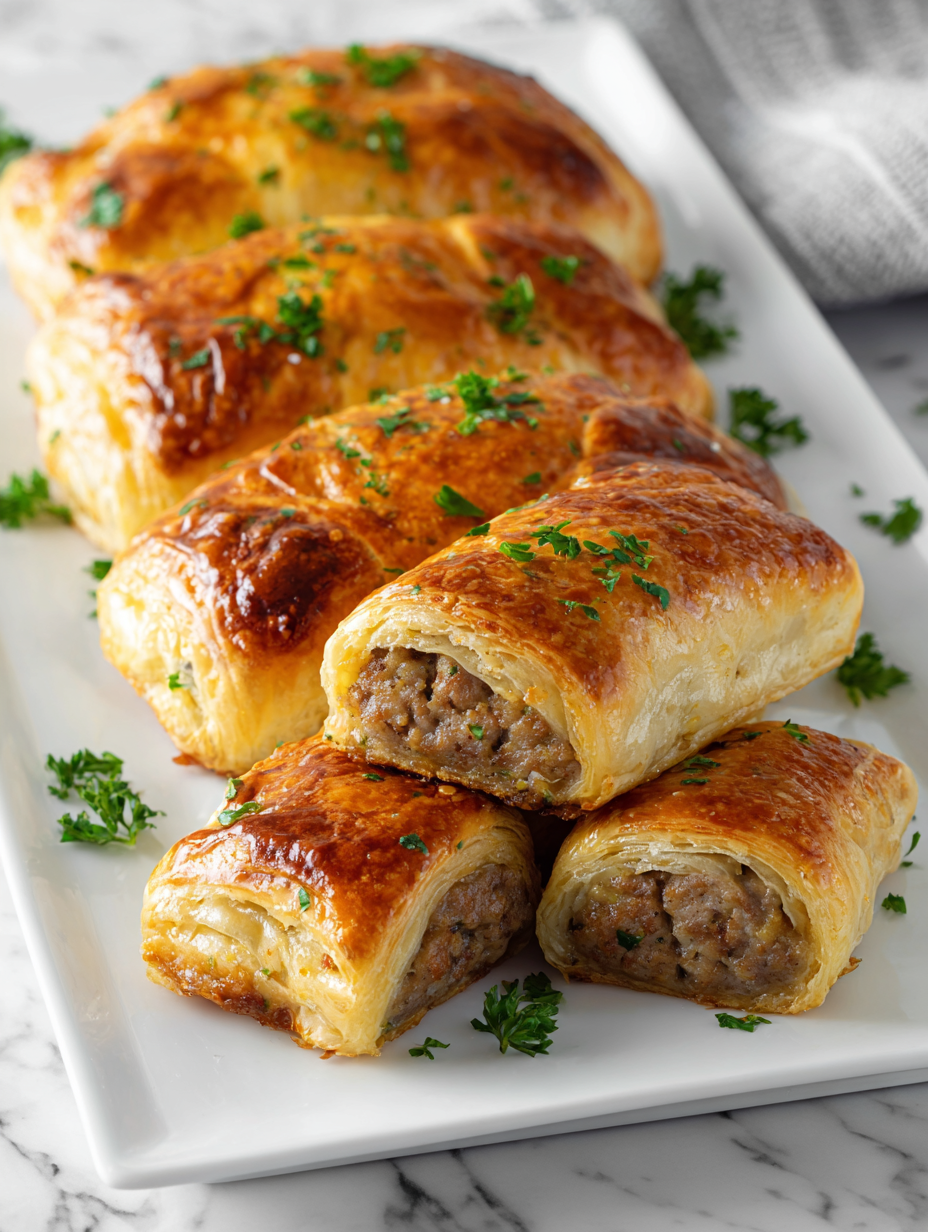
Focusing on making sausage rolls that are irresistibly flaky on the outside yet juicy and flavorful inside, emphasizing the importance of dough handling and sausage quality for that perfect bite.
The art of flaky, juicy sausage rolls
- Baking these always takes me back to my childhood kitchen, where the smell of baking pastry filled the air.
- There’s a rush of pride when I see that perfect golden sheen after just 20 minutes in the oven.
- Nothing beats the chaos of stuffing the sausage mixture, but the mess is part of the fun.
- I love experimenting with different sausages—spicy chorizo or herby chicken—to keep things interesting.
- When these are fresh from the oven, the crispy edges and juicy center make every effort worth it.
The roots of my sausage rolls
Making sausage rolls has always been a bit of a family ritual for me. My grandmother’s hands, dusted with flour, would roll out the dough while her voice hummed old tunes. I remember the chaos—sausages slipping, pastry tearing, but somehow it always turned into something golden and irresistible. It’s not just about the taste; it’s the messy, joyful process, the smell of baking pastry mingling with spices that takes me back every time.
Historical snippets about sausage rolls
- Sausage rolls originated in the UK, with roots stretching back to the Victorian era, where portable, hearty snacks were favored at picnics and fairs.
- The classic combination of pastry and sausage reflects a time when preserving meat and making it portable was essential for busy workers and travelers.
- In the 19th century, sausage rolls gained popularity in British bakeries, often sold as street food or during festive gatherings, becoming a staple comfort snack.
- Traditional recipes used simple ingredients, but regional variations evolved, adding herbs, spices, or even cheese for extra flavor.
- Today, sausage rolls are a beloved pub snack and party favorite worldwide, with countless variations reflecting local tastes and ingredients.
Ingredient breakdown: key components
- Pork sausage: I prefer a mix with a good amount of fat—juiciness depends on it. Feel free to swap for chicken sausage if you want leaner, but watch out for dryness.
- Puff pastry: I use store-bought for ease, but if you’re feeling ambitious, homemade flaky pastry is a game changer—more buttery, more crackle. Keep it cold until use.
- Egg wash: Brushed on before baking, it gives that shiny, golden finish. For a richer look, add a splash of milk, or skip for a matte surface if you prefer.
- Herbs & spices: A pinch of sage or thyme wakes up the sausage. Fresh herbs add brightness, but dried work too—just cut back a bit for potency.
- Breadcrumbs: I add these to soak up juices inside, keeping the filling tender. Use panko for extra crunch or skip if you like a looser filling.
- Onion & garlic: Finely chopped, they bring aroma and depth. Sauté until fragrant if you want a mellower flavor, or toss raw for a sharper bite.
- Flour (for dusting): I dust the surface to prevent sticking when rolling. Cornstarch can be a good gluten-free alternative, but it’s less forgiving.
Spotlight on key ingredients
Puff pastry:
- Pork sausage: I prefer a mix with a good amount of fat—juiciness depends on it. Feel free to swap for chicken sausage if you want leaner, but watch out for dryness.
- I use store-bought for ease, but if you’re feeling ambitious, homemade flaky pastry is a game changer—more buttery, more crackle. Keep it cold until use.
- Egg wash: Brushed on before baking, it gives that shiny, golden finish. For a richer look, add a splash of milk, or skip for a matte surface if you prefer.
Herbs & spices:
- Pork sausage: I prefer a mix with a good amount of fat—juiciness depends on it. Feel free to swap for chicken sausage if you want leaner, but watch out for dryness.
- A pinch of sage or thyme wakes up the sausage. Fresh herbs add brightness, but dried work too—just cut back a bit for potency.
Notes for ingredient swaps
- Pork sausage: I prefer a mix with a good amount of fat—juiciness depends on it. Feel free to swap for chicken sausage if you want leaner, but watch out for dryness.
- Puff pastry: I use store-bought for ease, but if you’re feeling ambitious, homemade flaky pastry is a game changer—more buttery, more crackle. Keep it cold until use.
- Egg wash: Brushed on before baking, it gives that shiny, golden finish. For a richer look, add a splash of milk, or skip for a matte surface if you prefer.
- Herbs & spices: A pinch of sage or thyme wakes up the sausage. Fresh herbs add brightness, but dried work too—just cut back a bit for potency.
- Breadcrumbs: I add these to soak up juices inside, keeping the filling tender. Use panko for extra crunch or skip if you like a looser filling.
- Onion & garlic: Finely chopped, they bring aroma and depth. Sauté until fragrant if you want a mellower flavor, or toss raw for a sharper bite.
- Flour (for dusting): I dust the surface to prevent sticking when rolling. Cornstarch can be a good gluten-free alternative, but it’s less forgiving.
Equipment & Tools
- Baking sheet: To hold the sausage rolls during baking.
- Pastry brush: To apply egg wash for shine and color.
- Sharp knife: To cut pastry and sausage into even pieces.
- Rolling pin: To roll out the pastry evenly.
- Parchment paper: To prevent sticking and ease cleanup.
Step-by-step guide to sausage rolls
- Equipment & Tools: Gather a baking sheet, pastry brush, sharp knife, rolling pin, and a small bowl for egg wash. The baking sheet should have sides and be lined with parchment.
- Preheat your oven to 200°C (390°F). Ensure the rack is in the middle for even heat.
- a. Roll out the puff pastry on a lightly floured surface to about 0.5 cm thick. Keep it cold to prevent sticking and tearing.
- b. Cut the pastry into strips about 10 cm wide and 20 cm long. Chill if it becomes too soft.
- Prepare the sausage filling: Mix your sausage meat with herbs, garlic, and breadcrumbs until well combined. Slightly chill for easier handling.
- a. Lay a sausage strip along one edge of each pastry strip. Leave about 1 cm border.
- b. Roll the pastry around the sausage, pinching the seam to seal. Use a little water if needed to stick.
- c. Cut into individual pieces about 3-4 cm wide. Place seam-side down on the baking sheet, spaced well apart.
- Brush the tops with beaten egg wash for a shiny, golden finish. Optional: sprinkle with coarse salt or sesame seeds.
- Bake for 20-25 minutes, until the pastry is puffed, flaky, and golden brown. Check at 20 minutes for color.
- a. If pastry is browning too quickly, tent with foil. If not golden enough, leave a few extra minutes.
- c. The sausage should be steaming and juicy inside; pastry crisp and crackling on the outside.
- Remove from oven and let rest for 5 minutes on a wire rack. This helps the filling set and keeps the pastry crisp.
- Serve warm or at room temperature. Plate with a simple side salad or just as is for a snack.
Let the sausage rolls rest for 5 minutes to set their juices. Serve warm with your favorite condiments or as is, crispy and aromatic.
How to Know It’s Done
- Golden, puffed pastry with crisp edges.
- Internal sausage temperature reaches at least 70°C (160°F).
- Juicy filling with no raw pastry visible.
Classic Sausage Rolls
Ingredients
Equipment
Method
- Preheat your oven to 200°C (390°F) and line a baking sheet with parchment paper. Roll out the chilled puff pastry on a lightly floured surface to about 0.5 cm thick, then cut into two long strips roughly 10 cm wide and 20 cm long.
- In a mixing bowl, combine the sausage meat with finely chopped onion, minced garlic, chopped herbs, breadcrumbs, and a pinch of salt and pepper. Mix gently until everything is evenly incorporated, being careful not to overmix to keep the filling tender.
- Lay a sausage portion along one edge of each pastry strip, leaving about 1 cm free on the sides. With clean hands, gently roll the pastry around the sausage, pinching the seam to seal. Use a little beaten egg along the edge to help it stick.
- Cut each rolled pastry into 3-4 cm wide pieces, creating individual sausage rolls. Place them seam-side down on the prepared baking sheet, spacing them evenly apart.
- Brush the tops of each sausage roll with the beaten egg to give them a glossy, golden finish. You can also sprinkle a little coarse salt or sesame seeds for extra flavor and presentation.
- Bake in the preheated oven for about 20-25 minutes, or until the pastry is puffed, flaky, and a deep golden brown. Keep an eye on them after 20 minutes to prevent overbrowning.
- Once baked, remove from oven and let the sausage rolls rest on a wire rack for 5 minutes. This helps the juices settle and keeps the pastry crisp.
- Serve the sausage rolls warm or at room temperature, paired with your favorite condiments or simply enjoyed on their own for a crispy, juicy bite.
Pro tips for perfect sausage rolls
- Bolded mini-head: Chilling the pastry → Keeps it firm and prevents tearing when rolling out.
- Bolded mini-head: Egg wash application → Brushing lightly and evenly gives a shiny, golden finish.
- Bolded mini-head: Sealing seams → Use a dab of water or beaten egg to prevent filling from escaping.
- Bolded mini-head: Oven temperature → Start high at 200°C (390°F) for crisping, then reduce if needed.
- Bolded mini-head: Rest after baking → Let sausage rolls sit for 5 minutes to set juices and maintain crunch.
- Bolded mini-head: Filling handling → Mix sausage gently to keep it juicy and avoid dense, dry bites.
- Bolded mini-head: Cutting before baking → Score or cut the pastry slightly before baking for even expansion and easier serving.
Common sausage roll mistakes and fixes
- FORGOT to preheat oven → Always start with a hot oven, 200°C (390°F).
- DUMPED sausage mixture → Handle gently to keep it juicy and tender.
- OVER-TORCHED pastry → Cover with foil if it browns too quickly, check at 20 min.
- MISSED sealing seams → Use a little water to stick pastry edges, prevents opening during baking.
Quick fixes and pantry swaps
- When pastry cracks, splash cold water along edges to seal quickly.
- If sausage filling is too loose, patch with a bit more breadcrumbs and chill.
- Splash a little vinegar in egg wash for extra shine and subtle tang.
- Patch small tears with bits of pastry brushed with egg before sealing with water.
- Shield pastry with foil if it browns too fast, crackle will still be golden and flaky.
Prep, store, and reheat tips
- Prepare the sausage mixture and roll out the pastry up to a day in advance. Keep wrapped tightly in the fridge; the filling stays moist and flavors meld overnight.
- Assemble and cut the sausage rolls a few hours before baking. Store them on a lined tray covered with plastic wrap in the fridge; they stay fresh and ready to bake.
- Baked sausage rolls can be kept in an airtight container in the fridge for up to 2 days. The pastry will soften slightly, but reheating restores crispness.
- Reheat in a preheated oven at 180°C (350°F) for about 8-10 minutes. Expect the pastry to crackle again and the filling to steam hot, with a fresh-baked aroma.
- For longer storage, freeze unbaked rolls on a tray, then transfer to a bag. They keep for up to 1 month. Bake directly from frozen, adding 5-7 minutes to the baking time, until golden and crispy.
Top questions about sausage rolls
1. What kind of sausage works best?
Look for sausage with a good fat content, around 20-30%, for juicy bites. Leaner sausages tend to dry out during baking.
2. Can I use another type of pastry?
Use puff pastry for that flaky, crisp exterior. Store-bought is fine, but homemade adds a richer, more layered crunch.
3. Is egg wash necessary?
Egg wash helps achieve a shiny, golden finish. If you want a matte look, skip it or use milk instead.
4. How do I know when they’re done?
Bake at 200°C (390°F) until golden and puffy, usually about 20-25 minutes. Check frequently to prevent over-browning.
5. Should I chill the ingredients before baking?
Chill the pastry and sausage mixture before assembling. Cold ingredients prevent sticking and tearing, making handling easier.
6. Can I freeze sausage rolls?
You can freeze unbaked rolls on a tray, then transfer to a bag. Bake from frozen, adding a few extra minutes.
7. What if they burn or dry out?
Overcooking causes a dry, tough pastry. If that happens, cover with foil and bake a few minutes longer for even crispness.
8. How do I get a perfect golden color?
Brush with egg wash just before baking for the best shine. Apply evenly to avoid streaks and uneven coloring.
9. Should I cut them before baking?
Use a sharp knife to cut the pastry before baking for cleaner edges and more even expansion during oven time.
10. Why rest the sausage rolls after baking?
Let baked sausage rolls rest for 5 minutes. This helps juices settle, making each bite juicy and the pastry crisp.
Making sausage rolls is more than just baking; it’s about capturing a moment of messy joy and satisfying simplicity. The smell of flaky pastry and savory sausage fills the kitchen, making it hard to wait. These little bites are a reminder that comfort food often comes from the simplest, most honest ingredients.
In the end, it’s the imperfect, crackly edges and juicy centers that make these sausage rolls special. No matter how chaotic the process, they always turn into something memorable—crisp, flavorful, and just a little nostalgic. And really, that’s what good cooking is all about.

Hi, I’m Claire Dawson, and I’m the voice behind The Procrastinators Cookbook. Food has always followed me around, even when I was busy putting other things off. Somewhere between long café shifts, half-finished to-do lists, and meals cooked later than planned, I realized that food was the one thing I always came back to.