Vegetable cutlets are often seen as a quick snack or a side, but mastering that perfect crispy exterior while keeping the inside tender is an art. It’s a balance I’ve fiddled with for years—trying to get that satisfying crunch without sacrificing flavor or moisture inside. When I finally cracked it, it felt like discovering a secret worth sharing.
This recipe isn’t just about frying; it’s about understanding each step to build that coveted texture. It’s an honest, no-fuss way to turn humble vegetables into something crave-worthy. Honestly, once you get the hang of the crispness, you’ll be reaching for these more often—crunch first, then the tender veggie heart.
Focusing on the overlooked aspect of achieving the perfect crispy exterior without losing the tender, flavorful interior—it’s the secret that transforms humble vegetable cutlets into a satisfying, crave-worthy snack.
Cracking the Crispy Exterior
- I love how the aroma of cumin and fresh herbs fills my kitchen as the cutlets fry—it’s oddly comforting.
- There was a moment I nailed that perfect golden crust; I felt like I’d unlocked a secret recipe.
- Frying these on a lazy Sunday always makes me nostalgic for childhood snacks, simpler times.
- Getting the texture just right—crispy outside, tender inside—feels like a small victory after many tries.
- Sharing these with friends always sparks a flurry of compliments and happy memories.
The story behind this recipe
- This recipe was born out of a quest to make vegetable cutlets that don’t just taste good but also hold up to the crunch test. I remember a rainy afternoon when I was experimenting with leftover vegetables, trying to turn them into something more exciting than a simple stir-fry. The goal was that elusive crispy exterior without sacrificing the tender, flavorful interior.
- Over time, I played around with different binders and frying techniques, always chasing that perfect balance. It’s a small victory every time I get that golden crust crackling just right, revealing a moist, veggie-packed center. These cutlets remind me that simple ingredients, with a little attention, can become something truly satisfying.
- heading: “The inspiration behind this dish”
Historical and Cultural Tidbits
- Vegetable cutlets have roots in street food stalls across India, where they were a quick, flavorful snack.
- The concept of combining mashed vegetables with spices and frying likely dates back centuries in various cultures.
- In many traditional recipes, the crispy exterior was achieved through shallow frying in leftover oil, making it an economical dish.
- Modern takes on vegetable cutlets often incorporate regional spices, reflecting local culinary histories and ingredient availability.
- Despite their humble origins, these cutlets became a canvas for culinary innovation, blending textures and flavors over generations.
Ingredient breakdown: key components
- Potatoes: I use starchy potatoes for that fluffy interior—if you prefer a firmer bite, swap for waxy ones, but expect less of that melt-in-your-mouth feel.
- Carrots: They add sweetness and color, and I love how their slight crunch contrasts with the softer veggies—try parsnips for a milder, earthier flavor.
- Breadcrumbs: I prefer fresh for a tender crumb, but if you want more crunch, go for toasted, seasoned breadcrumbs—they’ll give you a richer, more aromatic crust.
- Spices & herbs: I lean on cumin and coriander for warmth; skip or swap with herbs like cilantro or mint for a fresh, bright aroma that wakes up the palate.
- Binding agent: I use boiled potatoes or bread crumbs to hold everything together—if the mixture feels too loose, add a bit more, or if too stiff, a splash of water or milk helps.
- Oil for frying: I go for vegetable or sunflower oil; if you want a healthier option, try lightly brushing with oil and baking, though the crunch will be different.
- Optional extras: Finely chopped onions or green chilies add a kick—feel free to omit or swap with roasted peppers for a smoky twist.
Spotlight on key ingredients
Potatoes:
- I crave that fluffy, melt-in-your-mouth texture—using starchy ones like Russets helps achieve it. Swap for waxy potatoes if you want a firmer bite, but the fluff diminishes.
- Carrots: They lend a natural sweetness and vibrant color. Their slight crunch contrasts beautifully with softer veggies—try parsnips for a milder, earthier tone that still adds depth.
Breadcrumbs and spices:
- Breadcrumbs: I prefer toasted, seasoned breadcrumbs for a richer crust. Fresh crumbs give a tender bite, but toasted ones add a smoky aroma and crunch that’s hard to beat.
- Spices & herbs: Cumin and coriander bring warmth and earthiness. If you want a fresher scent, swap in chopped cilantro or mint—just watch the balance of flavors.
Notes for ingredient swaps
- Dairy-Free: Swap regular breadcrumbs for gluten-free or toasted coconut flakes for added crunch and flavor—expect a slightly sweeter, nutty note.
- Vegan: Use flaxseed meal mixed with water instead of eggs to bind—results are a bit less elastic but still hold well.
- Low-Starch: Replace potatoes with sweet potatoes for a sweeter, denser texture—be mindful of cooking time and moisture content.
- Spice Variations: Omit cumin and coriander, and add smoked paprika or garam masala for a different aroma and warmth.
- Herb Tweaks: Swap cilantro for chopped mint or parsley—freshness brightens the flavor but alters the overall aroma.
- Oil Options: Use sesame or avocado oil for frying—these add a subtle flavor twist and higher smoke points.
- Veggie Swap: Incorporate grated zucchini or spinach—adds moisture and color, but squeeze out excess water first to prevent sogginess.
Equipment & Tools
- Grater: Shred vegetables into fine, even pieces.
- Mixing bowl: Combine ingredients and seasonings thoroughly.
- Frying pan: Cook cutlets evenly with hot oil.
- Spatula: Flip and handle cutlets without breaking.
- Paper towels: Drain excess oil after frying.
Step-by-step guide to vegetable cutlets
- Equipment & Tools: Gather a grater (for veggies), mixing bowl (for ingredients), frying pan (preferably non-stick), spatula (to flip), paper towels (to drain).
- Prepare the veggies: Grate 2 cups of carrots, 2 cups of potatoes, and 1 cup of finely chopped bell peppers. Squeeze out excess moisture from the grated carrots and potatoes to prevent sogginess.
- Mix the base: In the bowl, combine the grated veggies with 1/2 cup of breadcrumbs, 1 teaspoon of cumin, 1/2 teaspoon of salt, and a pinch of pepper. Add 2 tablespoons of chopped cilantro if using. Mix thoroughly until the mixture holds together when pressed.
- Form the cutlets: Take about 1/4 cup of the mixture, roll into a ball, then flatten into a patty about 1 cm thick. Repeat with remaining mixture. If the mixture is too loose, add a little more breadcrumbs.
- Heat oil: Pour about 1/2 inch of vegetable oil into the pan. Heat over medium heat (~160°C / 320°F). To test if ready, drop a small piece of the mixture into the oil—if it sizzles and bubbles immediately, you’re good to go.
- Fry the cutlets: Place the cutlets in the hot oil, being careful not to overcrowd the pan. Fry for about 3-4 minutes per side, until golden brown and crispy. Adjust heat if they brown too quickly or not enough.
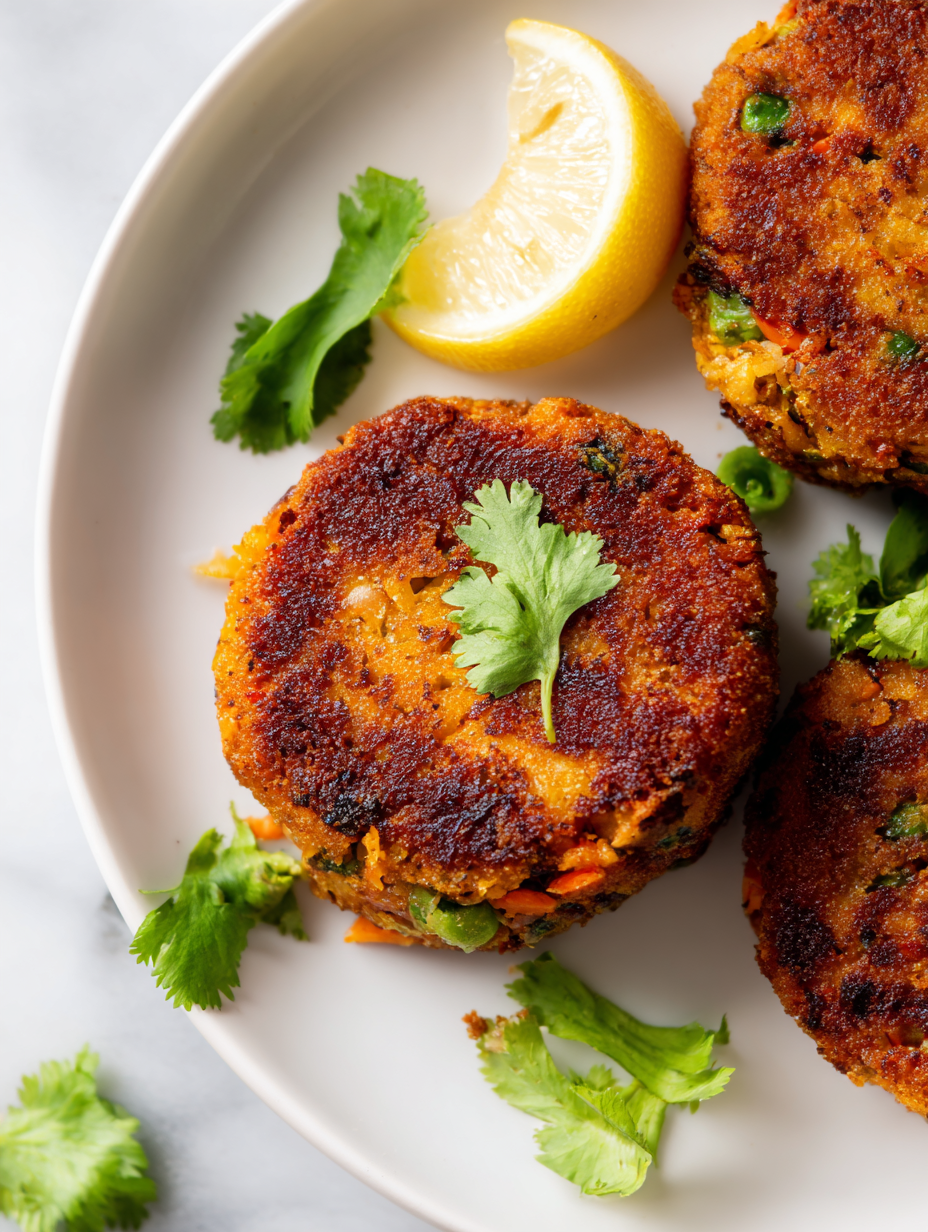
- Check doneness: The exterior should be deep golden, crispy, and crackly. The inside should be tender, moist, and hold together without falling apart. If they are soggy, let drain on paper towels.
- Rest & serve: Let the cutlets rest for 2 minutes on paper towels to drain excess oil. Serve hot with chutney or yogurt, or as part of a larger meal.
- Final touch: For extra crunch, sprinkle with a pinch of sea salt or serve with a squeeze of lemon for brightness.
Let the cutlets rest briefly on paper towels to remove excess oil. Serve immediately while hot and crispy, garnished with herbs or lemon if desired.
How to Know It’s Done
- Golden, crispy exterior with crackling surface.
- Interior remains moist and tender, not mushy.
- Properly cooked through, no raw veggie smell.
Crispy Vegetable Cutlets
Ingredients
Equipment
Method
- Gather all your tools: a grater, a mixing bowl, a frying pan, and paper towels ready for draining.
- Start by grating the carrots and chopping the bell peppers into tiny pieces. Make sure to squeeze out excess moisture from the grated carrots and mashed potatoes to prevent sogginess.
- In your mixing bowl, combine the grated carrots, mashed potatoes, chopped bell peppers, and chopped cilantro. Add the cumin powder, salt, pepper, and half of the breadcrumbs. Mix everything thoroughly until the mixture holds together when pressed.
- Divide the mixture into four equal parts. Take each portion and shape it into a flat patty about 1 cm thick, pressing firmly to ensure they hold shape. Chill the shaped cutlets in the fridge for 10-15 minutes if they feel too loose.
- Heat about half an inch of vegetable oil in your frying pan over medium heat until shimmering and hot. You can test readiness by dropping a small piece of mixture—if it bubbles and sizzles immediately, the oil is perfect.
- Carefully place the cutlets into the hot oil, making sure not to overcrowd the pan. Fry each side for about 3-4 minutes, until they turn a deep golden brown and the crust is crispy and crackling.
- Once golden and crispy, flip the cutlets with a spatula and fry the other side until similarly crisp and golden. The aroma of spices and frying oil will fill your kitchen.
- Transfer the cooked cutlets onto paper towels to drain excess oil. Let them rest for a minute to maintain their crunch.
- Serve the vegetable cutlets hot, garnished with additional cilantro or lemon wedges if desired. Enjoy their crispy exterior paired with the tender, flavorful interior.
Pro Tips for Crispy Cutlets
- Bolded Mini-Head: Use a gentle touch when shaping the cutlets—compact but not too tight, for even cooking.
- Bolded Mini-Head: Keep the oil at a steady medium heat—if it’s too hot, the outsides burn before the insides cook through.
- Bolded Mini-Head: Add a pinch of salt to the mixture—helps with binding and enhances natural flavors, just don’t overdo it.
- Bolded Mini-Head: For extra crispness, coat the cutlets in seasoned breadcrumbs twice—first in the mixture, then again before frying.
- Bolded Mini-Head: Rest the shaped cutlets in the fridge for 15 minutes—this firms them up and prevents breaking during frying.
- Bolded Mini-Head: Use a wide, shallow pan for frying—allows for even oil coverage and easier flipping, resulting in a uniform crunch.
Common mistakes and how to fix them
- FORGOT to drain excess moisture → Squeeze out water from grated vegetables thoroughly.
- DUMPED the mixture directly into oil → Chill mixture for 10 minutes before shaping to firm up.
- OVER-TORCHED the cutlets → Keep oil at medium heat; adjust if they brown too quickly.
- USED too much oil during frying → Use just enough to cover the base of the pan for crispness without greasiness.
Quick Fixes and Pantry Swaps
- When mixture feels loose, add a splash of water or extra breadcrumbs to firm it up quickly.
- If oil shimmers too much and splatters, reduce heat slightly to prevent burns and splatters.
- Splash a little lemon juice or vinegar if cutlets are bland after frying—brightens flavors instantly.
- Patch soggy cutlets by placing them in a hot oven or skillet for a minute—crisp them back up.
- Shield delicate cutlets with a splatter screen when frying—keeps your stove cleaner and prevents burns.
Prep, store, and reheat tips
- Prepare the vegetable mixture up to a day in advance; keep it covered in the fridge to prevent drying out. The flavors meld nicely overnight.
- Form the cutlets and refrigerate them for up to 4 hours before frying. They firm up, making flipping easier and preventing breakage.
- Cooked cutlets can be stored in an airtight container in the fridge for 2-3 days. Reheat in a hot skillet to refresh the crispness and warm through, aiming for that sizzling crackle.
- For longer storage, freeze uncooked or cooked cutlets for up to a month. Wrap tightly in plastic, then foil to prevent freezer burn.
- Reheating frozen cutlets: bake at 180°C / 350°F for 10-12 minutes, or until crispy and heated through. Keep an eye on the color—avoid burning the edges.
Top questions about vegetable cutlets
1. Can I use different potatoes?
Use potatoes that are starchy like Russets for a fluffy interior, but Waxy potatoes will give a firmer bite. It’s about balance in texture.
2. Can I substitute the carrots?
Yes, carrots add sweetness and color, but parsnips or zucchini can be swapped in for a different flavor and texture.
3. What can I substitute for breadcrumbs?
Breadcrumbs give crunch, but you can try toasted coconut flakes or crushed nuts for a unique texture and flavor.
4. My mixture is too soft, what do I do?
Ensure the mixture is firm enough to hold shape—if too loose, add more breadcrumbs or chill before shaping.
5. How hot should the oil be?
Fry in medium heat (~160°C / 320°F). Look for a golden, crackly exterior—if too dark, lower the heat.
6. Should I rest the cutlets after frying?
Let cooked cutlets rest for a couple of minutes on paper towels to drain excess oil and maintain crispness.
7. Can I make these in advance?
Yes, you can prepare the mixture a day ahead and store it covered in the fridge. Fry just before serving for best crunch.
8. How do I store and reheat leftovers?
Store leftovers in an airtight container in the fridge for up to 3 days. Reheat in a hot skillet to restore crispness.
9. My cutlets turned soggy, how fix that?
If the cutlets are soggy, re-crisp them in a hot oven or skillet for a minute or two—watch for burning.
10. How can I prevent oil splattering?
Use a splatter screen when frying to prevent oil splashes. Keep an eye on the temperature to avoid burning.
These vegetable cutlets are a reminder that simple ingredients, when treated with care, can turn into something truly satisfying. The crispy exterior and tender inside make them perfect for any season or occasion, especially when you want a comforting, homemade snack.
Sharing them with friends or family always sparks a moment of appreciation—there’s a quiet joy in crunching through that golden crust. No matter how many times I make this recipe, it still feels like a small celebration of humble vegetables turned special.

Hi, I’m Claire Dawson, and I’m the voice behind The Procrastinators Cookbook. Food has always followed me around, even when I was busy putting other things off. Somewhere between long café shifts, half-finished to-do lists, and meals cooked later than planned, I realized that food was the one thing I always came back to.