A cheese ball might seem like a humble party staple, but I think it’s really about the comfort it brings. There’s something nostalgic about that creamy, tangy center rolled in crunchy nuts or herbs—it’s like a little bite of childhood, dressed up for grown-up tastes. I’ve tweaked the classic recipe over the years, trying to keep that warmth but adding a modern touch that makes it feel fresh even at the family table or a casual holiday spread.
What I love most is how forgiving it is—mess it up a bit and you still end up with something irresistible. The trick is in balancing the cheese’s richness with a hint of acidity, and getting that perfect texture that’s soft enough to scoop but firm enough to hold its shape when sliced. It’s a simple dish, but it’s the kind that sparks conversations and memories, especially when served with a good crusty bread or crisp veggies.
Focusing on how to turn a simple cheese ball into a nostalgic, crowd-pleasing appetizer that feels like a warm hug from childhood, but with modern twists and tips for perfecting texture.
Nostalgic comfort in every bite
- Making this cheese ball always takes me back to family gatherings and long laughter-filled nights.
- I love how a simple mix of cheese, nuts, and herbs can turn into a show-stopping appetizer that everyone requests.
- There’s a quiet pride I feel when I see my friends’ surprised faces at how deliciously creamy and tangy it turns out.
- This recipe reminds me that sometimes, the most unassuming dishes carry the biggest nostalgic weight.
- I get a little thrill every time I find a new twist—like adding smoked paprika—that elevates an old classic.
The story behind this recipe
- This cheese ball recipe started as a way to use up some leftover cream cheese and sharp cheddar after a holiday feast. I remember pulling out that sticky, cheesy mixture from the fridge late at night, feeling a mix of anticipation and nostalgia. It’s funny how something so simple can bring back so many memories of family gatherings around the table, passing around crackers and laughing about silly stories. Over the years, I’ve tweaked it here and there, trying to make it more manageable and a little more special for friends or potlucks.
- The real inspiration came from those chaotic holiday mornings when I needed something quick, cheesy, and crowd-pleasing. It’s one of those dishes that’s forgiving—if you’re short on time, just toss in a handful of nuts or herbs, and it still looks like a showstopper. I love how it can be made ahead, and even better, it tastes just as good (if not better) after a night in the fridge, developing those tangy, cheesy flavors. It’s a humble dish, but the kind everyone asks for, no matter the occasion.
- heading: ‘The comfort of a childhood favorite’
Cheese ball trivia and history
- The cheese ball gained popularity in mid-20th century America, often served at potlucks and holiday parties.
- Originally, cheese balls were made with simple ingredients like cream cheese and processed cheese, evolving over decades with added herbs and nuts.
- Some believe the cheese ball’s roots trace back to European cheese spreads, adapted for American casual gatherings.
- Quirky trivia: In the 1960s, cheese balls were jokingly called ‘party animals’ because of their popular presence at celebrations.
Ingredient breakdown: key components
- Cream cheese: I love how it becomes silky and smooth when softened—really easy to blend. If it’s still cold, give it a minute to warm up for better mixing.
- Cheddar cheese: Sharp cheddar adds that punch of flavor I crave. For a milder version, swap in mozzarella or Monterey Jack, but you’ll lose some tang.
- Nuts (walnuts or pecans): Toasted nuts give crunch and depth. Skip if allergies are an issue, but consider crispy fried onions for a similar texture.
- Herbs (chives or parsley): Fresh herbs brighten the mix and add color. Dried herbs work, but they won’t give that vibrant, fresh pop.
- Seasonings (paprika or cayenne): A dash of smoked paprika adds warmth, while cayenne gives a subtle kick. Adjust based on how spicy you like it.
- Optional add-ins (bacon bits or sun-dried tomatoes): These bring bursts of flavor and texture. Use sparingly to keep the creamy balance intact.
- Binding agent (a splash of milk or sour cream): Keeps the mixture moist and easy to shape. Too much, and it won’t hold together—less is more here.
Spotlight on key ingredients
Cream cheese:
- I love how it becomes silky and smooth when softened—really easy to blend. If it’s still cold, give it a minute to warm up for better mixing.
- Cheddar cheese: Sharp cheddar adds that punch of flavor. For a milder version, swap in mozzarella or Monterey Jack, but you’ll lose some tang.
- Nuts (walnuts or pecans): Toasted nuts give crunch and depth. Skip if allergies are an issue, but consider crispy fried onions for a similar texture.
Cheddar cheese:
- Its pungent, salty tang is the backbone of the flavor. When melted, it becomes gooey and slightly stringy, adding richness.
- Nuts (pecans or walnuts): They turn golden and fragrant when toasted, offering a crunchy contrast to the creamy interior. Their natural oils enhance flavor and aroma.
Notes for ingredient swaps
- Dairy-Free: Swap cream cheese with a cashew-based cream cheese alternative, though it may be slightly less tangy and creamier.
- Cheddar Cheese: Use Monterey Jack or Colby for milder flavor, but expect less sharpness and complexity.
- Nuts: Substitute toasted sunflower seeds or crispy chickpeas for nuts if allergies are a concern; they add crunch but lose nutty richness.
- Herbs: Fresh basil or dill can replace chives or parsley, imparting different aromatic qualities and brightness.
- Seasonings: Smoked paprika can be replaced with cumin or chili powder for a different smoky or spicy note.
- Add-ins: Crumbled crispy bacon or chopped sun-dried tomatoes bring bursts of flavor, but use sparingly to avoid overwhelming the cheese base.
- Binding Liquid: Light sour cream or Greek yogurt can replace milk or sour cream for moisture, adding tang but slightly altering texture.
Equipment & Tools
- Mixing bowl: To combine and mix the ingredients thoroughly.
- Spatula: To fold ingredients together gently.
- Baking sheet: To hold the cheese ball during chilling and garnishing.
- Food processor or knife: To chop nuts finely or coarsely as preferred.
- Plastic wrap: To cover and chill the cheese ball.
Step-by-step guide to cheese ball
- Gather your equipment: a medium mixing bowl, a spatula, a baking sheet, and a food processor or sharp knife for chopping nuts.
- Soften 8 oz cream cheese by leaving it out at room temperature for about 30 minutes. This makes it easier to mix smoothly.
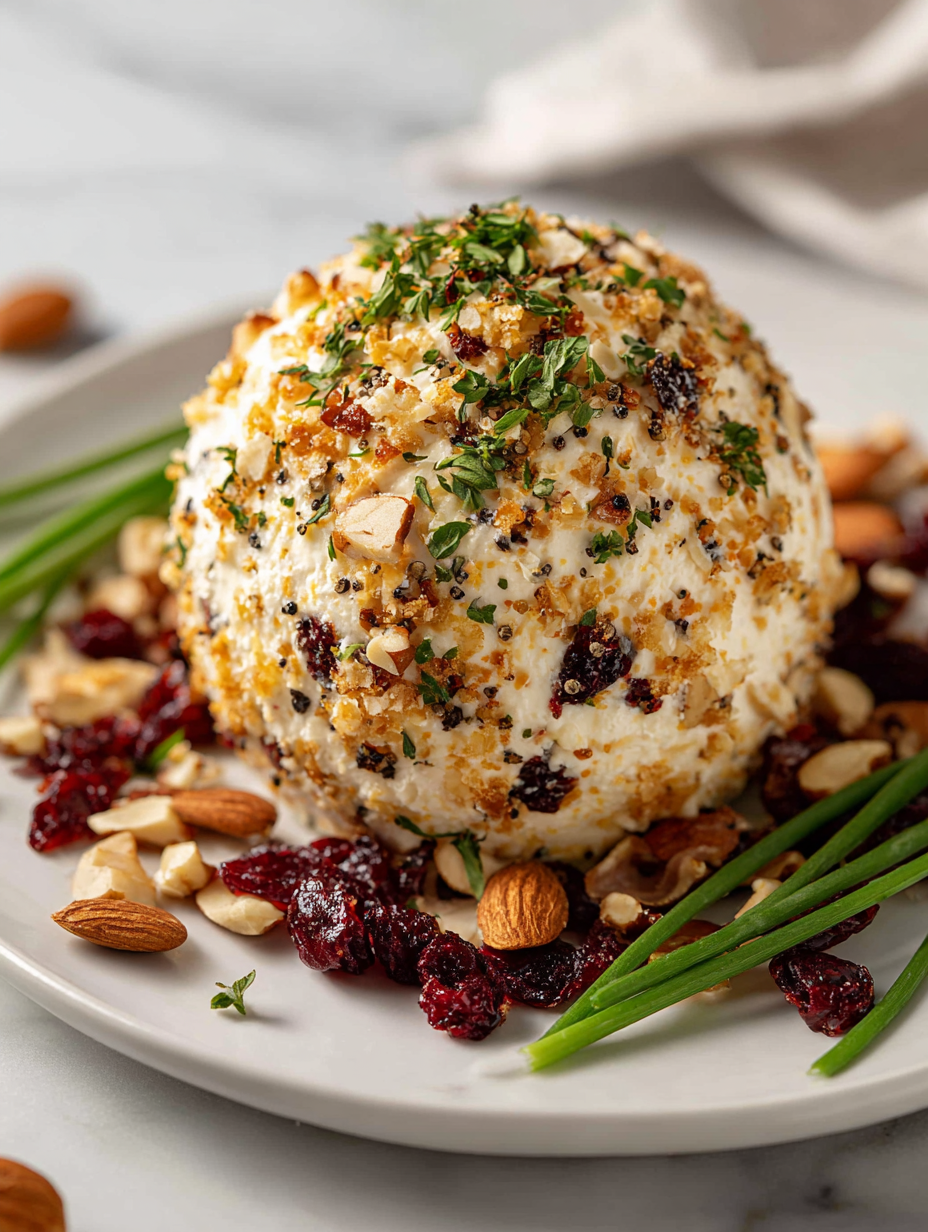
- In the bowl, combine the softened cream cheese with 1 cup shredded sharp cheddar, 1/4 cup toasted chopped pecans, 2 tablespoons chopped fresh chives, and 1 teaspoon smoked paprika.
- Mix thoroughly until all ingredients are well incorporated, avoiding overmixing to keep it fluffy.
- Shape the mixture into a tight ball, about 3 inches in diameter, using your hands or a spatula.
- Place the cheese ball on the baking sheet lined with parchment paper. Cover with plastic wrap and refrigerate for at least 2 hours, or overnight for more flavor development.
- While chilling, preheat your oven to 180°C (350°F). Toast additional chopped nuts for garnish if desired.
- Just before serving, roll the chilled cheese ball in the toasted nuts for a crunchy exterior. Alternatively, roll in chopped herbs or extra paprika for variation.
- Arrange on a serving platter with crackers, sliced baguette, or fresh veggie sticks. Serve chilled or at room temperature.
Chill the cheese ball in the fridge for at least 2 hours, preferably overnight. Before serving, roll in toasted nuts or herbs for added texture and flavor. Serve with crackers or veggie sticks, and enjoy the creamy, crunchy contrast.
How to Know It’s Done
- Cheese ball feels firm but moldable when shaped.
- Surface is evenly coated with nuts or herbs without excess oil or cracks.
- A slight jiggle in the center indicates proper chilling and setting.
Classic Cheese Ball
Ingredients
Equipment
Method
- Combine the softened cream cheese, shredded cheddar, chopped chives, and smoked paprika in a mixing bowl.
- Mix everything thoroughly with a spatula until the mixture is smooth, creamy, and well blended, paying attention to incorporate all ingredients evenly.
- Shape the mixture into a tight ball about 3 inches in diameter, pressing firmly to ensure it holds together.
- Place the cheese ball on a parchment-lined baking sheet, then cover tightly with plastic wrap.
- Refrigerate the cheese ball for at least 2 hours, or overnight, to allow flavors to meld and the shape to set firmly.
- Preheat your oven to 180°C (350°F). Toast additional chopped pecans until fragrant and golden, about 5 minutes.
- Once chilled, remove the cheese ball from the fridge and roll it in the toasted pecans, pressing gently to coat evenly.
- Transfer the coated cheese ball to a serving platter, then serve with crackers, sliced baguette, or fresh vegetable sticks.
Notes
Pro tips for perfect cheese ball
- Use room temperature cream cheese for easier mixing and a smoother texture.
- Toast nuts until fragrant and golden for maximum crunch and flavor.
- Chill the assembled cheese ball for at least 2 hours to help it hold shape.
- When rolling in nuts, press gently to ensure they stick and don’t fall off.
- Adjust seasoning gradually, tasting as you go to balance richness and tang.
- For a softer cheese ball, add a splash of milk or sour cream, but don’t overdo it.
- Use fresh herbs for a vibrant flavor and bright appearance, adding just before shaping.
Common mistakes and how to fix them
- FORGOT to chill the cheese ball before rolling → Chill for at least 2 hours for best shape.
- DUMPED extra nuts into mixture → Keep nuts to a quarter cup for balanced crunch.
- OVER-TORCHED nuts → Toast nuts until golden and fragrant, not smoked or burnt.
- MISSED to check texture before serving → It should be firm but scoopable, not runny or crumbly.
Quick fixes and pantry swaps
- When cheese ball feels too soft, splash it with a little more crushed nuts for crunch.
- If nuts are burnt, patch with fresh, lightly toasted nuts for a brighter flavor.
- Dipped in too much oil? Shield with a dusting of extra herbs or grated cheese to absorb excess moisture.
- If mixture sticks to your hands, rescue with a damp spatula or wetting your palms quickly.
- When the aroma shimmers with burnt notes, swap in fresh nuts and toast briefly—smell should be warm and nutty.
Prep, store, and reheat tips
- Preparing the cheese mixture a day in advance allows flavors to meld and enhances taste. Keep it covered in the fridge, where it becomes even more flavorful and tangy.
- The cheese ball can be shaped ahead of time and stored in the fridge for up to 24 hours. Wrap it tightly in plastic wrap to prevent it from drying out or absorbing fridge odors.
- For best texture, roll the chilled cheese ball in nuts or herbs just before serving. The coating stays crisp and fresh if added shortly before plating.
- Refrigerated cheese balls will last up to 3 days. Expect the flavors to deepen and the texture to firm up, so let it sit at room temperature for about 15 minutes before serving to soften slightly.
- To reheat or refresh, briefly warm in a low oven (around 150°C/300°F) for 10 minutes until just softened. The sensory cue: a faint aroma of toasted nuts and melting cheese signals it’s ready to enjoy.
Top questions about cheese balls
1. What exactly is a cheese ball?
A cheese ball is typically a mixture of softened cream cheese, shredded cheese, herbs, and nuts, shaped into a ball and chilled until firm. It’s a creamy, crunchy appetizer that’s easy to make and always a crowd-pleaser.
2. Can I make a cheese ball in advance?
Yes, you can prepare it a day ahead. Just shape the cheese ball, wrap it tightly in plastic, and refrigerate. Add nuts or herbs just before serving for maximum crunch and freshness.
3. Can I substitute ingredients in the cheese ball?
Yes, you can substitute cream cheese with mascarpone or Greek yogurt for a different texture or tang. Cheddar can be swapped with Monterey Jack or Colby, but expect a milder flavor.
4. How do I shape the cheese ball properly?
To ensure it holds its shape, chill the cheese mixture for at least 2 hours. Use cold hands or a spatula to shape it to prevent sticking and melting.
5. What are good ingredients for the cheese ball?
Use toasted nuts like pecans or walnuts for crunch, and fresh herbs like chives or parsley for brightness. Dried herbs can work but won’t give the same vibrant flavor.
6. What if my cheese ball falls apart?
If the cheese mixture is too soft, chill it longer or add a bit more shredded cheese or nuts. If nuts fall off, press them firmly into the surface before serving.
7. Any tips for making a perfect cheese ball?
Use room temperature ingredients for easier mixing. Toast nuts until fragrant and golden. Chill the ball well before serving to help it set and develop flavor.
8. How do I fix common issues with cheese balls?
When nuts burn, quickly remove and toast fresh nuts for a better flavor. If cheese feels too runny, add more shredded cheese or chill it longer.
9. What should I serve the cheese ball with?
Serve the cheese ball with crackers, sliced baguette, or veggie sticks. Keep it chilled until ready to serve, and let it sit at room temperature for 15 minutes before enjoying.
10. What’s the history of cheese balls?
The cheese ball originated as a mid-20th-century American party dish, often made with processed cheese and nuts. It became a popular holiday staple and a symbol of casual gatherings.
This cheese ball isn’t just a nostalgic throwback; it’s a reminder that simple ingredients can create something memorable. The creamy tang paired with crunch feels like a little celebration on a platter.
Whenever I serve it, I watch how the flavors spark in everyone’s eyes—those moments of sharing and comfort are what make this dish worth keeping around.

Hi, I’m Claire Dawson, and I’m the voice behind The Procrastinators Cookbook. Food has always followed me around, even when I was busy putting other things off. Somewhere between long café shifts, half-finished to-do lists, and meals cooked later than planned, I realized that food was the one thing I always came back to.